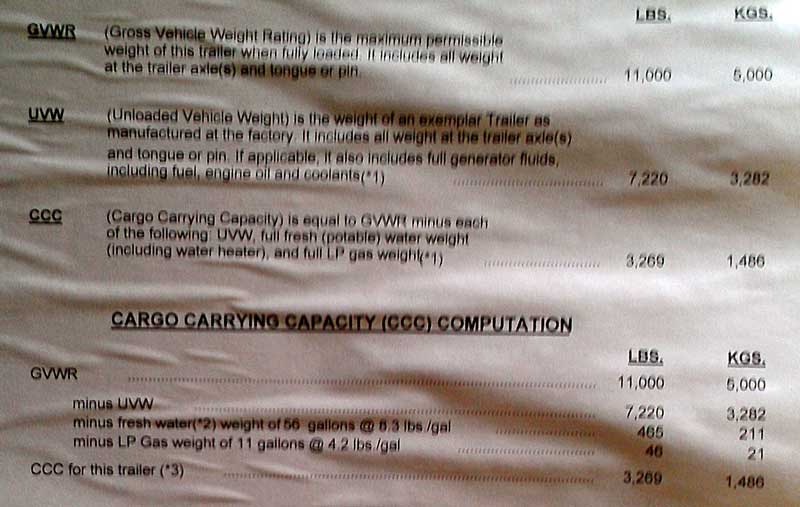
 |
|
Lighter Traveling in our
Alumascape Travel Trailer, page 1 |
|
|
|

|
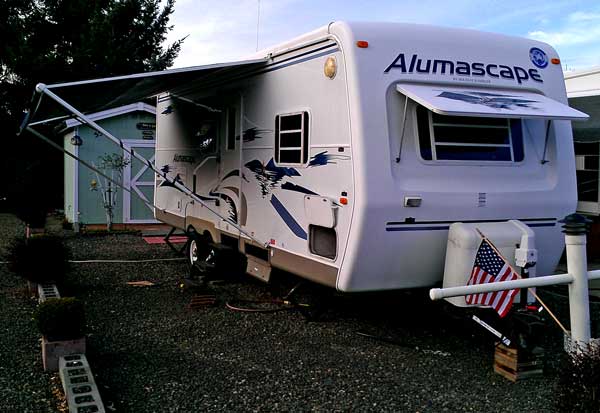
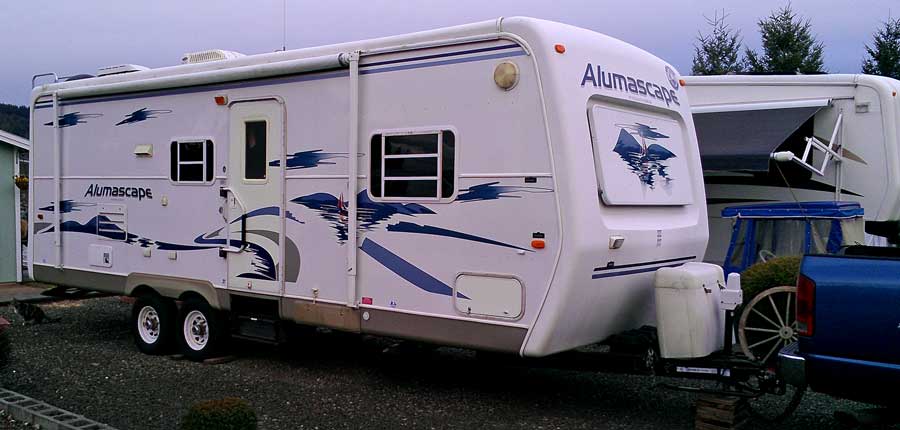
 Wednesday, March 13, 2013: Yesterday, we drove to Salem to buy a smaller travel trailer. Back in 2009 when I was anticipating retirement, a colleague told me her son had a large fifth wheel but sold it and bought something smaller because it was so hard to deal with such a large RV. I didn't understand at the time what the problem was when you've got a big truck to pull a big RV. Our fifth wheel weight near 16,000 lbs and the Dodge pulls it OK but there are considerations when pulling such a large RV which just slowly wear you down. Of course, since we are full time RV, we really had no choice until Wednesday, March 13, 2013: Yesterday, we drove to Salem to buy a smaller travel trailer. Back in 2009 when I was anticipating retirement, a colleague told me her son had a large fifth wheel but sold it and bought something smaller because it was so hard to deal with such a large RV. I didn't understand at the time what the problem was when you've got a big truck to pull a big RV. Our fifth wheel weight near 16,000 lbs and the Dodge pulls it OK but there are considerations when pulling such a large RV which just slowly wear you down. Of course, since we are full time RV, we really had no choice until |
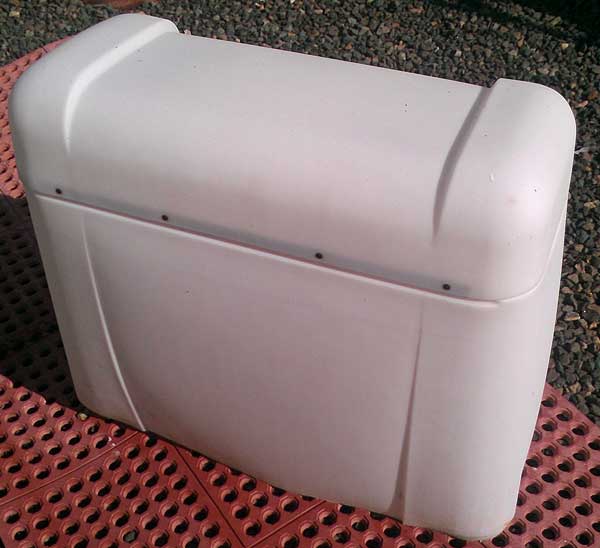
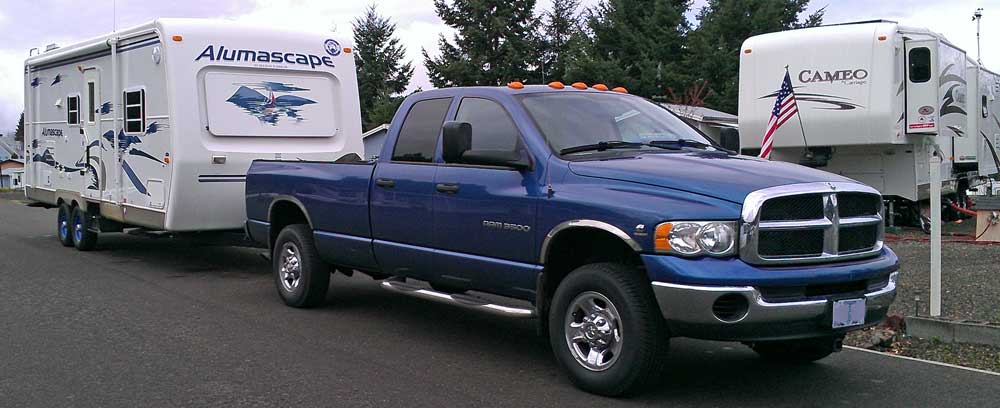
 we got our lot at Timber Valley. More than half the lot holders have a large RV parked to live in but something smaller to travel in. We decided to do the same. For a travel trailer, this Alumascape is a big, heavy travel trailer but when fully loaded it will be about 7,000 lbs lighter than our fifth wheel. We still want to travel about six months each year so we need something large enough to be comfortable. It measures 28.5 feet from tip to tip so the living area is about 26 feet with one slide. This model was built in 2004, so nine years old. The previous owner bought it new and didn't use it much, not like we will. Much of the trailer seems unused but needs a thorough cleaning. The story we got our lot at Timber Valley. More than half the lot holders have a large RV parked to live in but something smaller to travel in. We decided to do the same. For a travel trailer, this Alumascape is a big, heavy travel trailer but when fully loaded it will be about 7,000 lbs lighter than our fifth wheel. We still want to travel about six months each year so we need something large enough to be comfortable. It measures 28.5 feet from tip to tip so the living area is about 26 feet with one slide. This model was built in 2004, so nine years old. The previous owner bought it new and didn't use it much, not like we will. Much of the trailer seems unused but needs a thorough cleaning. The story |
|
| |
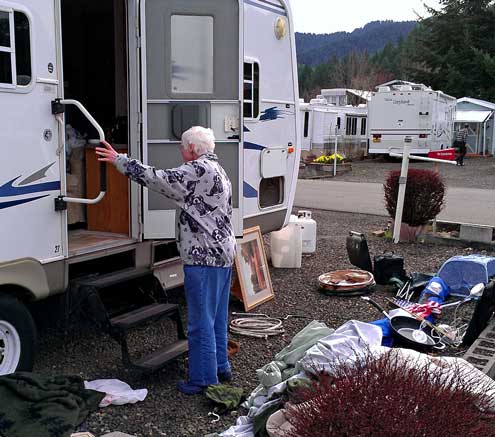
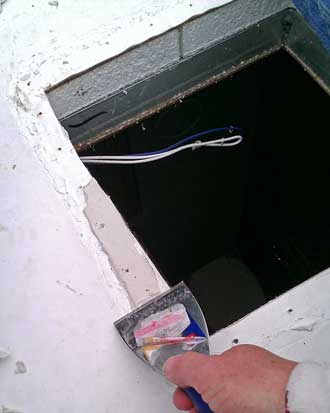
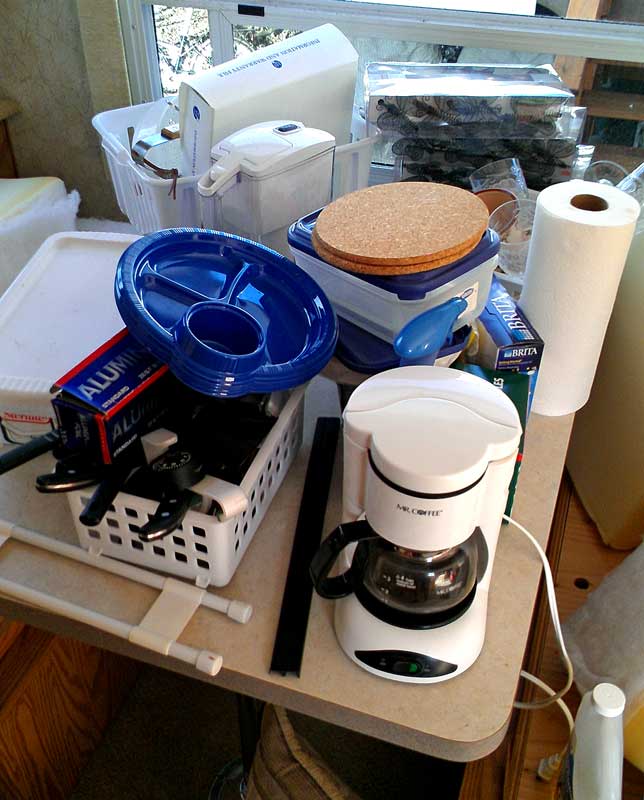
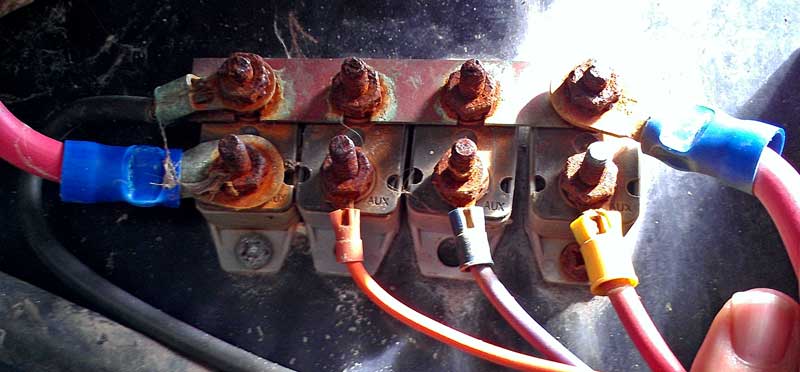
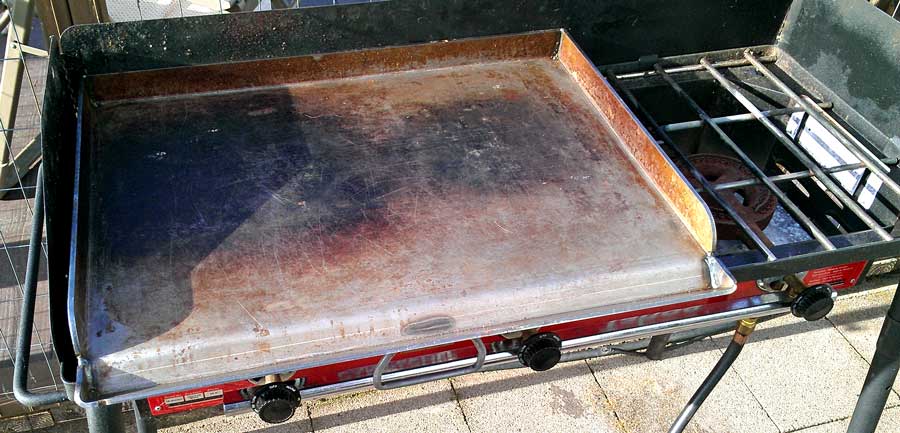
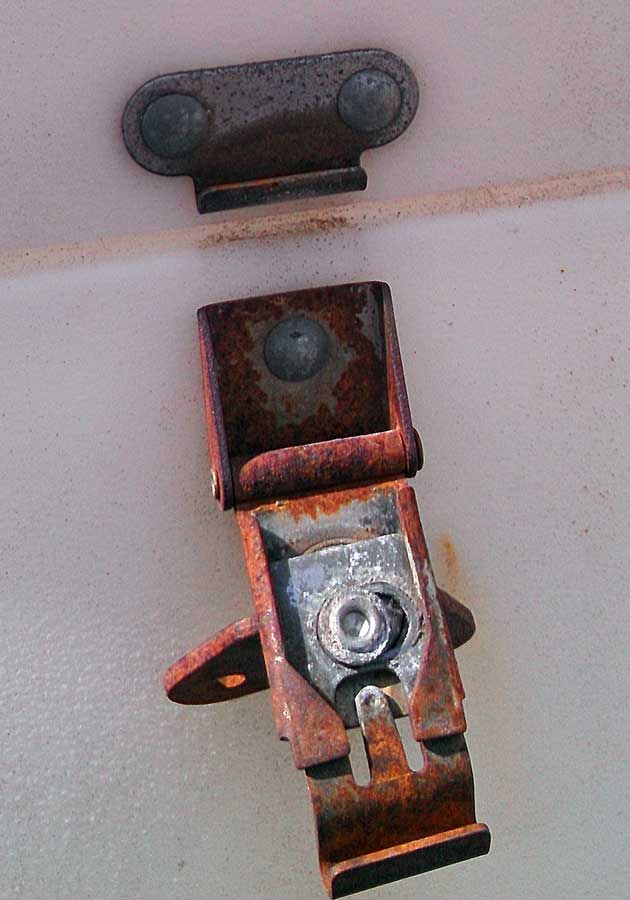
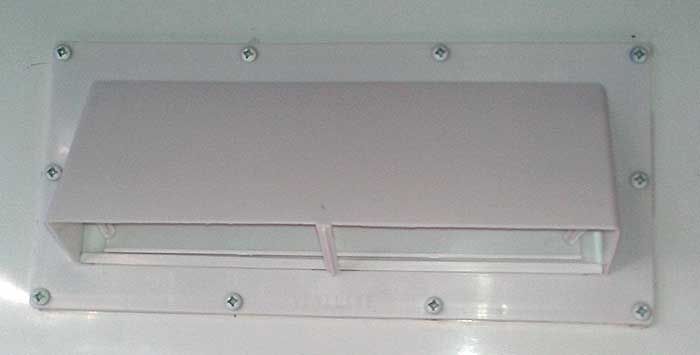
of the purchase is a good one. We did a lot of looking but found this model while visiting RVtrader online. What we found was a 2,000 at an RV dealer in Kent, Washington. I negotiated over the phone and we agreed to $9,100. The salesman didn't want a deposit which should have "rung some bells for me". The next morning I got an email saying they found some water damage which they wanted to repair. This would take a "long time so please look elsewhere for another trailer". Apparently another buyer was on the hook, probably for more money. So I DID look again. Since I had exhausted RVtrader, I went to Craigslist and searched from Sacramento, California to Seattle, Washington. I found ONE Alumascape, exactly the same model but four years newer advertised for more than $10,000. The owner was going out of town so we were able to view this trailer on Tuesday. We knew this was exactly what we ... Gwen, myself, Morgan, Annie and the DODGE wanted. We got it for $9,000 so that gives us some room to make repairs. The tires are the original, 2004 tires, they look great but when you do the research you'll learn you should never use tires older than six years no matter how good they look. I had already priced the tires so knew they would cost about $600. I also thought we would need a wheel bearing pack and brakes so after picking up the trailer, we drove 10 miles to Albany to Les Schwab to do the bearing pack. I learned this trailer has sealed bearings so no packing. The brakes were 80% good so no brakes, two expenses I avoided. I thought we might have to get new tires in Albany because I put our tire pressure sensors on the tires and one began to alarm almost immediately letting me know it was loosing air but it turned out to be a loose sensor instead. I'm waiting to give the tire business to Les Schwab here in Sutherlin. The previous owner "wanted out of the camping business entirely" so gave us everything inside the trailer. We were hoping for "treasures" and actually got some. You can see all the stuff scattered around inside and outside as we emptied the hatches and closet storage today. When plugged into shore power, everything works. The display on the combination convection/microwave oven does not work but it heats. But the refrigerator, air conditioner, lights, hot water heater, water pump, and overhead fans work when plugged into shore power. The lights don't work on batteries alone. The slide motor and hitch motor do work on the batteries so I know it's not a battery problem but a corroded connection problem. I've included a photo of the highly suspect corroded connection. The first expense was for two tanks of propane then for an anode rod for the hot water heater. I want the trailer to look new but the yellowed scare lights give away its age. I learned I could replace the two scare lights for only $25 so I've ordered them. Fred and Rita were the first to stop and wade through all our "treasures" to view our new RV. The upholstery hardly looks used but Gwen wanted to wash it since they came with zipper access. I was hoping to find a 1/2" socket drive to fit my cordless drill but no such luck. I know Harbor Freight sells it so the next time in Eugene I'll pick it up. I'll use it to drive the scissor jacks up and down. Today I sprayed white grease onto the screw drives and moved them down by hand. It wasn't hard, just time consuming. Finally, one of the "treasures" is the triple burner Camp Chef propane stove plus a 24" flat griddle. Those two items are worth $360 new. We also got a complete set of cast iron cookware to go with the stove. So somehow, we've done it again. Our first RV, a 21 foot travel trailer, we used for 4 years and sold for only $1,000 less than what we paid. Our second, the King of the Road 33 foot fifth wheel, we trading in for $4000 more than what we paid after using it for 2.5 years. The Cameo, we still love and use and now we are still feeling good about the Alumascape purchase. I believe, after cleaning it up, we could turn around and sell it for $3000 - $4000 more than we paid, but of course we want to USE it, not sell it. My next task is to pressure wash over, under and around the whole trailer then wax and polish. Click all the photos to see other views. The best part about this trailer and the reason I had to buy it was because the blue graphics match the blue of the truck. |
|
|
|
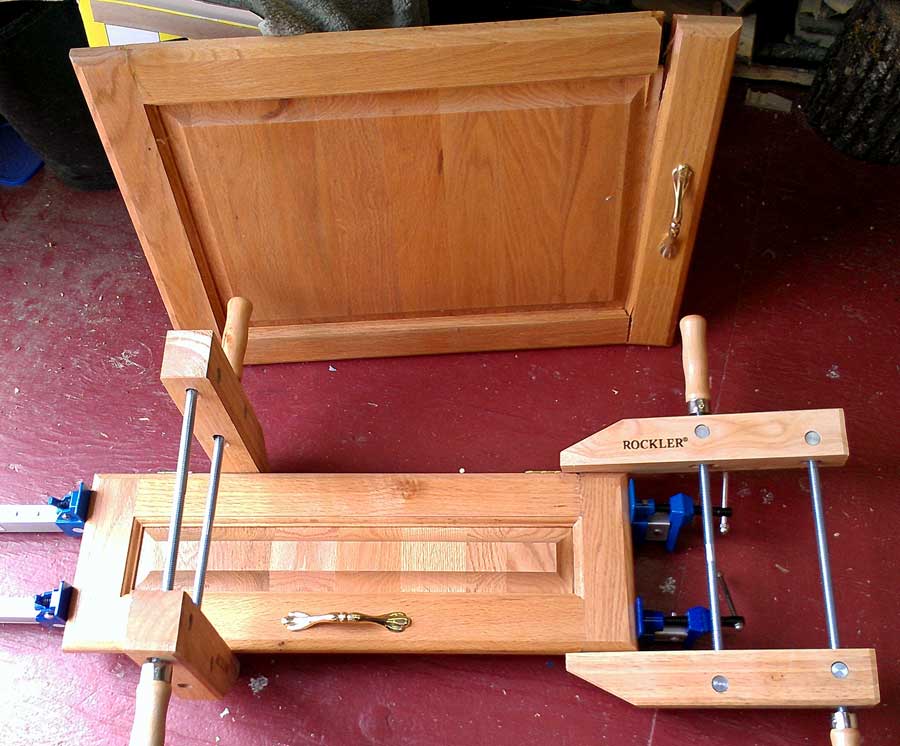
| Thursday, March 14, 2013: The Alumascape is our new project for the month. We want to use the trailer for travel toward the end of April so the repairs have begun in earnest. It's not like we haven't done this before. Here is the first time with the King of the Road. It was four years old when we purchase it but it needed lots of repairs. The Alumascape is actually in better condition than was the KOTR. We ordered the Cameo new from the factory to our specifications but we STILL made lots of changes to fit our life style. I had hoped to use the pressure washer today but it wasn't available so I did some cleaning and fixing of leaky drain hoses. Then I began to tackle the big job of fixing all the cabinet doors. Nearly all of them have separated at the joints because the previous owner did not control the moisture level inside the trailer. I have enough clamps to be able to fix two doors per day so this job may take a while. I was going to replace the latches on the propane tank cover because they were so badly rusted, however, I noticed they still worked fine. I decided to paint with Rustoleum instead. Be sure to click both photos for additional views. I'm trying to liquidate some of the "treasures". If you want to see the Camp Chef or trailer tires then click the links. (The Craigslist links will be active only the length of time the items are still listed, when sold, the links go dead.) |
|
|
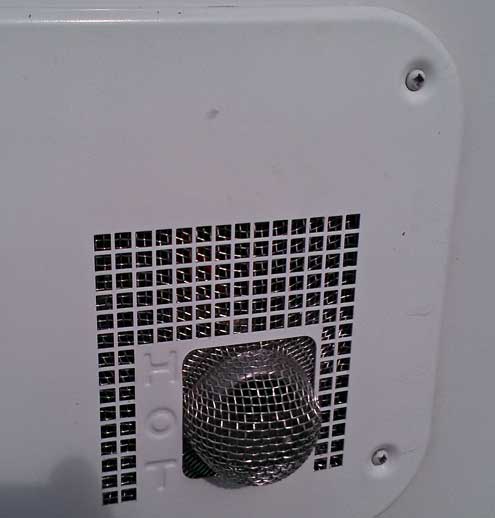
| Satuday, March 16, 2013: This day was mostly about visiting with our Canadian friends, Berndt and Erika who are driving south to continue an RV trip in the southwest US. After some Roseburg errands, we arrived home in late afternoon and continued cleaning up the new trailer. I am able to fix two cabinet doors per day due to a limited number of clamps so I replaced the two doors from yesterday and put two more into clamps today. I also vacuumed out the furnace floor vents then cut three magnetic vent covers to protect them. We have not used our furnace in years because we installed a propane radiant heater which is far more efficient. But we will likely need to use the furnace in the Alumascape until we install a radiant heater there. When not in use, these three floor vents need to be covered to keep things from falling into the vent system. After vacuuming the three vents and cleaning the grates, I cut the magnetic covers to fit perfectly. Behind the vent photo is more good news. Several of the day/night shades would not stay up but would fall down, covering the window. At first we thought we would have to replace the cord in these which is lots of work, we've done that before. But, I learned the cords only needed to be tightened. They've all been repaired tonight. Finally, Gwen is soaking the bathroom sink and tub with a clorox solution. As we clean, we are learning, even though the previous owner had this trailer for nine years, it has not been used much. In fact, the refrigerator and stove look brand new. Most of the cleaning we are doing is because the trailer has been UNUSED, not because it has been USED. Of course, we have lived 365 days/year in our fifth wheel since April 18, 2007 so I can understand a nine year old trailer looking "new" if only used one week each year. We are already planning our first trip which will likely be about six weeks. |
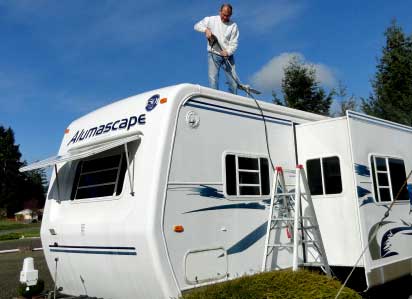
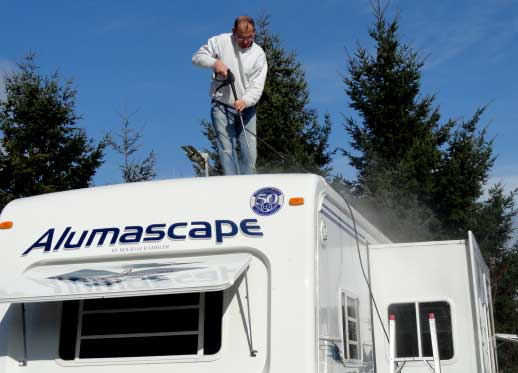
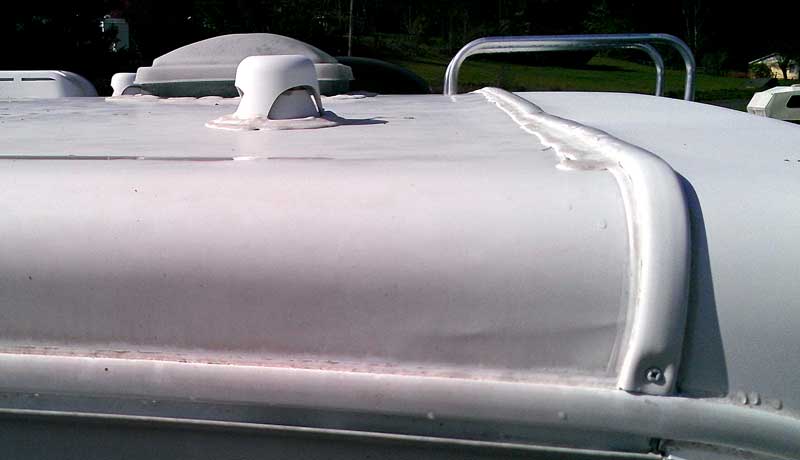
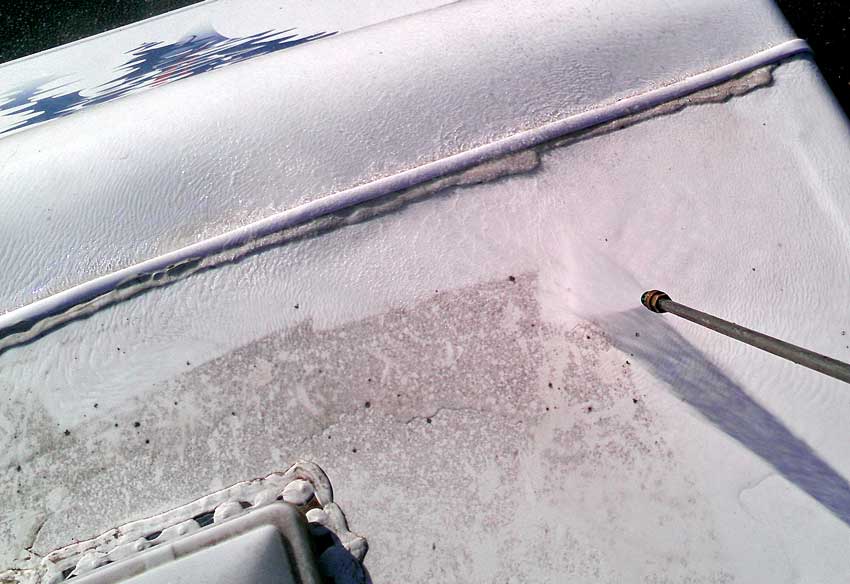
Sunday, March 17, 2013: This is my third time to use a pressure washer on my RV (first time for THIS RV). A pressure washer works pretty well for most RV scum especially the roof. The entire trailer was covered with "scum" from sitting in the Salem rain all fall and winter months. Fortunately, the park has a fine pressure washer which they allowed me to use. It took me all day to pressure wash the entire RV inch by inch, awning too. I washed the trailer with the slide out, then with the slide in. Washed the trailer with the awning out, then the awning in. I washed from the roof (see photo) and ground level. Then moved the ladder around the RV and washed from the ladder level. You DO have to be careful NOT to take off the graphics. The only graphics I lost was that on the air conditioner housing. It's a Carrier air conditioner, same model as on our Cameo except the Cameo has a low profile where this one is a high profile. All these photos are "before and after" pictures. Click each photo to see the "after" results of pressure washing. I did other things today, the pressure washing was actually done on Friday. |
|
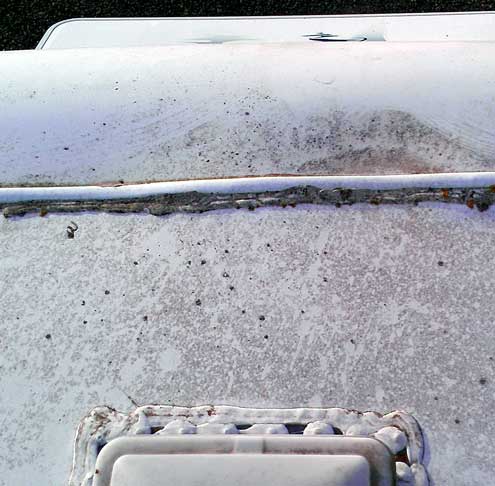
This is a good test for water leaks, and we found none. I will likely still be proactive and reseal the vents and around the TV antennae. The results of pressure washing are really impressive. Even the worst looking trailer can come out looking new after pressure washing. I had to figure this was nine years of crud built up on the trailer so I was really happy with the results. When shopping for travel trailers, I quickly learned that the better quality trailers had a fiberglass cap on the front and rear just like our fifth wheel. We saw VERY FEW high quality travel trailers. Most manufacturers are making the light weight models because vacationers are wanting to tow them with a 1/2 ton pickup or SUV. I didn't want the "light weight" model because the heavier trailers are better built with (heavier) materials and frame. Since I have a one ton pickup, I would have no trouble with a heavier trailer. I'm sure the fiberglass caps, front and rear, make this trailer heavier. But even this "heavy" travel trailer will still be 7,000 lbs lighter than my fifth wheel. This trailer will also be far more comfortable on long trips than the "light weight" models. |
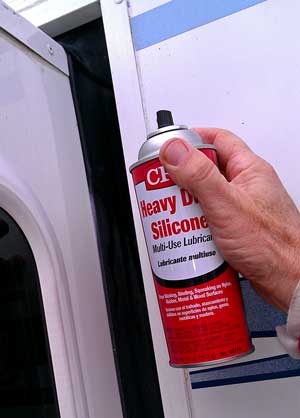
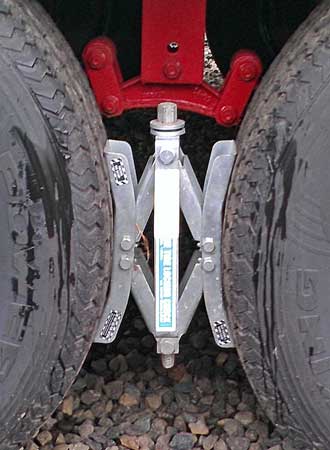
Monday, March 18, 2013: Today I took care of the rubber circling the slide. I learned this while in Middlebury, Indiana when visiting Fox RV repair with our Cameo. It's true, I wasn't very happy with their repair. We were there for them to fix our slice mechanism. It worked only a couple of times after their repair before it began slipping again and indeed, they did more damage to it than repair. I has also asked them to verify the structure of the shackle straps which they said "good". A month later, one failed and all the rest were near failure. Anyway, the owner of Fox RV told me I needed to lubricate the rubber seals on our slides and showed me how to do it using "Silicone spray". I believe he was right about this, the other problems were mostly caused by an incompetent employee. Most RV parts supply sources sell special lubrication and preservative for rubber seals but charge a fortune for a can. Silicone spray sells for about $3 at Walmart. Just spray the rubber, both sides if possible, with the spray. Don't use WD40, it will dehydrate the rubber. |
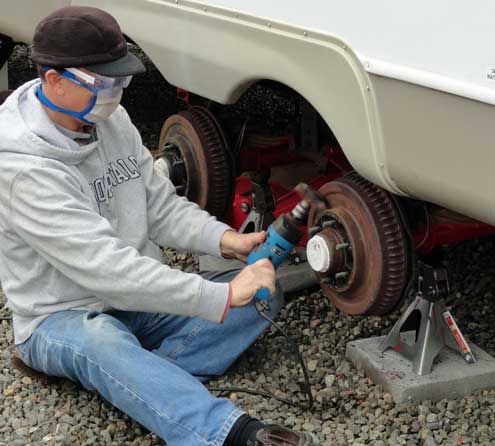
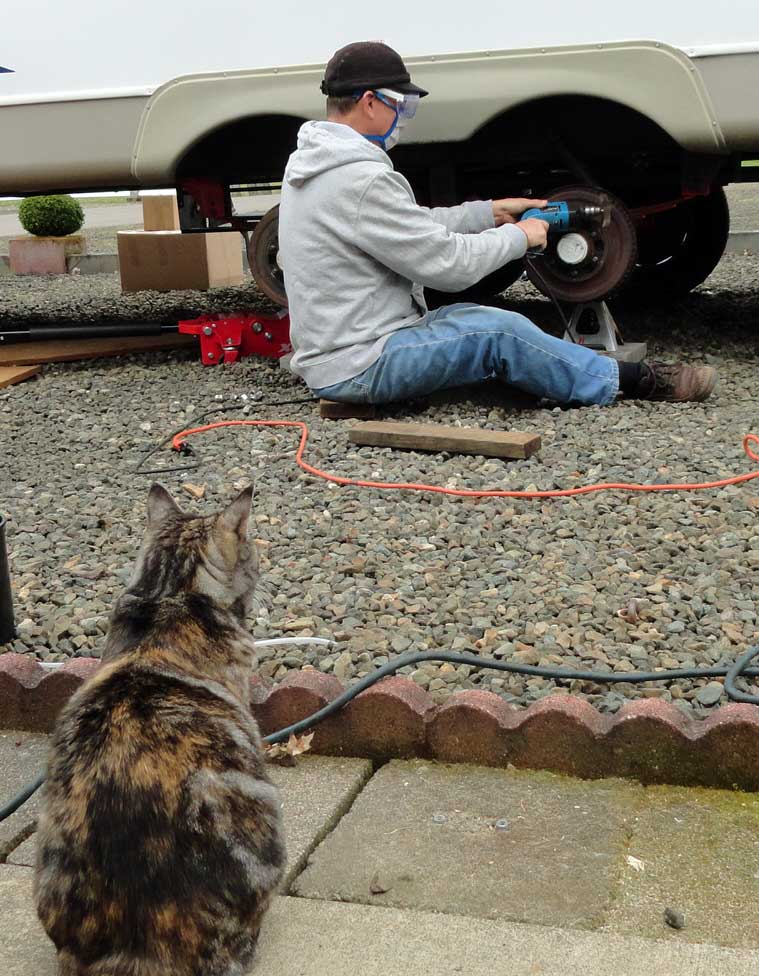
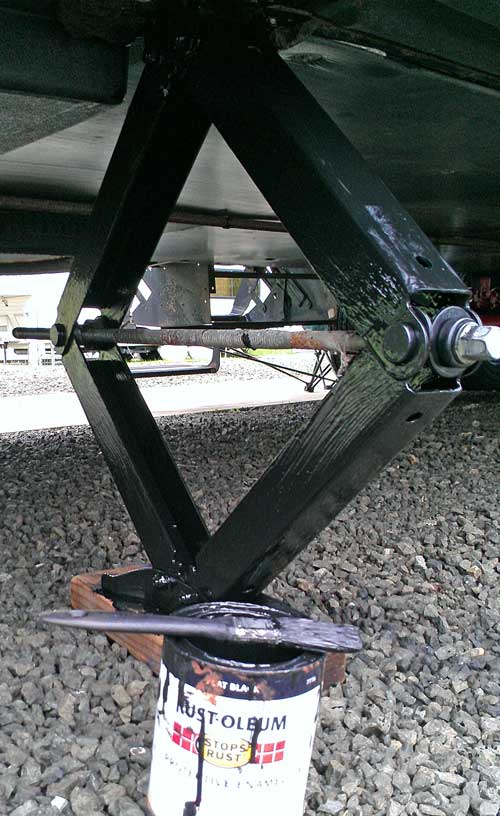
Tuesday, March 19, 2013: Maybe because this trailer has been stored in Salem, one of the wettest cities in Oregon, it seems to have it's share of rust. Although, I DO remember parking on the beach in southern Texas for a week and EVERYTHING steel on the Cameo turning to rust in that period of time. Anyway, I want to deal with the rust now before beginning to travel with our new RV. I also want to add a little accent to the wheels by painting the drum brakes a bright red. Yes, I DID Google this idea to be sure the paint would not catch fire if the drum become hot and the forum I found had a long discussion with a final conclusion of "it would be fine". I'm hoping the drums don't get hot anyway, after all, I just spent a major amount to get exhaust brakes installed (May 15, 2012) on the Dodge and it worked great this last summer on some steep grades in northern Washington and Idaho. I may not have to even touch the drum brakes except at stop signs. So I used a rotary rust remover brush on my electric drill. This was my first time to use this electric drill since 2006 when I stored it at my sister's house in California. I didn't want to breath any of this rusty dust or get it in my eyes so wore protection. I worked early this morning to beat a "significant spring storm" which was to arrive this afternoon (and DID arrive this afternoon). My goal is to get the drums painted, wheels painted and the trailer down to Les Schwab this week for new tires. While I'm at it, I'll paint other parts of the frame too. Click the photo to see my supervisor. |
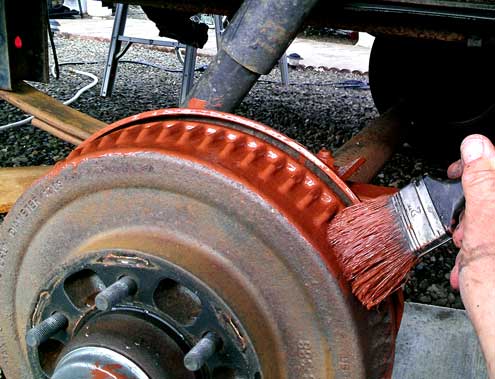
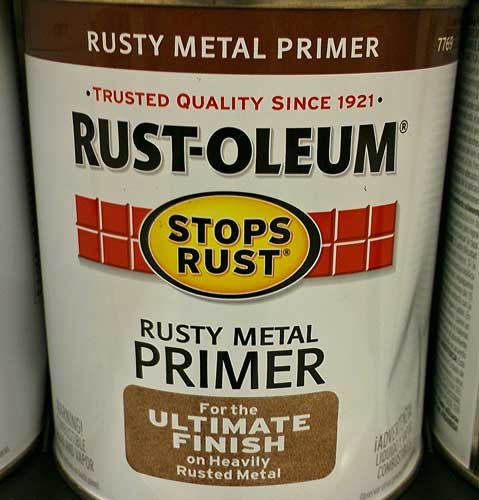
Wednesday, March 20, 2013: Anything on the trailer which had rust got covered with Rustoleum, Rusty Metal Primer, "For the Ultimate Finish on Heavily Rusted Metal". This is just the beginning of making our new trailer into "something different" ... not exactly like all the rest of the travel trailers. Name the first travel trailer brand that comes to your mind with RED brake drums? Yes, you are right, it's the Great Blue Heron Edition Alumascape. I used up nearly a quart of the "rusty primer" on the undercarriage and other rusty parts of the trailer. This was not a fun job crawling around on rocks under a trailer on jack stands (one side only) hoping NOT to spill my quart of paint. Next comes the color. Click the photo to see the Rustoleum product I am using. |
|
|
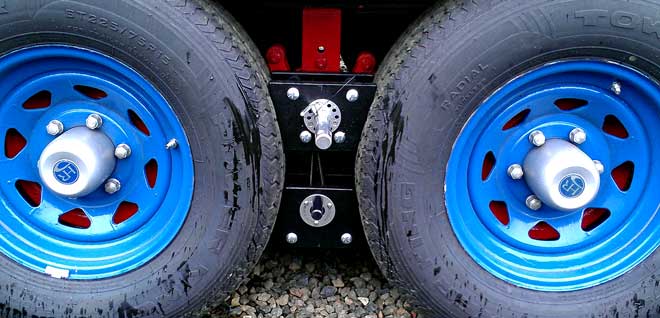
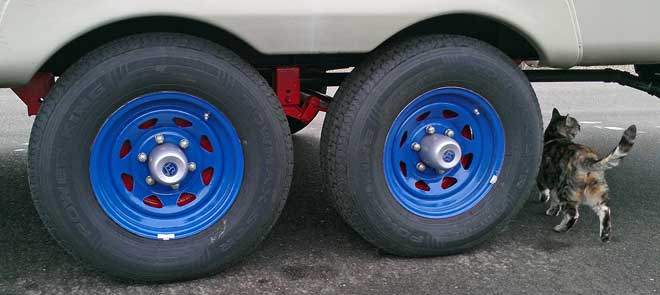 Thursday, March 21, 2013: Repainting the axles/drum brakes/rims/caps has been completed. Click these photos for completion views. Everything was rusted but it's been fixed. I painted the wheels blue to match the graphics on the trailer and the Dodge. The brake drums and suspension is painted red to contrast with the blue. Les Schwab installed new tires today. The original tires were manufactured the 4th week of 2003, so ten years old. The new Les Schwab, ten ply tires were manufactured the 3rd week of 2013 (know how to read the DOT tire code). I used primer on the rims in addition to Rustoleum blue so they should be rust-free from now on. The Les Schwab boys in Sutherlin loved my colors. Unlike the Costco tire guys (slow and lethargic) the Les Schwab boys had my trailer in the air practically before I was in the building to order the new tires. Annie is inspecting the Les Schwab tire installation, she already approved of my paint job. Thursday, March 21, 2013: Repainting the axles/drum brakes/rims/caps has been completed. Click these photos for completion views. Everything was rusted but it's been fixed. I painted the wheels blue to match the graphics on the trailer and the Dodge. The brake drums and suspension is painted red to contrast with the blue. Les Schwab installed new tires today. The original tires were manufactured the 4th week of 2003, so ten years old. The new Les Schwab, ten ply tires were manufactured the 3rd week of 2013 (know how to read the DOT tire code). I used primer on the rims in addition to Rustoleum blue so they should be rust-free from now on. The Les Schwab boys in Sutherlin loved my colors. Unlike the Costco tire guys (slow and lethargic) the Les Schwab boys had my trailer in the air practically before I was in the building to order the new tires. Annie is inspecting the Les Schwab tire installation, she already approved of my paint job. |
|
|
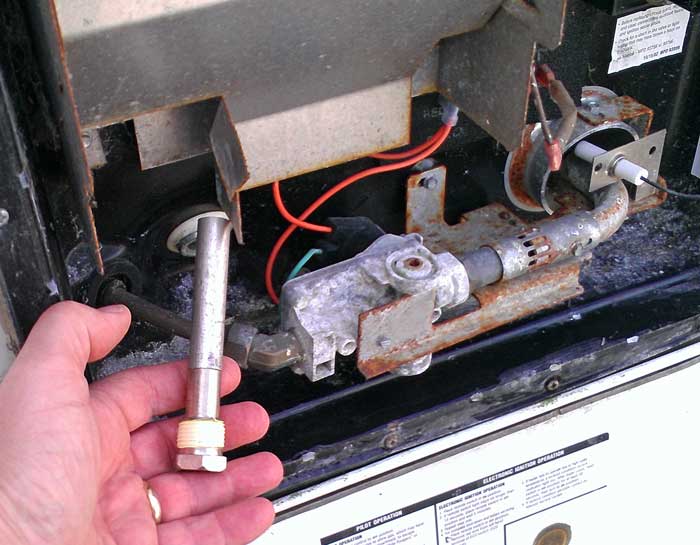
Friday, March 22, 2013: I removed the furnace cover today to be sure it was cleaned out before testing it. I found a wasp nest just above the exhaust vent. I've always known you must screen the opening to the furnace, usually to keep mud daubers out, so the screen is called a mud dauber guard. The screen acts to keep out other insects, mice and even small birds too. After cleaning out the furnace I installed a mud dauber guard, then tested the furnace. Yes! It works. So far, all systems in the trailer work on both electricity and propane. |
|
|
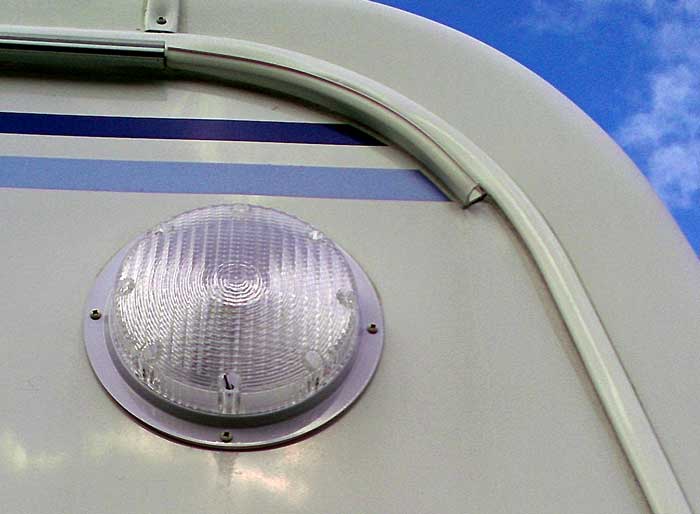
| Monday; March 25, 2013: These are the "scare lights". After nine years they have turned yellow and opaque. For only $25 (including shipping) I was able to replace both with new fixtures. This one change takes away the age of the Alumascape. Of course I checked to be sure the new light was working before installing it. Click the photos for additional comparison views. |
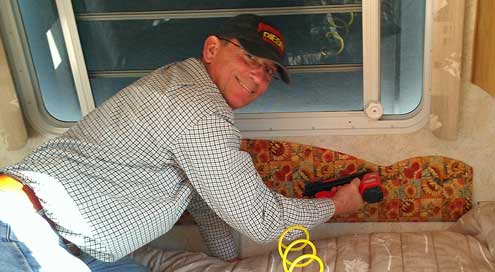
Tuesday, March 26, 2013: This is the beginning of a sad story with a happy ending. The headboard in the Alumascape was plain, stained and a simple piece of shaped plywood covered with padding and fabric. This would be an easy fix compared to the last time we did it. The last time was in our King of the Road fifth wheel, in 2004, the year the Alumascape was manufactured. This should have been far easier but, it wasn't. I ended up doing it twice. I learned this fabric covered plywood was attached to the wall with brads shot from a pneumatic nailer. Well, I happen to own one and so reattaching should be a piece of cake. The headboard pulled from the wall easily. |
|
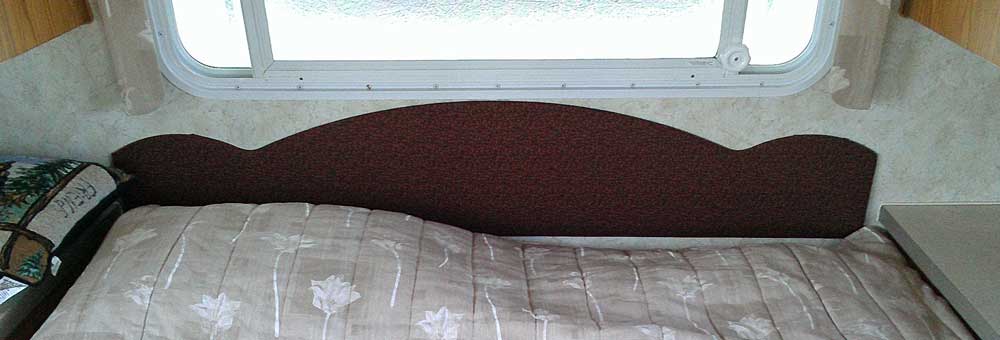
| Next came the shopping for the right fabric to cover the headboard. Again, it should have been easy. But we couldn't find the right fabric. We went to the Roseburg Jo Anns, then the Roseburg Quilt Center, then Walmart, then back to Jo Anns finally settling on little blocks of sunflowers. I used a traditional hand stapler to attach the fabric to the plywood back because I couldn't find short staples for my pneumatic stapler. That part of the job went quickly. I brought the air compressor out of my shop to use my pneumatic brad nail gun and attached the headboard to the wall using 1-1/4" brads because the factory had used long brads. I had wondered about this since the wall board was only 1/8" thick so about an inch of the brad is just hanging in the insulation of the wall. OK! The job is done. We stood back and looked at it. We both hated it. Ugly! I think we both ran out of the trailer screaming trying to get away from the "monster" in the bedroom. We did SO much better in our King of the Road. No time to make changes now, we had to drive to Klamath Falls to see the "kids". While there, however, we visited the Klamath Falls Jo Anns which had a much larger selection of fabric. We picked out something "rich" according to Gwen. I did the whole job over again a second time. This time I used 5/8" brads thinking the only reason the factory used the longer brads was because they didn't want to take the time to change the brad length. Click the photos for additional views including the final look under the last photo. |
|
|
| Wednesday, March 27, 2013: I decided several weeks ago that I wanted to make the Alumascape into something special. I wanted to give it a name. I knew of the "Silver Fox Edition" made by Arctic Fox and the Champagne Edition by Hitch Hiker. I'm sure there are other "editions". So I chose the "Great Blue Heron Edition" which I'm sure has added about $5,000 to the value of our Alumascape (because the other "RV editions" add about that much for an "edition"). I had the lettering made in Roseburg and ordered the Great Blue Heron decal online. Yes, I did add the "2014", after all, I'm working hard to make this Alumascape look new. The new 2014 models will be available in June, so this number will be believable starting in June. There are RV snobs out there who notice things like this. There are also RV parks who limit the renters to RV's no older than 15 years, so in a few years, this 2014 will have a practical use as well as impressing the snobs. The DMV still knows this is a 2004 model but others won't know the truth. No this isn't my first time to do this, I put 2005 on our "2000" King of the Road. I call it the "big lie technique". I think I learned how to do this in 9th grade history class. Click the photo for additional views. I'm still working on making it look new. |
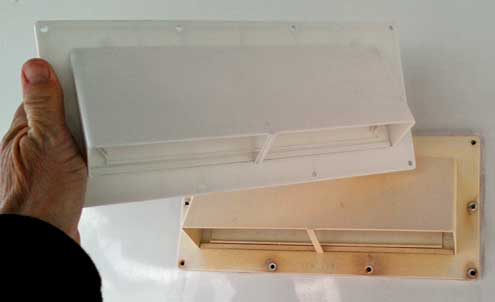
Thursday, March 28, 2013: Here's a good cheap example of making the "Great Blue Heron Edition" look new again. The old stove vent cover has turned yellow and looks ugly. The new vent cover, same brand, exactly the same size was only $8 and it's nice and white. It makes a difference in how the trailer looks. Click the photo to see the new vent installed. The change over was very easy. I also replaced the old rusty screws with new ones. |
|
|
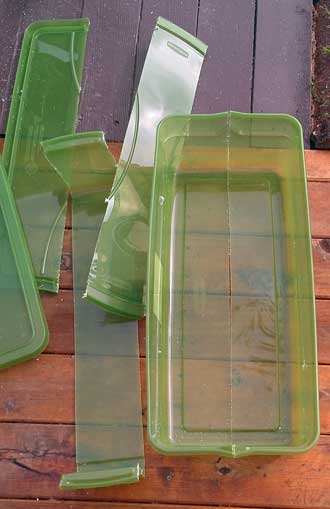
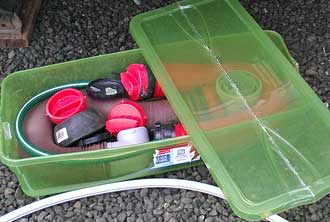
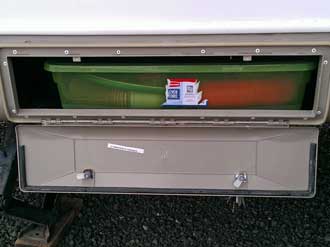
| Friday, March 29, 2013: This trailer came with several sets of sewer hoses and parts. None of them are of high quality so will likely be replaced sometime in the future but they are currently in good shape. The previous own had thrown them into one of the small, short hatches but I don't like doing that because that gets sewer juices all over the inside of that hatch. I prefer to store in a container which can be removed and washed out periodically. But there are NO containers which will fit this odd sized hatch. I found the perfect "Rubbermaid" container for length and height but about six inches too wide. I was about to return the Rubbermaid then got an idea. I used my table saw to cut six inches out of the middle of the contain with the lid in place. That worked perfectly to give me two halves of a contain with a custom fit lid. I used clear package sealing tape to tape the two halves back together again making them water tight. I taped both sides for strength. It worked to make a custom container for this odd sized space. The hoses and parts fit the container. The fit was tight but the container squeezed into the space without a lid, then the lid fit into the space once the container was in place. My plan worked perfectly. |

Saturday, March 30, 2013: Since today is the last Saturday of the month, it was the day to celebrate birthdays and anniversaries with the Timber Valley folks. As it turns out, Gwen and I were the only March anniversary and there were NO birthdays. It was a luncheon meeting at Sizzler.
I spent the morning painting out more rust. This time it was on the four stabilizer jacks. That meant more time on my back, on the rocks, under the trailer. Each arm of the jack has six sides to paint. It felt like 20. Click the photo for another view. No more rust on the jacks. |
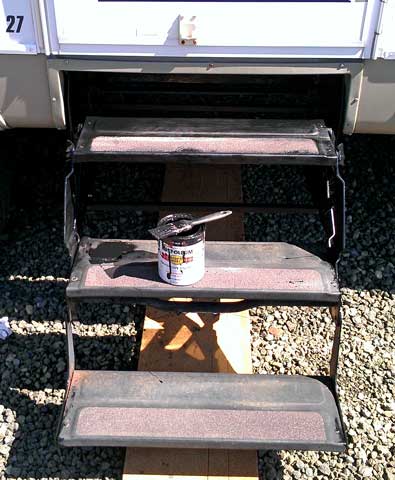
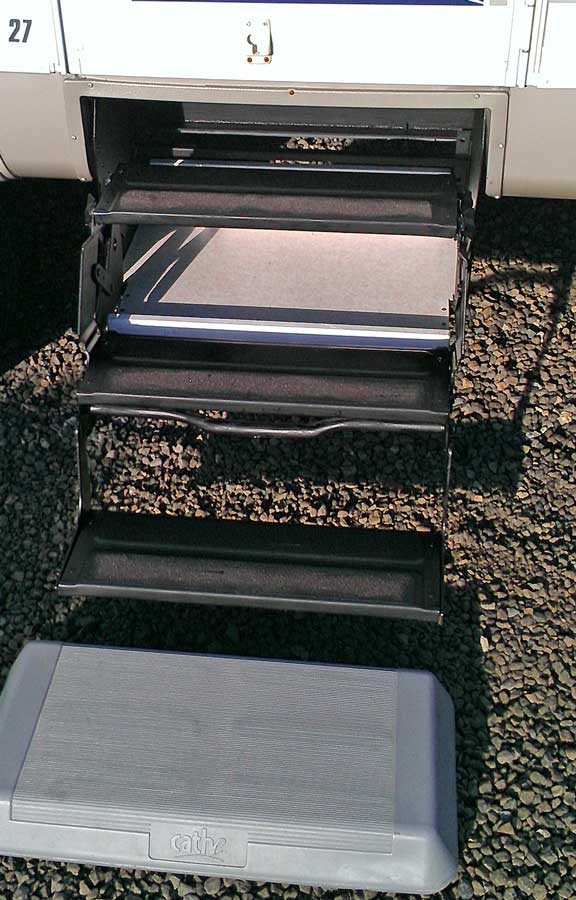
Tuesday, April 2, 2013: The steps into the "Great Blue Heron Edition" are the last to be painted. They have rust in places but not as bad as other areas of the trailer. These steps are identical to the steps into the Cameo. I repainted those steps last summer by removing them from the trailer and intended to do the same with the Alumascape steps however, I learned that Alumascape tack welded them to the frame. I didn't want to break the weld so decided to paint them in place. It wasn't as difficult as I thought it might be but it meant getting on my back in the rocks again. I painted everything I could reach so all visible rust is gone and the steps look new again. Click the photo to see the finished product. You'll also see the custom shelf I built to fit under set two. This was built for the Cameo but since the two steps are identical, the shelf fits the Alumascape too. I usually put my shoes on the shelf so I'm not tracking dirt into the trailer. The board is on the ground because it's more comfortable to lay on a board than to lay on the rocks. |
|
|
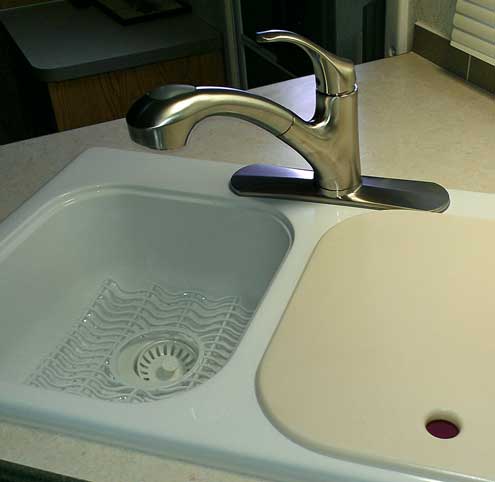
| Friday, April 5, 2013: During our short camping trip with the "Great Blue Heron Edition" we discovered a few problems. One of the problems was a drip from the kitchen faucet. I checked all the connections and found no leaks so the problem had to be an internal problem with the old, plastic, original faucet. Gwen picked out a nice Pfister faucet at Lowes which was half the price of the one we installed in the Cameo. This was extremely easy installation because of the quick connect hose connections provided by Pfister and because this sink has cabinet door access to the rear of the sink. Another view is under the left photo. The old faucet is most cheap plastic and it's nine years old so not a surprise that it's leaking. Gwen hasn't seen the new faucet installed yet but I'm sure she will like it. It doesn't leak. The new faucet also pulls out for a spray feature. |
|
|
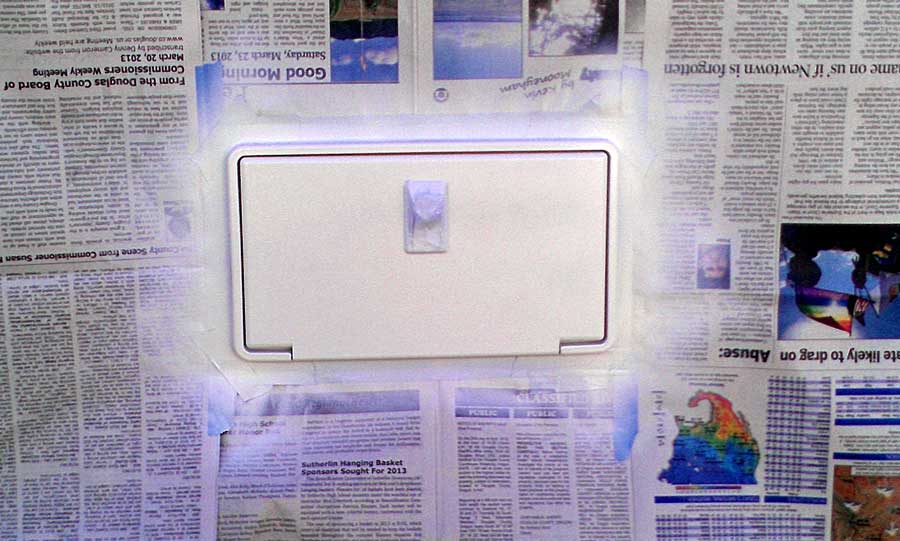
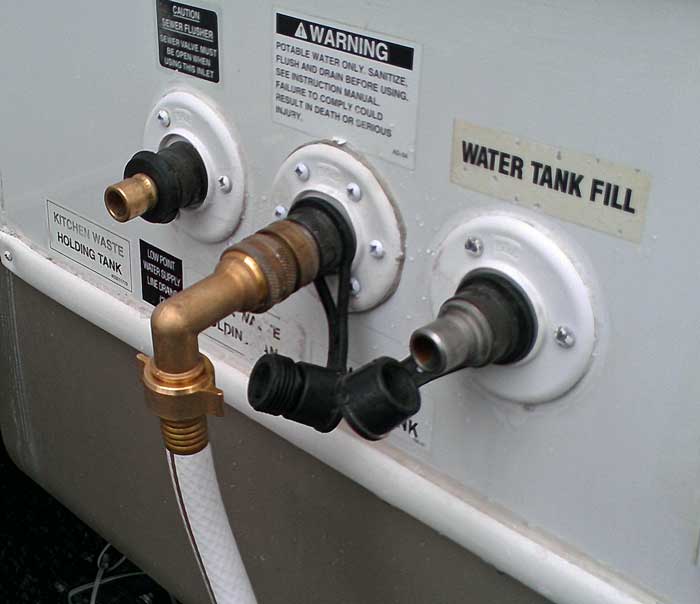
| Saturday, April 6, 2013: I have one more old, yellowed, plastic panel which needs to be renewed. This is the door to the outside shower head. It is far to complicated to replace if I have another choice. My decision is to paint the yellowed plastic rather than replace the panel. The left photo shows the panel before it was painted. Click the photo to see the panel after it is painted. The right photo shows the renewed panel with the three water supply quick connects. The left quick connect is for black water tank flush. That quick connect is different from the other two and the two styles are not interchangable. I don't ever want to confuse the quick connects. The hose which connects to the black water flush is also occasionally used to drain the gray water tanks. The middle quick connect is for fresh water while parked at an RV park. The quick connect to the right is also for fresh water but to fill the fresh water holding tank. So the middle and right quick connects are identical because both take the drinking water hose to connect. Click the photo to see the connections. I've installed a 90° elbow on the drinking hose to reduce the stress on the connection and another difference between the flush and drinking water hoses. |
|
|
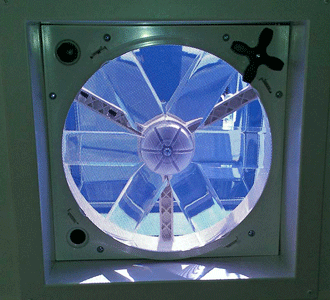
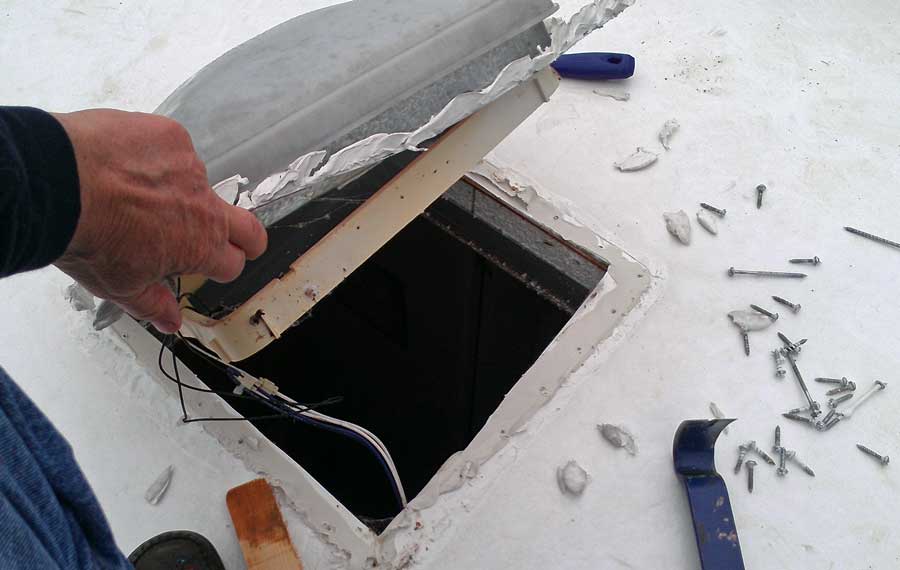
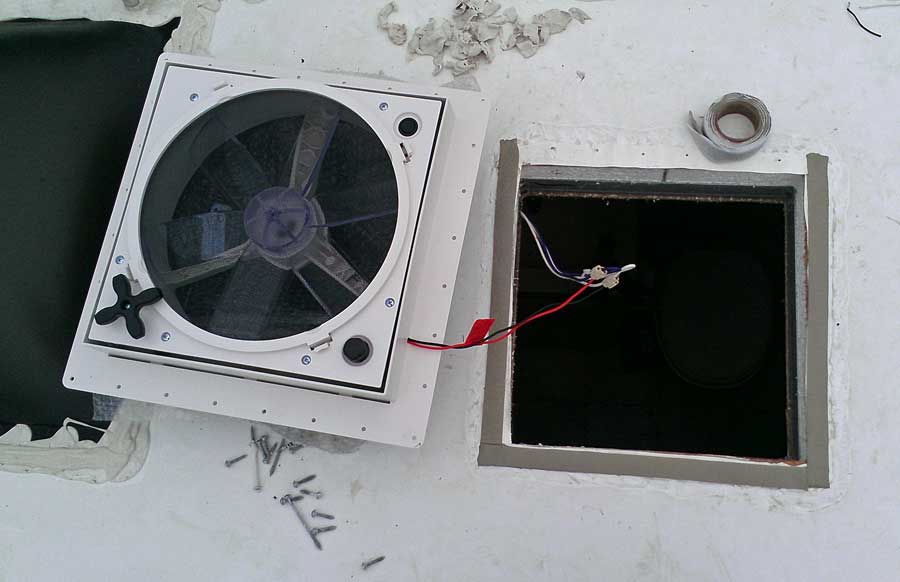
| Tuesday, April 9, 2013: The vent in the bathroom has a problem. It is one of those "egg beater" style fans which make a lot of noise and don't do much. The plastic vent lid is so brittle, it cracked and broke with only a light, accidental touch. I had already ordered a replacement fan, the variable speed ShurFlo exactly like the one I installed into the Cameo. I like this fan because the variable speed can be controlled with the knob down to barely turning. The fan is also reversable and can be run with the vent closed as a "ceiling fan". The next step above the "gold" fan is a remote controlled fan |
 |
 |
|
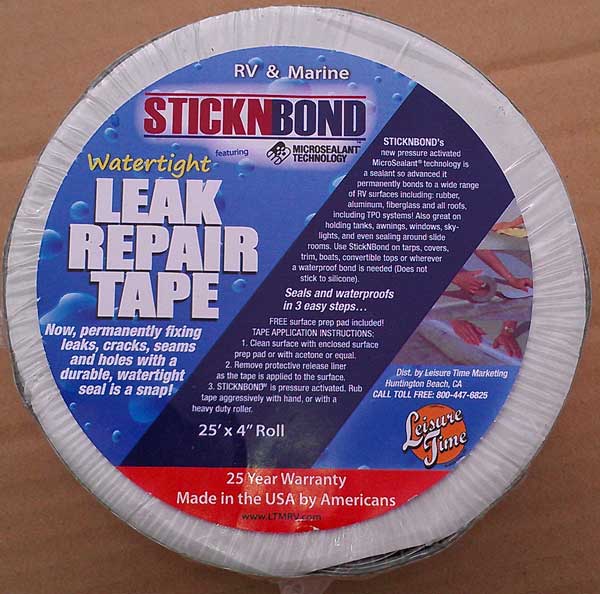
| which would be needed if installed in a tall ceiling. For exterior installation, I'm using a 4" wide tape which was called Eternabond but has changed names since the last time I purchased it. Now it's called "StickNBond". This tape is something every RV owner should have on-board.It will seal almost anything. Both the Cameo and Alumascape manufacturers used it to seal the fiberglass caps to the body of the trailers. I've used it to seal vents, roof damage, body damage and holding tanks. I used it when installing this vent. Click the photos for additional views. |
|
|
Wednesday: April 10, 2013: A BAL tire chock came with the trailer (one tire chock). I owned these many years ago. But learned that they would not hold my trailer on a slight incline ... the trailer rolled. So I sold them on eBay and purchased the RotoChoks, they WORK. Now, the wheels of the Cameo are much closer together than the wheels of the Alumascape. The RotoChoks would not it the Alumascape. So I contacted RotoChok and they were happy to send me the parts to make them FIT the Alumascape. I only had to remove two bolts then replace them with the new parts. The whole process took only 20 minutes. Now the Alumascape has two good RotoChoks. |
|
|
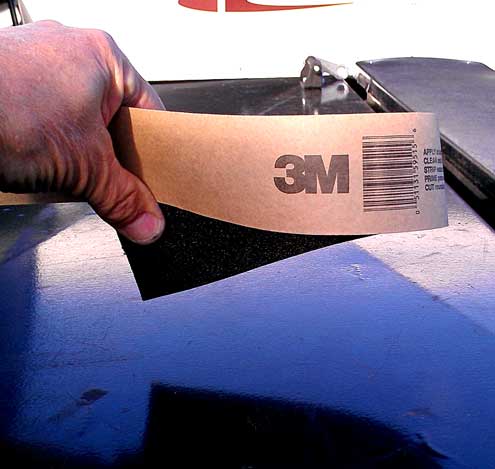 Saturday, April 13, 2013: With the new Alumascape comes a different traveling problem. Where the fifth wheel has lots of storage space, this little travel trailer has very little. Where, for example, will I put the generator, gasoline for the generator, the barbeque, the folding table and lawn chairs, my tools for maintenance and repair of the trailer, water filters, extra wood blocks for the stabilizer jacks, and more. All this sort of stuff was stored in the ample fifth wheel storage are for travel. The answer, of course, is in the truck bed. Where my truck bed was not available due to the fifth wheel hitch, it is now available. I plan to keep everything stored in large Rubbermaid tubs, both for convenience and security. It would be nice to have a cover over all the tubs too. My friend and neighbor, Gene gave me his old tonneau cover. This one fit my bed perfectly except that Gene has a larger utility box than I have so he cut the rails about 9" shorter than my bed. I improvised some rails which work just fine. The lock on the cover does not work so I improvised there too. Although this lock looks pretty funky, it has a meaningful history. This came from the bike lock I used in both high school and college. I was the only high school student riding a bicycle but one of 10,000 bicycles at college. A student needed a lock to keep other students from "borrowing" the bike for their next class. You can see, nothing about this lock would stop a serious thief but my bike was not one which was attractive to anyone except for convenience. As a freshman in college, I didn't lock my bike thinking, "no one will want this bike". However it was "borrowed" and I was without transportation for several days until the local police called me to report they had found it. They actually questioned me as if I had discarded the bike because they couldn't believe anyone would steal that bike either. Anyway, this lock worked, keeping my bike secure for five more years (one year of graduate school). That was 48 years ago. What is amazing is that I remembered the combination to that lock. I said to myself, "How many times do you think you opened that lock? Probably more than 10,000 times. THAT'S why you remember the combination!" (Yes, I know this security system will only keep "honest people honest". Do you really think there is ANY tonneau lock which will keep out a serious thief? "Out of sight, out of mind." Notice I had to fill in the area on the tailgate which is normally open for the fifth wheel hitch. Yes, you can buy a nice insert for a couple hundred dollars but this insert works as well at much less cost. With the installation of the tonneau cover, my bike would no longer fit the fork connection so I moved it. So how do you cover holes in a utility box? I used 3M pressure sensitive stair tread material. This covered the holes, made the box water tight again and eliminates a slippery surface if I climb onto the utility box. I looked this tonneau cover up on the Internet. A new one is nearly $1,000 so this was a pretty nice gift from Gene. Click the photos for different views. Saturday, April 13, 2013: With the new Alumascape comes a different traveling problem. Where the fifth wheel has lots of storage space, this little travel trailer has very little. Where, for example, will I put the generator, gasoline for the generator, the barbeque, the folding table and lawn chairs, my tools for maintenance and repair of the trailer, water filters, extra wood blocks for the stabilizer jacks, and more. All this sort of stuff was stored in the ample fifth wheel storage are for travel. The answer, of course, is in the truck bed. Where my truck bed was not available due to the fifth wheel hitch, it is now available. I plan to keep everything stored in large Rubbermaid tubs, both for convenience and security. It would be nice to have a cover over all the tubs too. My friend and neighbor, Gene gave me his old tonneau cover. This one fit my bed perfectly except that Gene has a larger utility box than I have so he cut the rails about 9" shorter than my bed. I improvised some rails which work just fine. The lock on the cover does not work so I improvised there too. Although this lock looks pretty funky, it has a meaningful history. This came from the bike lock I used in both high school and college. I was the only high school student riding a bicycle but one of 10,000 bicycles at college. A student needed a lock to keep other students from "borrowing" the bike for their next class. You can see, nothing about this lock would stop a serious thief but my bike was not one which was attractive to anyone except for convenience. As a freshman in college, I didn't lock my bike thinking, "no one will want this bike". However it was "borrowed" and I was without transportation for several days until the local police called me to report they had found it. They actually questioned me as if I had discarded the bike because they couldn't believe anyone would steal that bike either. Anyway, this lock worked, keeping my bike secure for five more years (one year of graduate school). That was 48 years ago. What is amazing is that I remembered the combination to that lock. I said to myself, "How many times do you think you opened that lock? Probably more than 10,000 times. THAT'S why you remember the combination!" (Yes, I know this security system will only keep "honest people honest". Do you really think there is ANY tonneau lock which will keep out a serious thief? "Out of sight, out of mind." Notice I had to fill in the area on the tailgate which is normally open for the fifth wheel hitch. Yes, you can buy a nice insert for a couple hundred dollars but this insert works as well at much less cost. With the installation of the tonneau cover, my bike would no longer fit the fork connection so I moved it. So how do you cover holes in a utility box? I used 3M pressure sensitive stair tread material. This covered the holes, made the box water tight again and eliminates a slippery surface if I climb onto the utility box. I looked this tonneau cover up on the Internet. A new one is nearly $1,000 so this was a pretty nice gift from Gene. Click the photos for different views.
|
|
|
|
| Monday, April 15, 2013: This is not what I did today, instead, I rode my bike in the rain with a friend. This job was done a couple of weeks ago but I'm just now reporting on it. On our first trip with the Great Blue Heron Edition, we learned the bathroom receptacle (there is only ONE in the bathroom) is on the same circuit as the dining room. Of course you need heat in the bathroom and a little electric heater came with the trailer for that purpose. The only bathroom outlet is located just above the toilet paper so anything plugged into that outlet drapes over the paper (well, I've fixed that now but that's another story). We need another separate circuit for the bathroom heater. This isn't the first time we needed something like this, I did the same thing in the Cameo. This time it was much easier because the circuit breaker box was in the bathroom, near the floor and only 18" from where I needed the new outlet. In addition to creating an outlet for the heater, I want another outlet for my charger station. The bathroom closet is an ideal location for the charger station, it's out of the way and with a hidden AC receptacle to hide the power wire, convenient. All our phones, MP3 players, tablets and blue tooth devices can be charged in the bathroom closet. While helping Ralph and Janet in Medford, I visited Grover's Electrical Supply and picked up the electrical supplies I needed including a new 15amp circuit breaker to create another circuit. The circuit breaker box was packed with AC and DC wires. I had to remove both the neutral and ground wires to access the available, unused AC port. I had easy access to the rear of the box when the two bathroom cabinet drawers were removed. I inserted the new wire through the back of the box, connected to the new circuit breaker, neutral bar and ground bar ... shebang ... I have a new circuit. The wire from the circuit breaker box leads to a new outlet only 18" away. Of course is has a ground-fault interrupt, we wouldn't want anyone getting a "jolt" playing with the electrical outlet while sitting on the "john", would we? I snapped the little cover off the circuit breaker panel cover to open up another slot for the new breaker then replaced the panel cover. Now I needed another outlet near the water heater where it clears the two drawers but close enough for the charger station power cord. Then I need a way to get through the floor of the closet to access the new outlet. I'm using a computer wire access plug, you push the plug through the hole, then insert the hole cover to close the hole. The new circuit is complete. Click the photos for additional views. If the heater is set to "high" it pulls 1500 watts. If you remember high school physics, Watts = Amps x Volts. So 1,500 watts is 12.5 amps at 120 volts. That gives me plenty of amps left over to charge phones, etc., they don't take much power. |
|
|
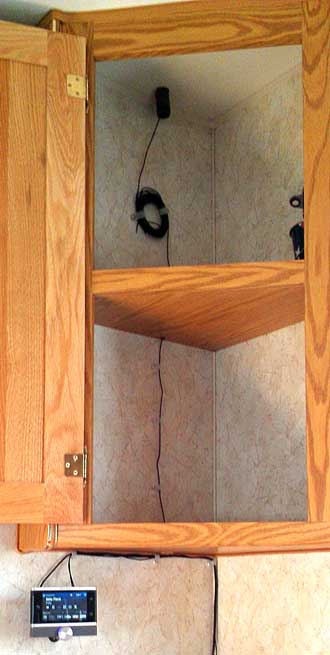 Saturday, May 11, 2013: The Great Blue Heron Edition is back on our lot for a few days to prepare it to visit the Pacific ocean next week. In the past we have hauled along satellite dishes for both TV and Internet. This time we have decided to leave the television in Sutherlin and the Internet will be a Verizon WIFI receiver (when we re-subscribe for longer trips). So, for news and entertainment, we will use satellite radio. We have subscribed to satellite radio for several years and enjoy the content. We can even get every NFL game plus the tennis matches we like. We'll just have to imagine the sports activity from the commentary since we can't see the action. We expect to be in remote areas of the Arizona desert just as we have in the past so that's another reason we feel the need for satellite radio reception. The fee is greatly reduced when purchasing a year and only a fraction of the cost of satellite TV. The Blue Heron Edition is already setup for audio input from an auxillary source into the built-in sound system. I've already connected the radio to text out the system but I don't want to run the antenna wire out a window or door so it must go through the roof. That sounds frightening but I've done it before with solar wire through the roof. There is a cabinet just above the sound system so the antenna wire can run though the cabinet to the radio. The audio and power wires will come from the sound system cabinet below. Before doing any drilling, I tested the satellite reception with the antenna receiver in a weather proof box ... full bars. Next, I built the box with a conduit coming from the bottom of the box, plugging the one hole in the side. Dicor self-leveling sealant is used the seal the box to the roof and make sure all holes are waterproof. Dicor is also used to seal the lid in addition to the rubber gasket supplied with the cover. The screws securing the box to the roof and cover to the box are also sealed with Dicor. The antenna wire is long because it's made for vehicles. I chose the vehicle option because I want the radio to work on DC rather than AC current. That means, it will work in the desert where we aren't plugged into shore power. I also wanted to use the vehicle antenna rather than a home antenna because the vehicle antenna is omni-directional while the home antenna is directional and must be pointed. I don't want to point the antenna as we move from one location to another. I gathered all the wires and secured to the wall using nylon loops. I chose the radio location because it came with a remote control. I wanted it high enough to clear anything set on the sound cabinet top and pointed in the direction of our seating area so we could read the artist and channel information. I also wanted it under the top cabinet so anything hung on the wall next to the cabinet would not interfer with the radio. Click ALL these photos for additional views. Saturday, May 11, 2013: The Great Blue Heron Edition is back on our lot for a few days to prepare it to visit the Pacific ocean next week. In the past we have hauled along satellite dishes for both TV and Internet. This time we have decided to leave the television in Sutherlin and the Internet will be a Verizon WIFI receiver (when we re-subscribe for longer trips). So, for news and entertainment, we will use satellite radio. We have subscribed to satellite radio for several years and enjoy the content. We can even get every NFL game plus the tennis matches we like. We'll just have to imagine the sports activity from the commentary since we can't see the action. We expect to be in remote areas of the Arizona desert just as we have in the past so that's another reason we feel the need for satellite radio reception. The fee is greatly reduced when purchasing a year and only a fraction of the cost of satellite TV. The Blue Heron Edition is already setup for audio input from an auxillary source into the built-in sound system. I've already connected the radio to text out the system but I don't want to run the antenna wire out a window or door so it must go through the roof. That sounds frightening but I've done it before with solar wire through the roof. There is a cabinet just above the sound system so the antenna wire can run though the cabinet to the radio. The audio and power wires will come from the sound system cabinet below. Before doing any drilling, I tested the satellite reception with the antenna receiver in a weather proof box ... full bars. Next, I built the box with a conduit coming from the bottom of the box, plugging the one hole in the side. Dicor self-leveling sealant is used the seal the box to the roof and make sure all holes are waterproof. Dicor is also used to seal the lid in addition to the rubber gasket supplied with the cover. The screws securing the box to the roof and cover to the box are also sealed with Dicor. The antenna wire is long because it's made for vehicles. I chose the vehicle option because I want the radio to work on DC rather than AC current. That means, it will work in the desert where we aren't plugged into shore power. I also wanted to use the vehicle antenna rather than a home antenna because the vehicle antenna is omni-directional while the home antenna is directional and must be pointed. I don't want to point the antenna as we move from one location to another. I gathered all the wires and secured to the wall using nylon loops. I chose the radio location because it came with a remote control. I wanted it high enough to clear anything set on the sound cabinet top and pointed in the direction of our seating area so we could read the artist and channel information. I also wanted it under the top cabinet so anything hung on the wall next to the cabinet would not interfer with the radio. Click ALL these photos for additional views. |
|
|
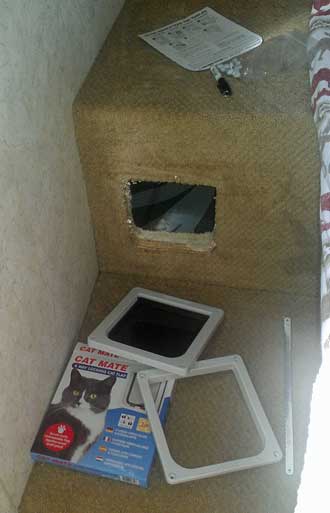
Tuesday, May 14, 2013: For the trip beginning tomorrow, we are taking Annie with us. We have always be able to put her food and litter box in a storage bin of the "basement" in the fifth wheel. In this travel trailer there is only one storage bin, it passes across the front of the trailer under the bed. There are two walls where a cat door could be installed, one on each side of the bed. Eventually all the solar wires and controls will be on the right side of the bed so the cat door goes on the left side. There is a one inch gap between the interior wall of the hatch and the wall inside the hatch. I filled the gap with "Great Stuff", which is expanding foam which cures solid in about eight hours. It expands to fill the one inch gap then continues to expand from the hole I cut in the wall. After eight hours, I can cut this now-solid foam from the opening and discard. The gap is now filled and the wall is solid. The litter box and food will stay in the hatch, outside of the living space of the trailer. I've put down a special mat to catch any litter material before it is tracked into the living area. Click all three of these photos for additional views. This will be an interesting trip since Annie has become very independent after living in her deck house I built. She now prefers to be outside and has NOT been in the Cameo for a month. She is obsessed with being outside. I don't know HOW this is going to work when we are traveling. We aren't changing our travel plans to satisfy the cat however, so what happens ... happens. |
|
|
| Thursday, May 30, 2013: Here is a sample of some great stickers I found for our Great Blue Heron Edition. I have four of the Great Blue Heron stickers to place around the existing graphics. They are on a clear carrier so you see only the Heron. I found a few others too. Click the photos to see all of them. This really wasn't what I did today, I did this while visiting the Oregon Coast. I worked all day on moving the solar charging system from the Cameo to the Great Blue Heron Edition. I've been able to move my Trojan T-125 batteries (two of them) to the Alumascape and the other two into the battery compartment of the Cameo. I'll start detailing the process with photographs tomorrow. I figure it will take as much as another four days to complete this job. |
|
|
 |
Friday, May 31, 2013: If you have the tenacity to follow this whole project of moving my solar charging system from the Cameo to the Alumascape then you will understand why I have put this off for three months. To understand, you should look at the original |
 |
|
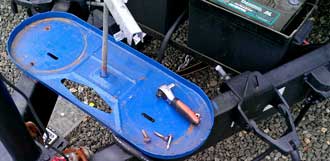
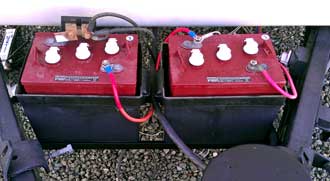
| solar power report, installing the system into the Cameo in 2009. There is also a complete financial list in that report. Panels are now about 1/3 what they cost in 2009, but all the other parts are about the same. Our short two week camping trip to the coast reminded us of how ill-prepared the Alumascape is for anything but parking in an RV park. I believe the previous owner tried wilderness camping in this trailer and found it frustrating, hence his desire to give us EVERYTHING having to do with camping. Fortunately, we know how to make it right, its just going to be a lot of work. As soon as we moved into the National Forest Service campground and set up, we needed to turn on the furnace because it was cold. There's the first problem! The Century,12 volt, sealed, "Marine/RV", "Deep Cycle" batteries which came with the Alumascape lasted about 3 hours before they were completely dead mostly due to the draw from the furnace. You simply can't use these inefficient furnaces for dry camping. Fixing that problem is the next project, so a separate report. The Century batteries are simply the WRONG batteries for wilderness camping. RV solar systems are NOT understood by many RVers, even those who have a solar charging system. A solar charging system purpose is to bring batteries back to full charge so that stored energy can be used at night. Once the batteries are at full charge, then excess solar energy can be used to power appliances during the daylight hours but the power is always passing through the batteries to be used in the RV. The first part of the project is to move the batteries. In 2009, I tried to purchase Trojan T-105, 6 volt batteries (a very popular battery for solar systems) but the store was out of stock so sold me Trojan T-125 batteries (a step up) for the same price. I purchase four to be used in the Cameo but only two will fit into the Alumascape. Since we don't plan to be heavy power users in the Alumascape, two should be fine. These are very heavy batteries but I devised a lever system to pickup each battery and remove from the Cameo compartment. Two of the batteries will stay with the Cameo. I moved them back into the battery compartment which was being used to house the inverters (I'll tell about inverters later). Most RVs use 12 volt lighting and appliance systems. So how do you get two six volt batteries to give 12 volts. You tie the positive and negative terminals together on one end of each battery then attach the RV system wires to the remaining positive and negative terminals, again, one on each battery. Now you have 12 volts. I removed the propane tanks and propane tank holder to have easier access to the Alumascape batteries. Much of this was rusted so I painted everything. Initially, I set the Trojan batteries on the ground under the tongue so I could paint the rusted crossbars which support the two battery cases. I'm leaving the propane tanks out of the way until I'm finished with all the battery wiring. The batteries have been move successfully. Next step, move the panels. Click these photos for additional views. We also discovered that the converter (the RV appliance which changes AC power to DC power and charges the batteries when connected to a power source) is nothing but a trickle charger. Unlike the converter in the Cameo which gives the batteries a 50 amp jolt for the first hour of "shore power", the Alumascape converter trickles in 3 amps. Again, fine for RV parks but very poor for wilderness camping. It means connecting to a gas powered generator charges the batteries very slowly ... a waste of gas. No need to upgrade the converter however since the solar charging system should keep the batteries fully charged 97% of the time. |
|
|
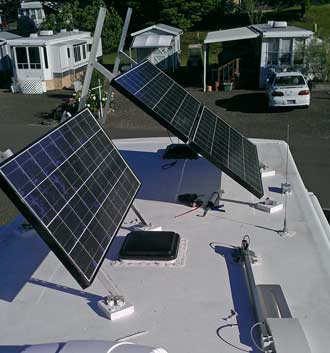 Saturday, June 1, 2013: Today was another full day of working on transferring the solar system to the Alumascape. The panel frames on the Cameo are mounted pieces of nylon cutting board which I happened to have an cut into squares then used Dicor to seal them to the roof. I needed more height on the Alumascape so used cedar squares painted white. I was able to remove the panels and frames as expected. I was also able to move the junction box and the aluminum mounting brackets. I hadn't expected to be able to move those figuring the Dicor would not release them. I'm glad I was wrong, because it saved me time and money to be able to use the old parts. When setting up the panel frames on the Alumascape, I did so in such a way to allow me to tip the panels in two directions. I was able to time the panels only in one direction on the Cameo. Tipping the panels is not necessary during the summer months but during the winter, the panels must be pointed to the south because the sun is so low in the sky. The short number of daylight hours during the winter makes it difficult to get a full charge so pointing the panels helps. The next step is to find a wiring route from the batteries to the charge controller which I plan to locate inside the closet on my side of the bed. The wire from the panels should drop directly into that closet after drilling a hole in the roof. Click the photos for additional views. Saturday, June 1, 2013: Today was another full day of working on transferring the solar system to the Alumascape. The panel frames on the Cameo are mounted pieces of nylon cutting board which I happened to have an cut into squares then used Dicor to seal them to the roof. I needed more height on the Alumascape so used cedar squares painted white. I was able to remove the panels and frames as expected. I was also able to move the junction box and the aluminum mounting brackets. I hadn't expected to be able to move those figuring the Dicor would not release them. I'm glad I was wrong, because it saved me time and money to be able to use the old parts. When setting up the panel frames on the Alumascape, I did so in such a way to allow me to tip the panels in two directions. I was able to time the panels only in one direction on the Cameo. Tipping the panels is not necessary during the summer months but during the winter, the panels must be pointed to the south because the sun is so low in the sky. The short number of daylight hours during the winter makes it difficult to get a full charge so pointing the panels helps. The next step is to find a wiring route from the batteries to the charge controller which I plan to locate inside the closet on my side of the bed. The wire from the panels should drop directly into that closet after drilling a hole in the roof. Click the photos for additional views. |
|
|
 |
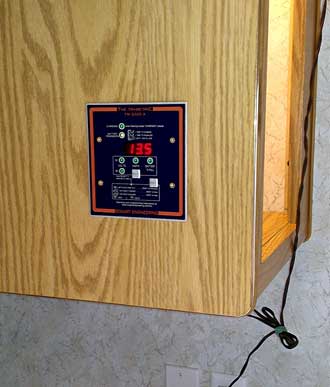 |
Sunday, June 2, 2013: It took a whole day to find a wiring route and run the wires from roof to batteries. The charge controller is going into my closet so all wires must reach there somehow. I removed my drawer next to the bed for easy access to storage compartment roof and also easier to cut a slot into the back of the counter top over the drawer compartment. I searched and found a perfect location to pass the wires through the floor of the storage compartment. The Trimetric meter to monitor the batteries is mounted on the side of the closet facing the bed. Once all the wires are connected to the batteries, I'm seeing 13.5 volts which is as good as I will see when on shore power where the converter is trickle charging the batteries. |
|
| Once the solar panels are connected I see 14.8 volts which is what the charge controller is programmed to deliver to the batteries. This is why batteries can NEVER be fully charged without a solar system. Trojan batteries need a charging voltage of 14.8 volts to become fully charged and the converter will never give that full charge. I'm sure I went into all that in my solar discussion back in 2009. So the system is working perfectly. The next step is cosmetic. Hiding all the wires and putting everything back in its place. |
|
|
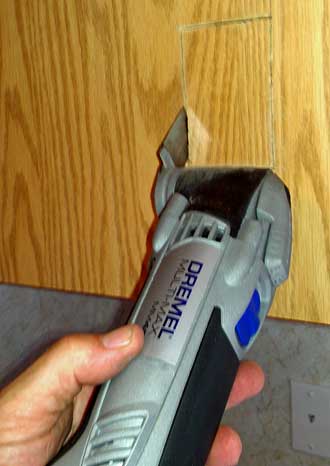
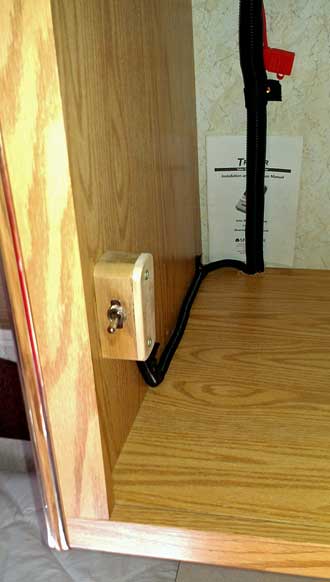 Tuesday, June 4, 2013: I began with making molding to hide the wires passing between the bedside closet and bedside drawer. I happen to have some nice hardwood on hand which I cut a dado on one side to hide the wires. I used an adjustable angle finder to locate the angle needed to match the slope of the trailer front as it meets the bedside drawer. This was transferred to the saw blade angle. I predrilled screw holes then used screw hole buttons to hide the screws. The switch in the front of the closet is to turn the inverter on/off remotely. Wire loom is used to wrap the multitude of wires passing from one area to another. Click the photos for additional views. The next step is to connect and install the inverter. An inverter transforms 12 volt DC power to 110 volt AC power so batteries can be used to run the AC items in the coach such as computers, comfort fan, charge the toothbrushes, phones, and other electronic devices (these can also be charged using the one DC outlet in the trailer), Gwen's sewing machine and a small iron. Don't confuse the "inverter" which changes DC power to AC power, with the "converter" which changes AC power to DC power. All modern RVs have two electrical systems, DC, used to power lights, furnace, exhaust fans, the entertainment center (in our trailer), electronics in the refrigerator, water heater, furnace, safety sensors (CO detector and propane detector). AC is used to power the air conditioning, microwave, all small appliances in the kitchen, television, and can be used to power the water heater and refrigerator. An inverter is NOT normally used to power these big appliances because RVs just can't haul enough batteries to store the power needed for the big appliances nor is there enough room on the roof of an RV for the number of solar panels needed to charge more than four batteries. (Yes, there are some RV travelers I've met who have many solar panels, usually spread out on the ground around the RV but these are VERY rare.) Tuesday, June 4, 2013: I began with making molding to hide the wires passing between the bedside closet and bedside drawer. I happen to have some nice hardwood on hand which I cut a dado on one side to hide the wires. I used an adjustable angle finder to locate the angle needed to match the slope of the trailer front as it meets the bedside drawer. This was transferred to the saw blade angle. I predrilled screw holes then used screw hole buttons to hide the screws. The switch in the front of the closet is to turn the inverter on/off remotely. Wire loom is used to wrap the multitude of wires passing from one area to another. Click the photos for additional views. The next step is to connect and install the inverter. An inverter transforms 12 volt DC power to 110 volt AC power so batteries can be used to run the AC items in the coach such as computers, comfort fan, charge the toothbrushes, phones, and other electronic devices (these can also be charged using the one DC outlet in the trailer), Gwen's sewing machine and a small iron. Don't confuse the "inverter" which changes DC power to AC power, with the "converter" which changes AC power to DC power. All modern RVs have two electrical systems, DC, used to power lights, furnace, exhaust fans, the entertainment center (in our trailer), electronics in the refrigerator, water heater, furnace, safety sensors (CO detector and propane detector). AC is used to power the air conditioning, microwave, all small appliances in the kitchen, television, and can be used to power the water heater and refrigerator. An inverter is NOT normally used to power these big appliances because RVs just can't haul enough batteries to store the power needed for the big appliances nor is there enough room on the roof of an RV for the number of solar panels needed to charge more than four batteries. (Yes, there are some RV travelers I've met who have many solar panels, usually spread out on the ground around the RV but these are VERY rare.) |
|
|
| Wednesday, June 5, 2013: I'm taking a break from solar installation while I wait for a simple part to arrive. Another item on the "To-Do list" from our short coast trip are "robe hooks". We learned we had no place to hang hats, robes, coats, sweatshirts, etc. You can never have too many hooks in an RV so I've made three simple mounting boards for the hooks. Two for each side of the bedroom and one for the bathroom. I'm planning another hook/shelf for each side of the bedroom but that won't happen today. I cut and routered these mounting boards then put two coats of satin polyurathane on them. I drilled 3/8" countersink holes because I will use 3/8" screw hole buttons to fill the holes once the board is screwed to the wall. I like "robe" hooks much better than "coat" hooks. I installed three hooks on each board but planned to install FOUR. WalMart was sold out of this hook so I must visit another time or another WalMart. Click the photos for additional views. |
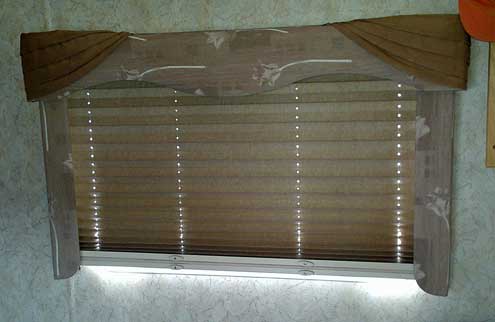
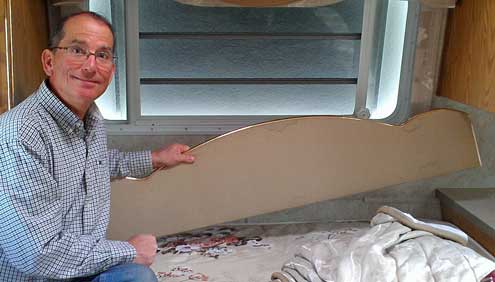
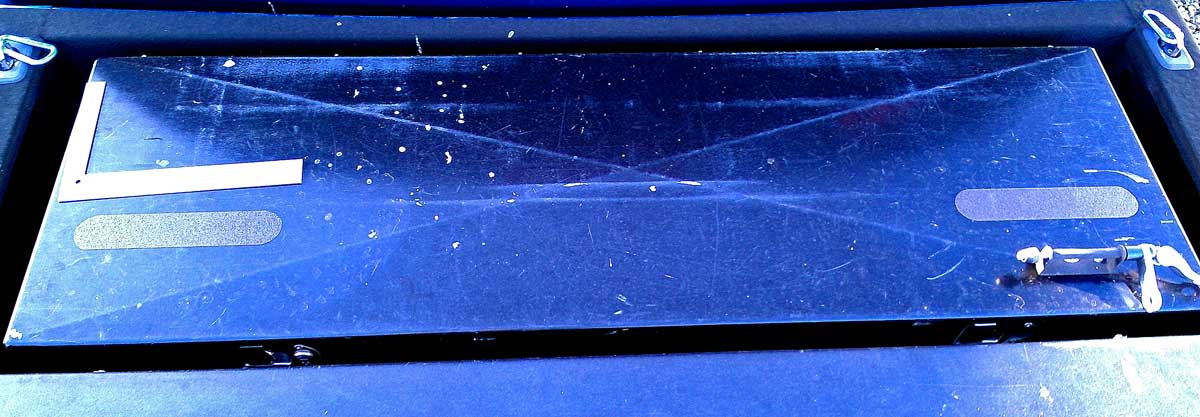
Thursday, June 6, 2013: Another item on the "To-Do" is to replace the ugly valance face with a usable shelf. Gwen hates the valence face and I'd like to have something more practical since the places to set things is limited in this little trailer. The photo at left is the "before" photo and you can get an "after" photo by clicking this photo. So I spent the day replacing most of the valence with a nice pine shelf and another robe hook. The shelf needs to have a retaining lip to help kept items from falling off the shelf unintentionally. First, I must design a shelf shape to clear the closet (cabinet) door when open. I'm nicely set up to do woodworking, it's good to have the right tools for the job. |
|
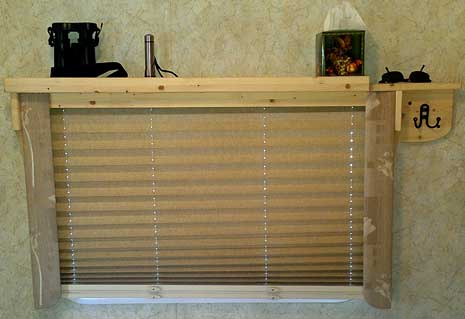 Once all the parts are cut and sanded, I routered (rounded) the edges. When it came time for assembly I was surprised how easily the old valance came off the wall. Only four screws held the entire assembly to the wall. Another four screws held the shade to the valence. I used the sides of the valence but threw away everything else. Gwen and I couldn't decide on a stain color and/or finish so we left it unfinished for now. The project really turned out nice and functional. I'm already imagining all the items I can put on the shelf when parked and I love having ANOTHER robe hook. The shelf is solid, I put considerably more than four screws to secure this assembly to the wall. Hopefully the part needed to finish the solar job will arrive tomorrow and I'll report on the completion of that job too. Click all the photos for additional views. Behind this photo is a view of the cabinet door open. Once all the parts are cut and sanded, I routered (rounded) the edges. When it came time for assembly I was surprised how easily the old valance came off the wall. Only four screws held the entire assembly to the wall. Another four screws held the shade to the valence. I used the sides of the valence but threw away everything else. Gwen and I couldn't decide on a stain color and/or finish so we left it unfinished for now. The project really turned out nice and functional. I'm already imagining all the items I can put on the shelf when parked and I love having ANOTHER robe hook. The shelf is solid, I put considerably more than four screws to secure this assembly to the wall. Hopefully the part needed to finish the solar job will arrive tomorrow and I'll report on the completion of that job too. Click all the photos for additional views. Behind this photo is a view of the cabinet door open. |
|
|
| Friday, June 7, 2013: The solar power installation is complete. I want the inverter on the outside of the trailer so I don't have to run an electric line through another hole in the trailer, it also makes it closer to the batteries and the closer to the batteries the better. I'm not sure how well this will work, I'm afraid the plastic box will break apart on the first gravel road. I'm on the look-out for a metal box, but until then, we'll see if the plastic box works. So the inverter is wired directly to the batteries and receives all power from the batteries, not the solar panels. However, when you click the photos you see another view. The view behind the right photo is of the AC powered fan inside the trailer running this afternoon on the power from the inverter. I can say that the fan is "solar powered" because the solar panels keep the batteries at full charge during the day. The charge controller reduces the charge to the batteries when they are fully charged to keep them from over-charging. If I turn on the fan, the charge to the batteries is increased buy the amount the fan uses to maintain the batteries at full charge. As I use more power from the batteries, whether AC or DC power, the charge controller continues to increase the charge to the batteries to maintain the fully charged status. If I use more power than the charge controller can send to the batteries (because of a cloudy day, sun low in the sky, or just too many power items on at one time) the batteries will begin to discharge and they will no longer be at a full charge. I can continue to say the fan is "solar powered" at night because the charge stored in the batteries has come from the sun. Stored energy in a battery is measured in Amp Hours. One Amp Hour would be one amp used for a period of 1 hour. I usually measure the number of amps each item uses in the trailer so I know how much power we are using. When dry camped in the Cameo, we would normally use about 100 Amp hours in an evening with four batteries. On a good sunny day in winter Arizona (sun up at 8:30 am and down at 4:30 pm) we could be fully charged by 1pm if we allowed all solar energy to go to the batteries (didn't use power in the trailer). With the smaller trailer and only two batteries we expect to use only 50 Amp hours each night or less by managing the power. More about power management later. The 600 watt inverter will have enough power for the fan, Gwen's sewing machine, computers and keep our tooth brushes charged. All DC items in the trailer are powered by the batteries so all are "solar powered" too. |
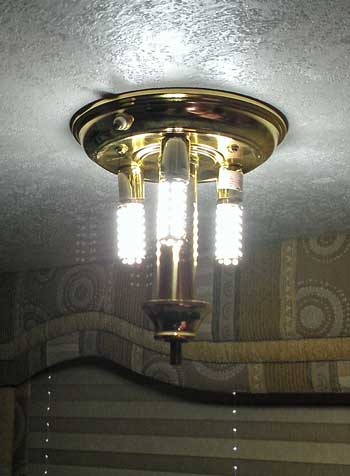
Wednesday, June 12, 2013: I've installed LED bulbs in the key light fixtures of the Great Blue Heron Edition. Knowing the number of Amps each electrical item uses is important when living with solar power. After installing the panels and the Trimetric meter I was able to measure Amps used by key items such as the lighting fixtures. All the lights are DC powered (12 volt) so draw their power from the batteries directly (not through the inverter). I spoke above about battery power measured in "Amp Hours". I calculate we will need to use at least 50 Amp Hours each evening stored in the batteries. I'll know more when we actually start living in the Alumascape. I measured the Amps used by the dining area light fixture. It was an amazing 5 Amps. Amazing because our television uses only 3.2 Amps. During an Arizona winter stay, the lights will go one at 4:30pm and likely stay on until 11pm. This ONE light fixture, then, would use 30 Amp Hours over a 6 hour period JUST FOR LIGHT. That won't work when living "off the grid". The light bulbs at left are very bright LED bulbs replacing the incandescent bulbs. Rather than 5 Amps, they use only .7 Amps to produce the same or more light. When "off the grid", Gwen and I like to play card games, read, use our computers. Now we can "afford" the Amp Hours used by the lighting fixtures when we are doing those night-time activities. Click the photo to see the light fixture with the glass shade replaced. Living on solar power makes a person very aware of the amount of power we use in our different lifestyles. |
|
| Thursday, June 13, 2013: I have reached the bottom of the list for changes needed in the Great Blue Heron Edition. The furnace in any RV usually does a great job of heating but two things are wrong with those furnaces. One, they are very inefficient. Just stand outside next to the furnace vent and you feel 40% of the heat blowing into the outside. Two, they draw a lot of DC power to run the blower on the furnace. Running a furnace without shore power will drain your batteries in less than three hours. As I said before, this trailer was made to travel from one RV park to another. The last item on the list is to install a heater which is 99.7% efficient and won't require ANY power. The answer in our Cameo was the Empire brand, ventless, propane heater. The heater in the Cameo is the 18,000 BTU model and does a great job of heating the entire unit. We haven't used the furnace since the Empire was installed. The answer for the Great Blue Heron Edition is also an Empire Brand ventless propane heater. In this case, the 10,000 BTU model. That should be plenty for this little trailer. I mention the "Empire" brand because there are other brands available for less money. The Empire is manufactured in the USA and repair parts are available if needed. The others are manufactured in China. There is no place to permanently mount the Empire so I chose to install a quick-connect fitting and keep the heater portable and moveable (into the bathroom if desired). I located a propane source inside the room air vent covering the furnace. The photo at left shows three copper tubes leading to the kitchen stove, furnace and refrigerator. The furnace will likely NEVER be used again but I don't want to disable it so I need to add a fourth copper tube for the quick-connect. Look how easy it will be to tap into this available propane source. Add another "T" and the job is done. Click all the photos for other views. Behind the left photo is a view of the second "T" installed. The local RV dealer wanted to sell me a quick-connect made for barbeques. That style does not seal both female and male connections, only the female connection. The last thing you need is to disconnect your propane heater quick-connect and have propane pouring out the attaching hose. Both the female and male ends should seal when disconnected. Fortunately, my friend Wally, works for RVSolarElectric and was able to get the correct connection for me. The valve fit perfectly into a 7/8" hole then I used zip-ties to secure the valve in place. I tested each connection for leaks before replacing the vent cover. Some people, like my friend Terry, put an additional valve onto this line to cut off the propane when not using the heater. There are no extra valves installed by the RV manufacturer to cut off any other propane appliances so I chose not to install a valve. I trust the quick-connect to self-seal. It took about two minutes to force all the air from the copper and quick-connect lines. Once flushed, the heater ignited. Our Great Blue Heron Edition is now much MORE than "park" model. We are headed out on our next trip to a National Forest near Sisters, Oregon on Monday. No hook-ups but with solar power, LED light bulbs, an inverter for AC power, a tank of freshwater, and three empty holding tanks, and a 99.7% efficient propane heater our new portable home is ready for wilderness parking. This is NOT "camping", we are just moving our "apartment" from one location to another. The "camping" I once did was with a backpack and often only pine needles and stars surrounded my bed. I enjoyed my backpacking and now I'm enjoying my "apartment" in some of the same National Forests. |
|
|
|
 Wednesday, March 13, 2013: Yesterday, we drove to Salem to buy a smaller travel trailer. Back in 2009 when I was anticipating retirement, a colleague told me her son had a large fifth wheel but sold it and bought something smaller because it was so hard to deal with such a large RV. I didn't understand at the time what the problem was when you've got a big truck to pull a big RV. Our fifth wheel weight near 16,000 lbs and the Dodge pulls it OK but there are considerations when pulling such a large RV which just slowly wear you down. Of course, since we are full time RV, we really had no choice until
 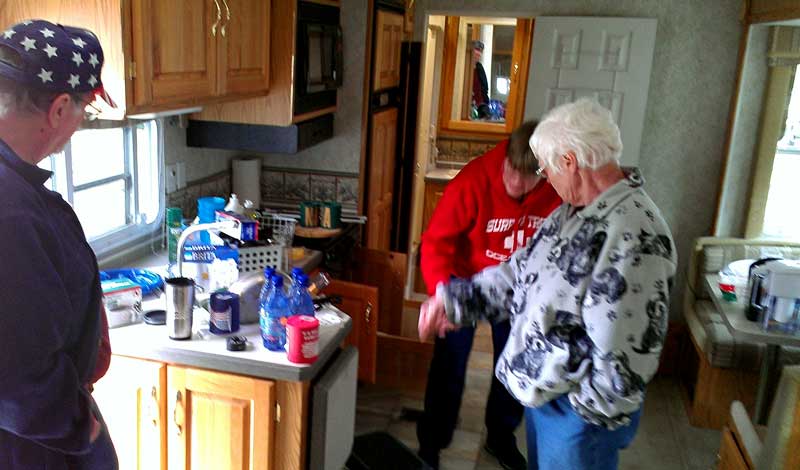 we got our lot at Timber Valley. More than half the lot holders have a large RV parked to live in but something smaller to travel in. We decided to do the same. For a travel trailer, this Alumascape is a big, heavy travel trailer but when fully loaded it will be about 7,000 lbs lighter than our fifth wheel. We still want to travel about six months each year so we need something large enough to be comfortable. It measures 28.5 feet from tip to tip so the living area is about 26 feet with one slide. This model was built in 2004, so nine years old. The previous owner bought it new and didn't use it much, not like we will. Much of the trailer seems unused but needs a thorough cleaning. The story

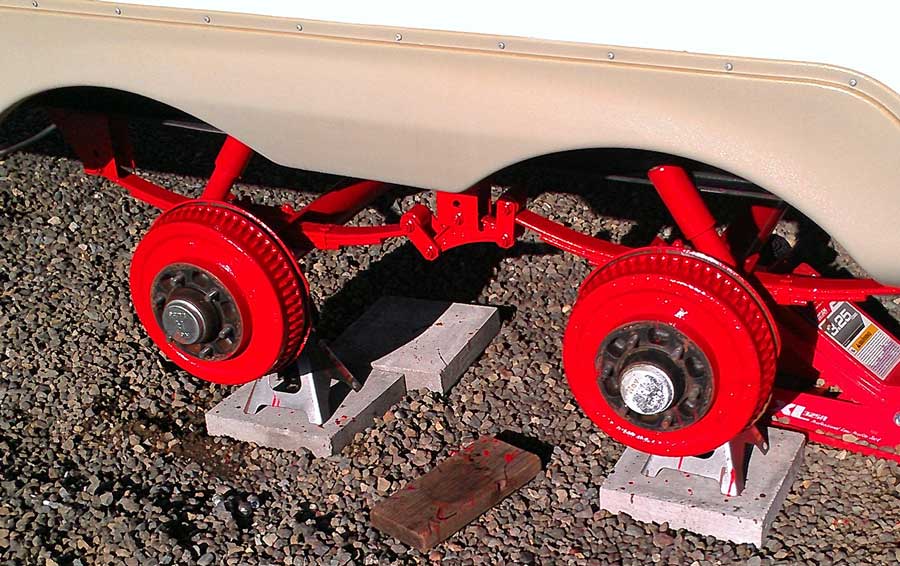
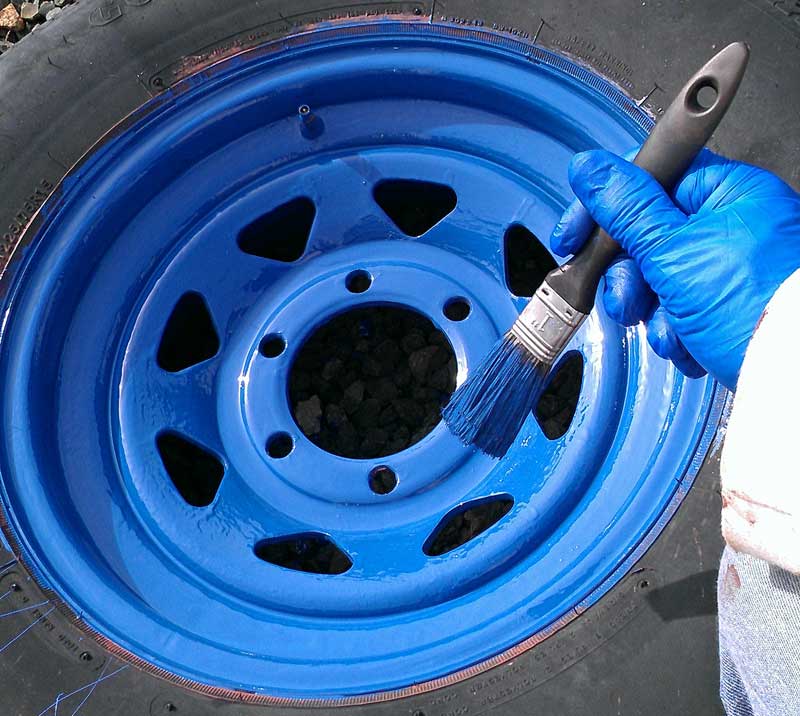

 Thursday, March 21, 2013: Repainting the axles/drum brakes/rims/caps has been completed. Click these photos for completion views. Everything was rusted but it's been fixed. I painted the wheels blue to match the graphics on the trailer and the Dodge. The brake drums and suspension is painted red to contrast with the blue. Les Schwab installed new tires today. The original tires were manufactured the 4th week of 2003, so ten years old. The new Les Schwab, ten ply tires were manufactured the 3rd week of 2013 (know how to read the DOT tire code). I used primer on the rims in addition to Rustoleum blue so they should be rust-free from now on. The Les Schwab boys in Sutherlin loved my colors. Unlike the Costco tire guys (slow and lethargic) the Les Schwab boys had my trailer in the air practically before I was in the building to order the new tires. Annie is inspecting the Les Schwab tire installation, she already approved of my paint job.


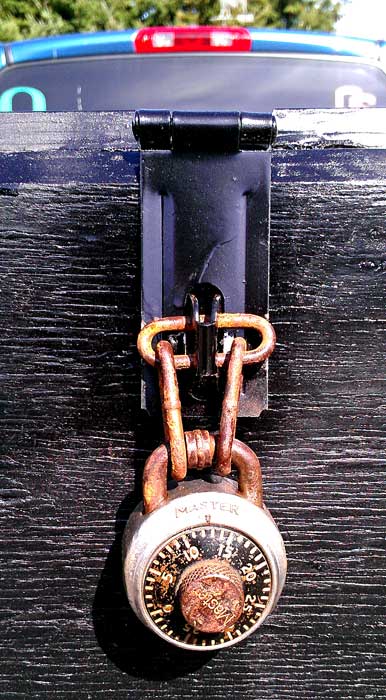
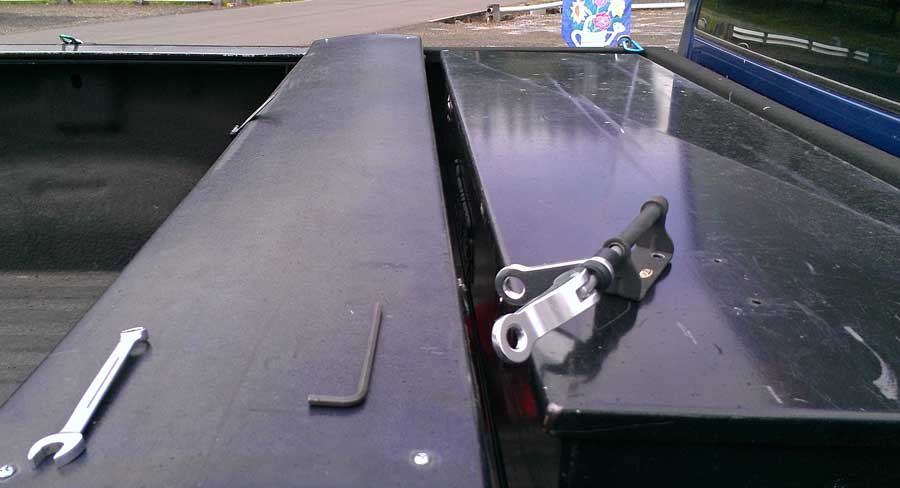
 Saturday, April 13, 2013: With the new Alumascape comes a different traveling problem. Where the fifth wheel has lots of storage space, this little travel trailer has very little. Where, for example, will I put the generator, gasoline for the generator, the barbeque, the folding table and lawn chairs, my tools for maintenance and repair of the trailer, water filters, extra wood blocks for the stabilizer jacks, and more. All this sort of stuff was stored in the ample fifth wheel storage are for travel. The answer, of course, is in the truck bed. Where my truck bed was not available due to the fifth wheel hitch, it is now available. I plan to keep everything stored in large Rubbermaid tubs, both for convenience and security. It would be nice to have a cover over all the tubs too. My friend and neighbor, Gene gave me his old tonneau cover. This one fit my bed perfectly except that Gene has a larger utility box than I have so he cut the rails about 9" shorter than my bed. I improvised some rails which work just fine. The lock on the cover does not work so I improvised there too. Although this lock looks pretty funky, it has a meaningful history. This came from the bike lock I used in both high school and college. I was the only high school student riding a bicycle but one of 10,000 bicycles at college. A student needed a lock to keep other students from "borrowing" the bike for their next class. You can see, nothing about this lock would stop a serious thief but my bike was not one which was attractive to anyone except for convenience. As a freshman in college, I didn't lock my bike thinking, "no one will want this bike". However it was "borrowed" and I was without transportation for several days until the local police called me to report they had found it. They actually questioned me as if I had discarded the bike because they couldn't believe anyone would steal that bike either. Anyway, this lock worked, keeping my bike secure for five more years (one year of graduate school). That was 48 years ago. What is amazing is that I remembered the combination to that lock. I said to myself, "How many times do you think you opened that lock? Probably more than 10,000 times. THAT'S why you remember the combination!" (Yes, I know this security system will only keep "honest people honest". Do you really think there is ANY tonneau lock which will keep out a serious thief? "Out of sight, out of mind." Notice I had to fill in the area on the tailgate which is normally open for the fifth wheel hitch. Yes, you can buy a nice insert for a couple hundred dollars but this insert works as well at much less cost. With the installation of the tonneau cover, my bike would no longer fit the fork connection so I moved it. So how do you cover holes in a utility box? I used 3M pressure sensitive stair tread material. This covered the holes, made the box water tight again and eliminates a slippery surface if I climb onto the utility box. I looked this tonneau cover up on the Internet. A new one is nearly $1,000 so this was a pretty nice gift from Gene. Click the photos for different views.
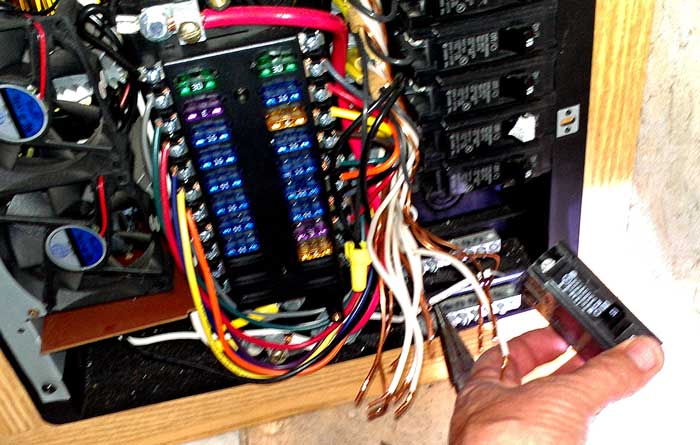
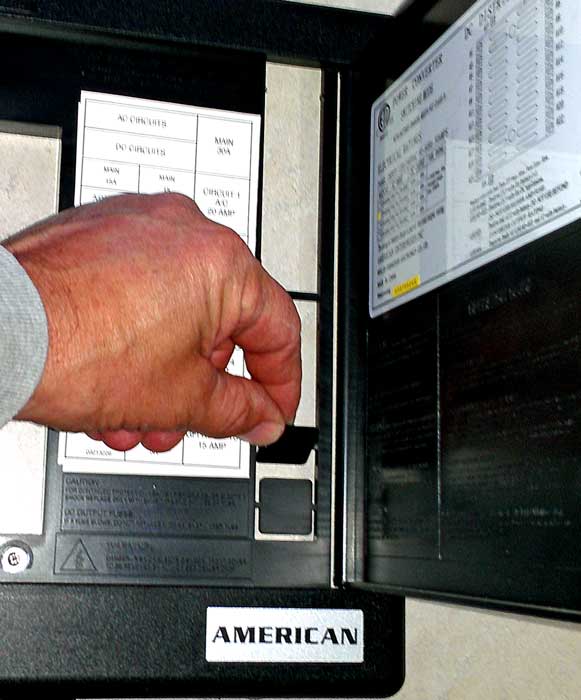
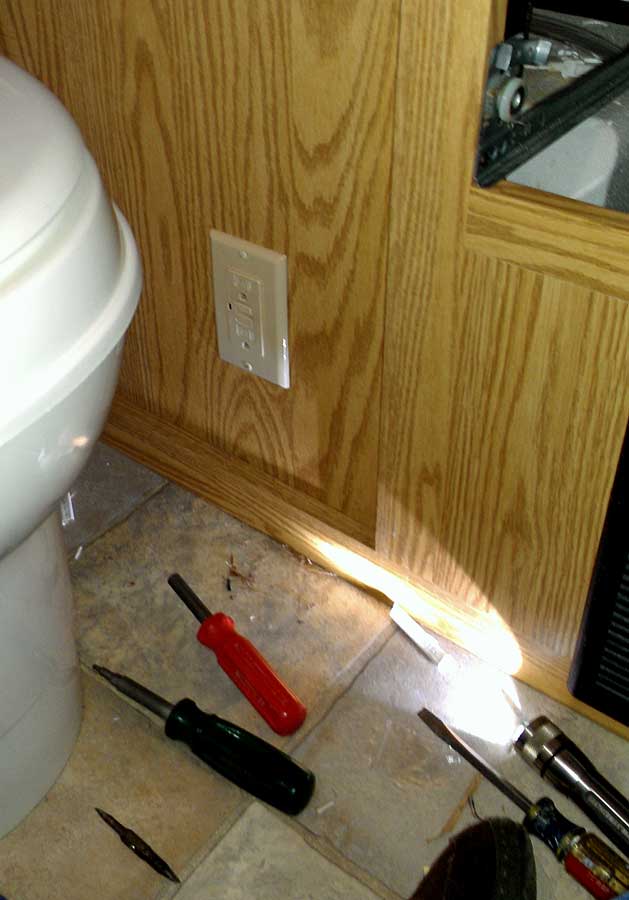
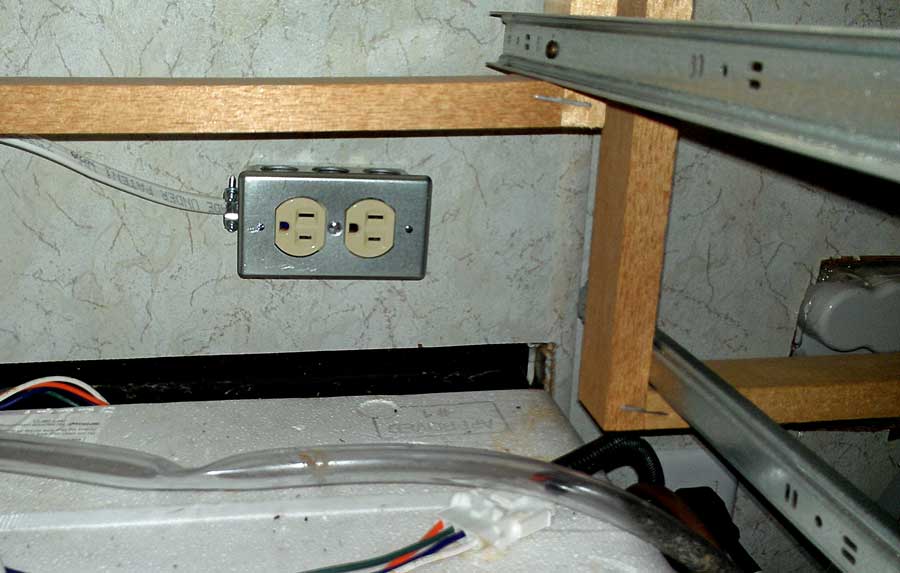
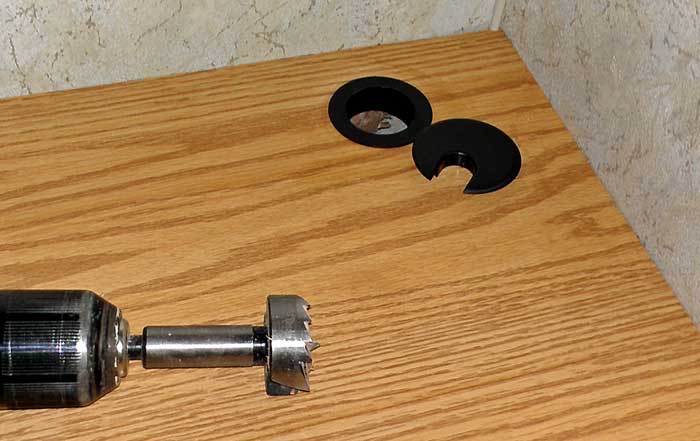
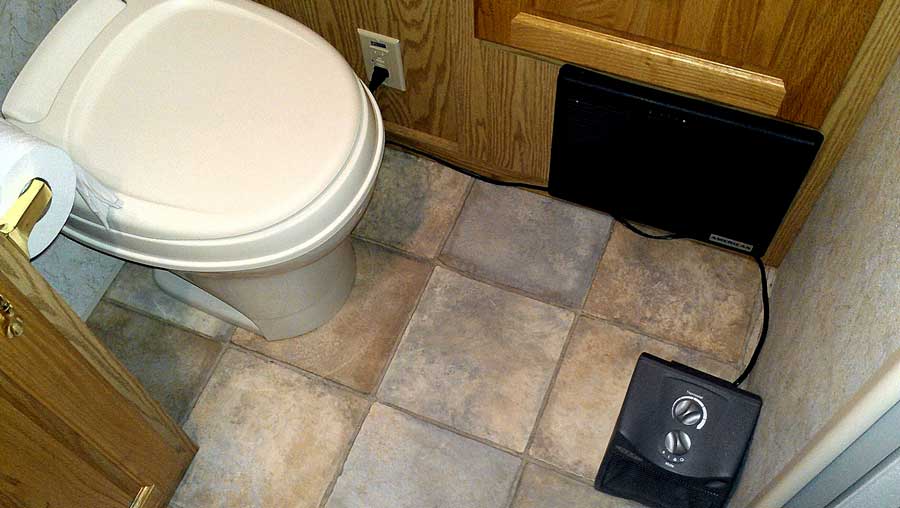
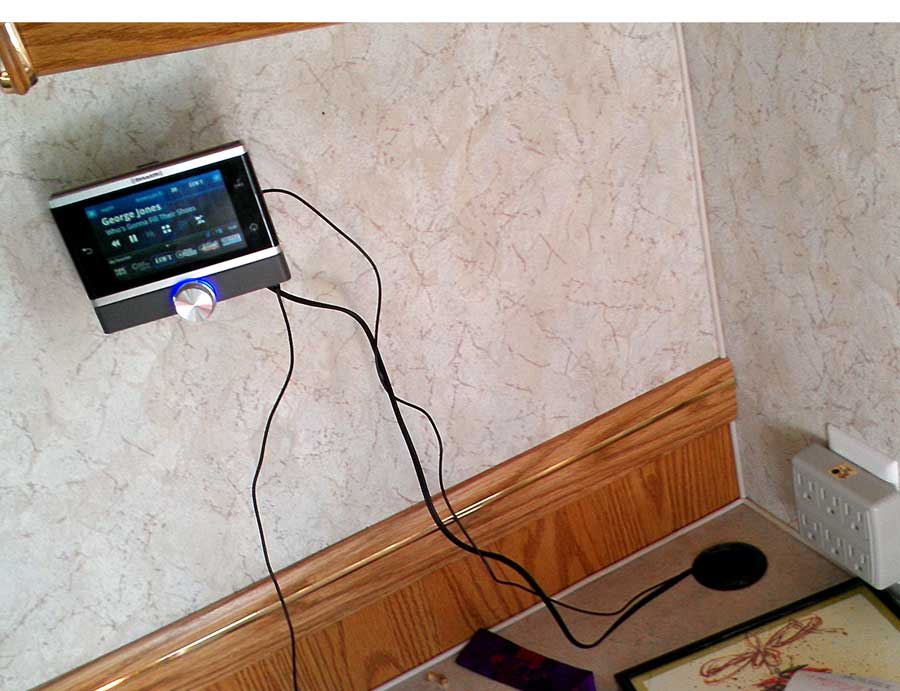
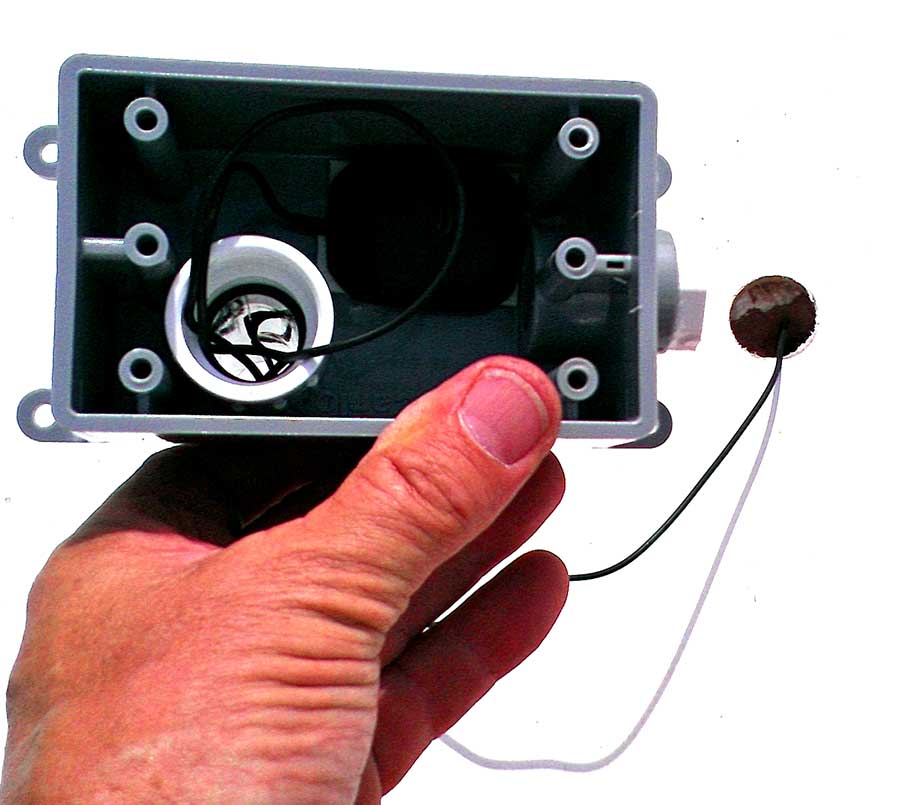
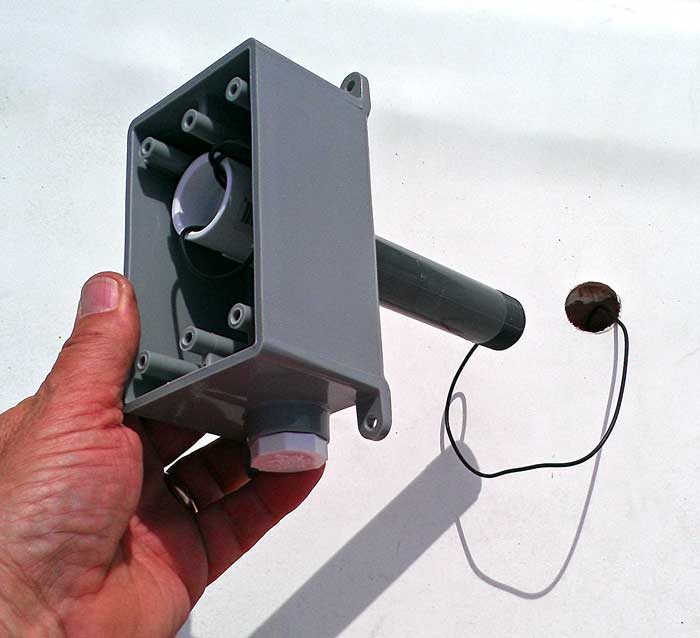

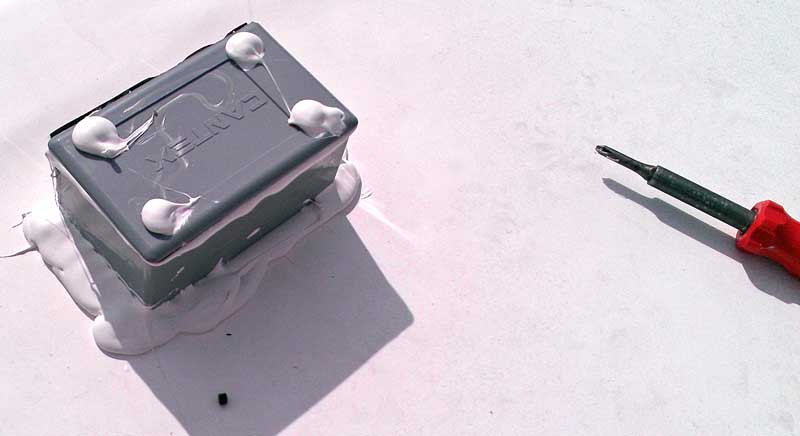
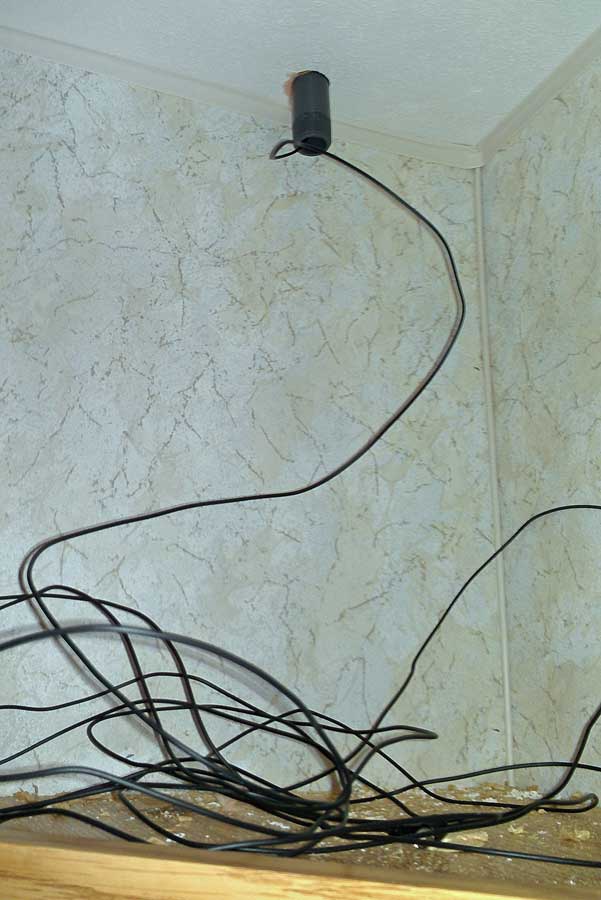
 Saturday, May 11, 2013: The Great Blue Heron Edition is back on our lot for a few days to prepare it to visit the Pacific ocean next week. In the past we have hauled along satellite dishes for both TV and Internet. This time we have decided to leave the television in Sutherlin and the Internet will be a Verizon WIFI receiver (when we re-subscribe for longer trips). So, for news and entertainment, we will use satellite radio. We have subscribed to satellite radio for several years and enjoy the content. We can even get every NFL game plus the tennis matches we like. We'll just have to imagine the sports activity from the commentary since we can't see the action. We expect to be in remote areas of the Arizona desert just as we have in the past so that's another reason we feel the need for satellite radio reception. The fee is greatly reduced when purchasing a year and only a fraction of the cost of satellite TV. The Blue Heron Edition is already setup for audio input from an auxillary source into the built-in sound system. I've already connected the radio to text out the system but I don't want to run the antenna wire out a window or door so it must go through the roof. That sounds frightening but I've done it before with solar wire through the roof. There is a cabinet just above the sound system so the antenna wire can run though the cabinet to the radio. The audio and power wires will come from the sound system cabinet below. Before doing any drilling, I tested the satellite reception with the antenna receiver in a weather proof box ... full bars. Next, I built the box with a conduit coming from the bottom of the box, plugging the one hole in the side. Dicor self-leveling sealant is used the seal the box to the roof and make sure all holes are waterproof. Dicor is also used to seal the lid in addition to the rubber gasket supplied with the cover. The screws securing the box to the roof and cover to the box are also sealed with Dicor. The antenna wire is long because it's made for vehicles. I chose the vehicle option because I want the radio to work on DC rather than AC current. That means, it will work in the desert where we aren't plugged into shore power. I also wanted to use the vehicle antenna rather than a home antenna because the vehicle antenna is omni-directional while the home antenna is directional and must be pointed. I don't want to point the antenna as we move from one location to another. I gathered all the wires and secured to the wall using nylon loops. I chose the radio location because it came with a remote control. I wanted it high enough to clear anything set on the sound cabinet top and pointed in the direction of our seating area so we could read the artist and channel information. I also wanted it under the top cabinet so anything hung on the wall next to the cabinet would not interfer with the radio. Click ALL these photos for additional views.
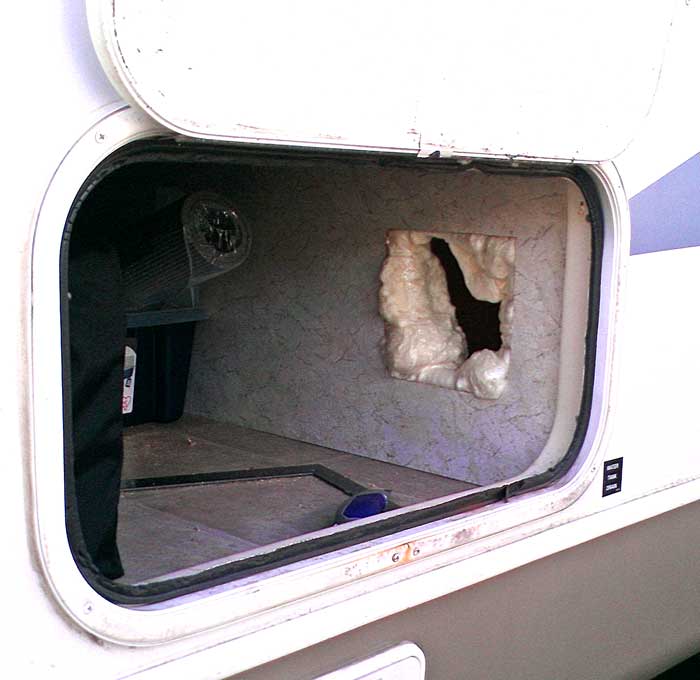

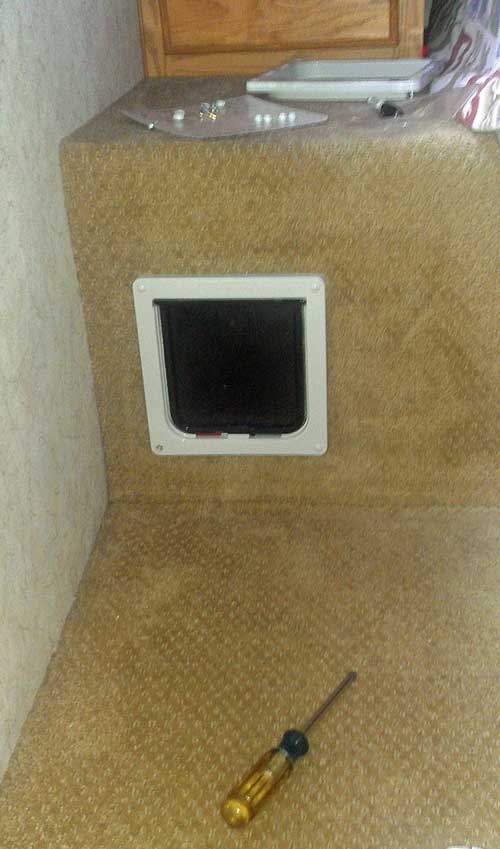

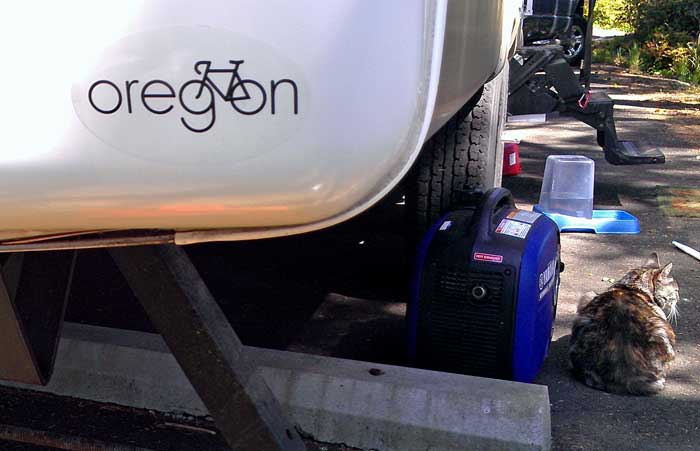
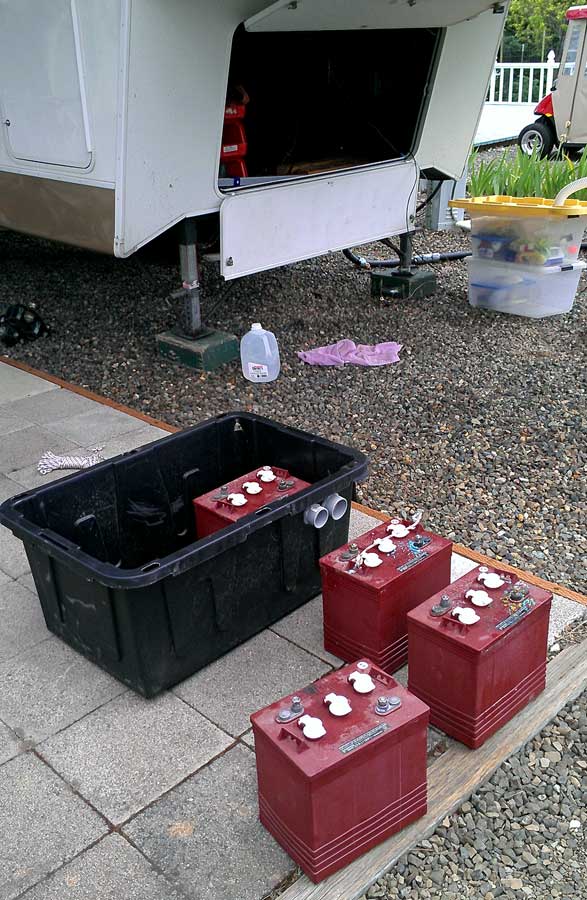
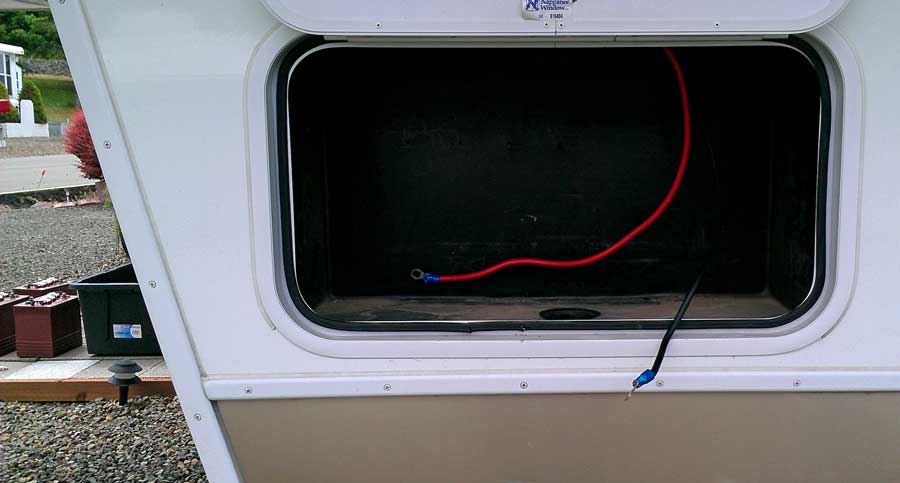
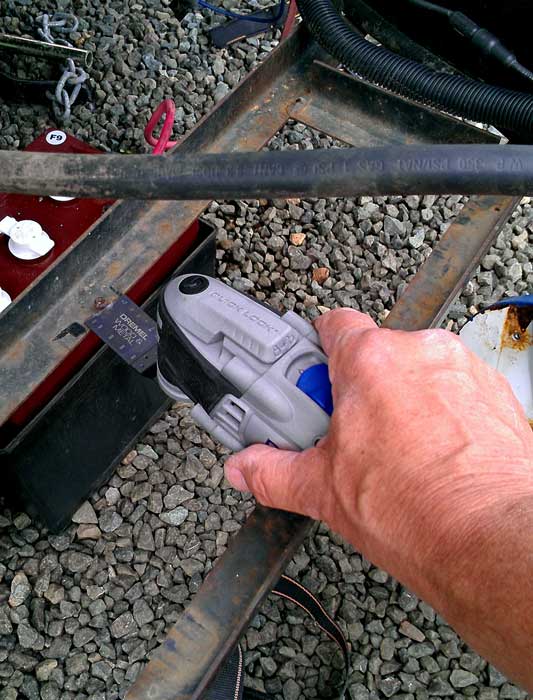
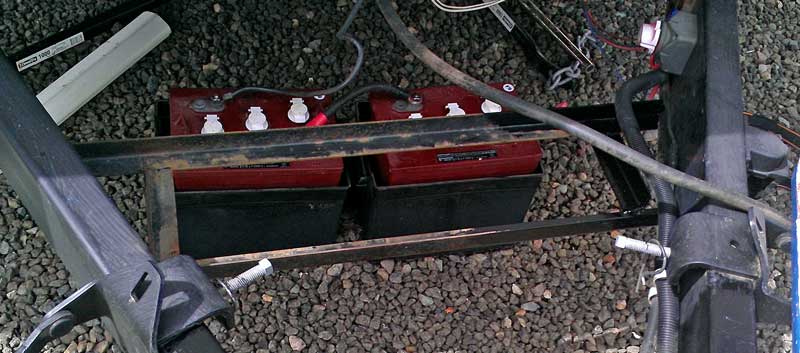
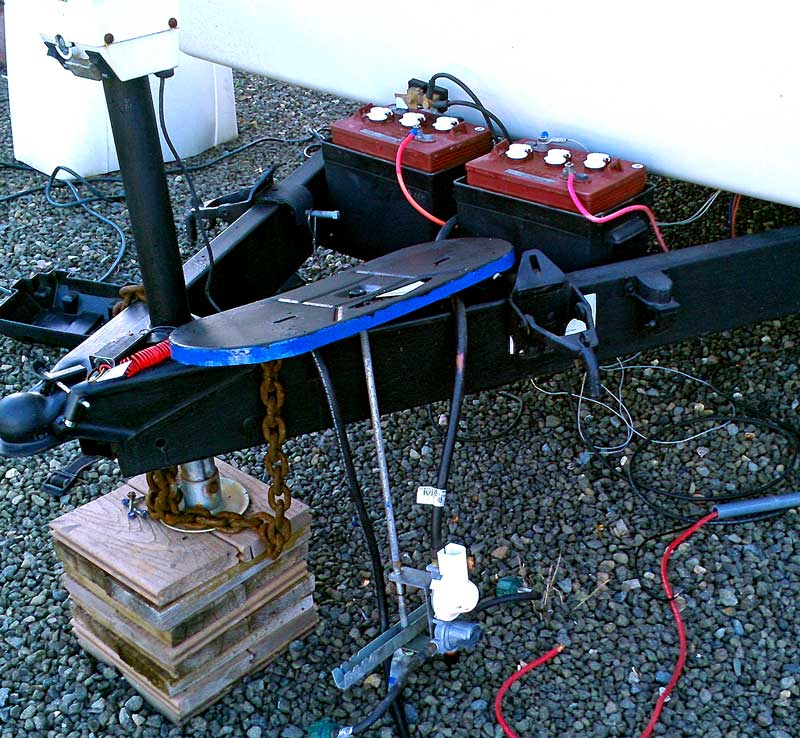

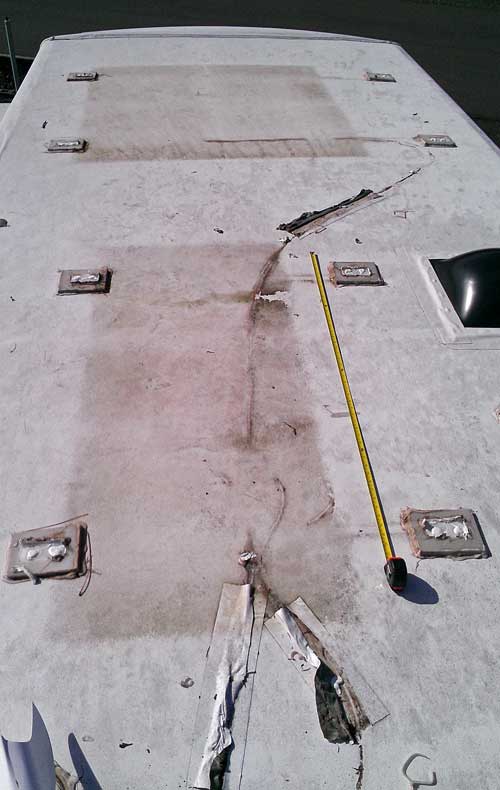
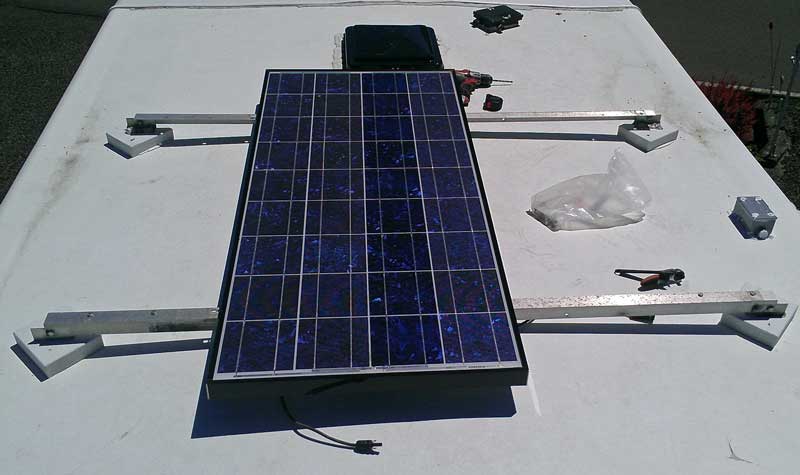
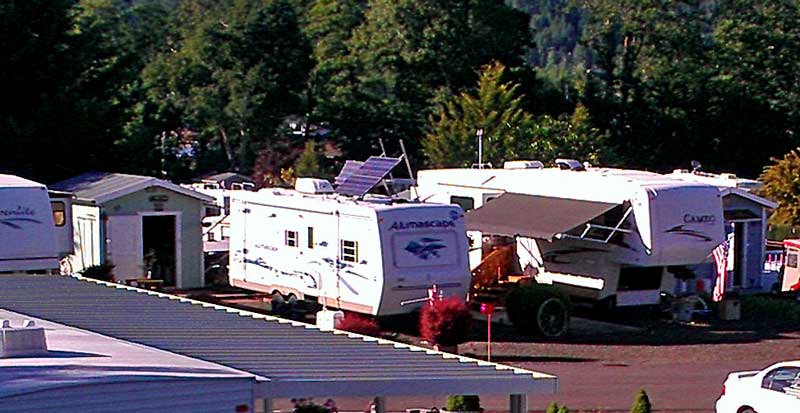 Saturday, June 1, 2013: Today was another full day of working on transferring the solar system to the Alumascape. The panel frames on the Cameo are mounted pieces of nylon cutting board which I happened to have an cut into squares then used Dicor to seal them to the roof. I needed more height on the Alumascape so used cedar squares painted white. I was able to remove the panels and frames as expected. I was also able to move the junction box and the aluminum mounting brackets. I hadn't expected to be able to move those figuring the Dicor would not release them. I'm glad I was wrong, because it saved me time and money to be able to use the old parts. When setting up the panel frames on the Alumascape, I did so in such a way to allow me to tip the panels in two directions. I was able to time the panels only in one direction on the Cameo. Tipping the panels is not necessary during the summer months but during the winter, the panels must be pointed to the south because the sun is so low in the sky. The short number of daylight hours during the winter makes it difficult to get a full charge so pointing the panels helps. The next step is to find a wiring route from the batteries to the charge controller which I plan to locate inside the closet on my side of the bed. The wire from the panels should drop directly into that closet after drilling a hole in the roof. Click the photos for additional views.
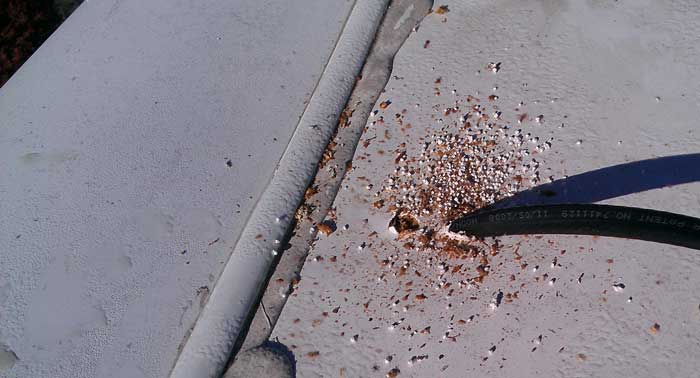
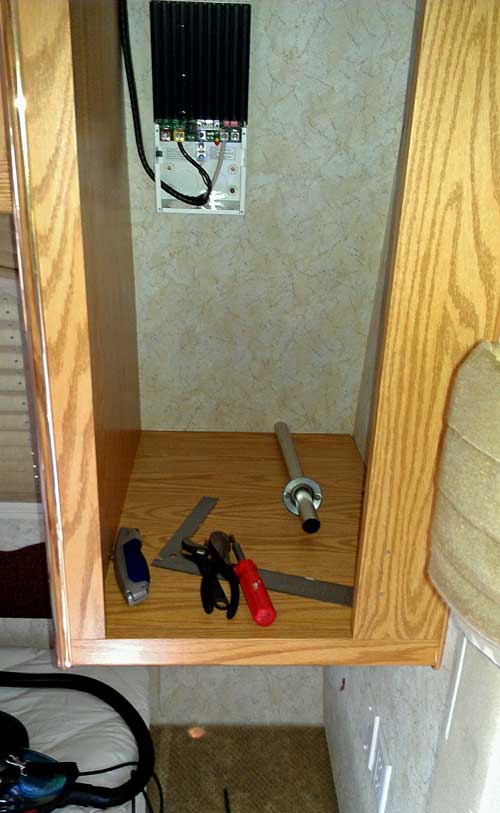

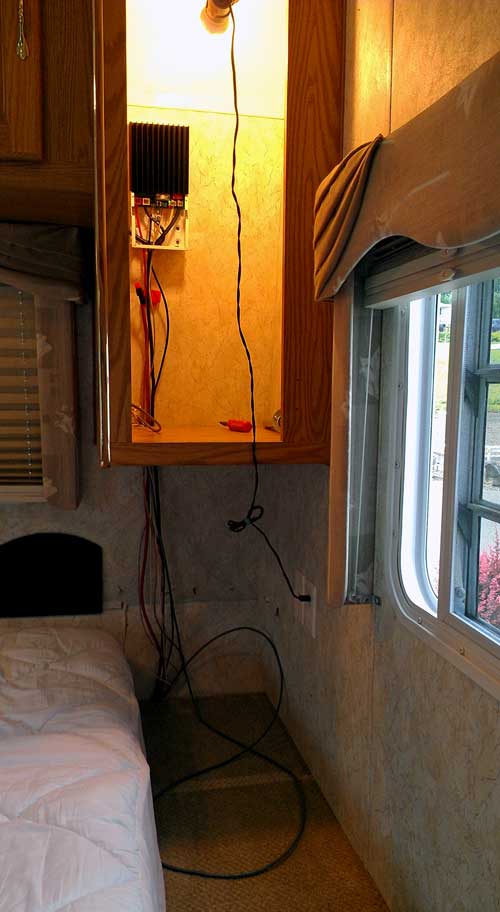
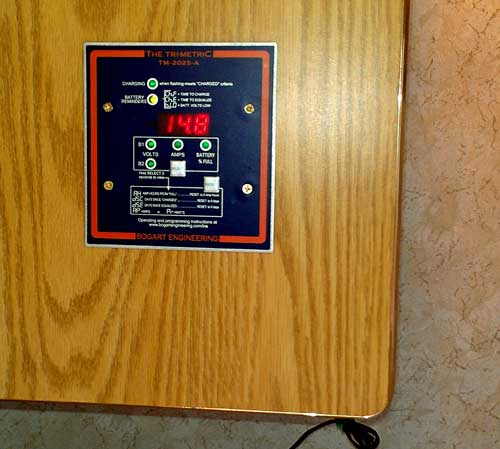
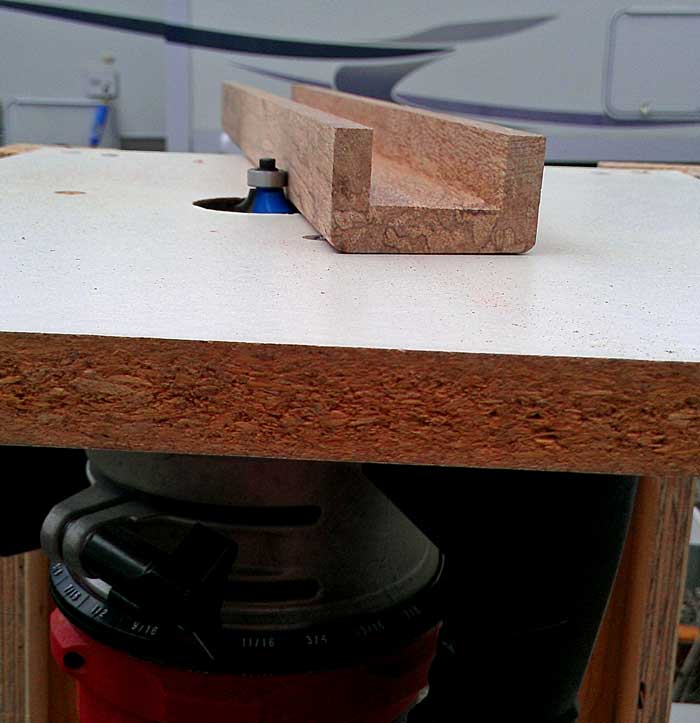

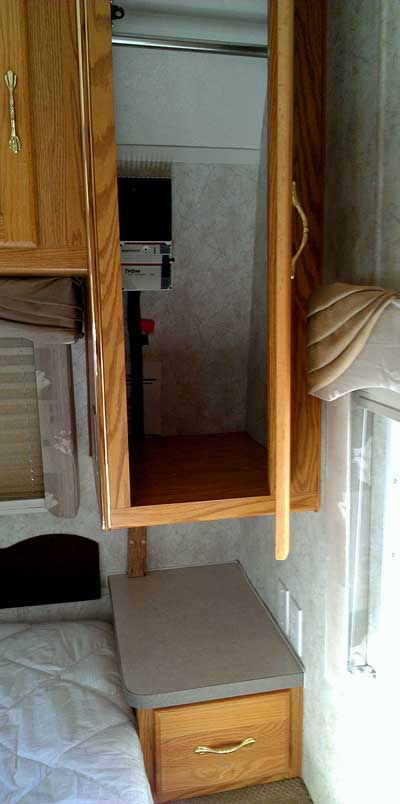
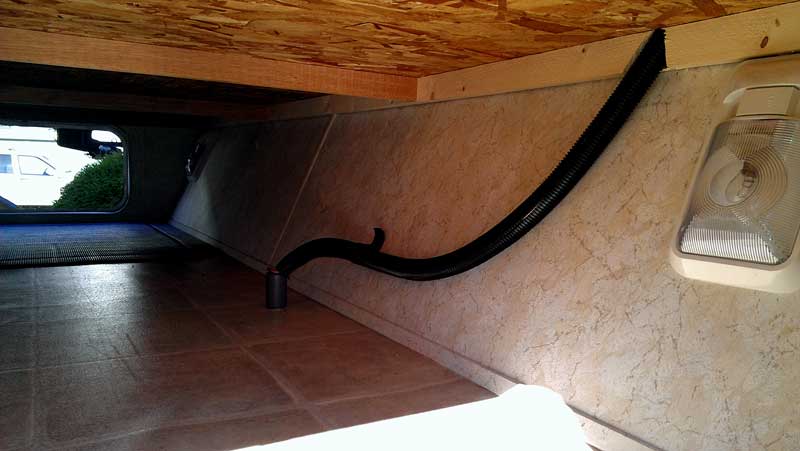 Tuesday, June 4, 2013: I began with making molding to hide the wires passing between the bedside closet and bedside drawer. I happen to have some nice hardwood on hand which I cut a dado on one side to hide the wires. I used an adjustable angle finder to locate the angle needed to match the slope of the trailer front as it meets the bedside drawer. This was transferred to the saw blade angle. I predrilled screw holes then used screw hole buttons to hide the screws. The switch in the front of the closet is to turn the inverter on/off remotely. Wire loom is used to wrap the multitude of wires passing from one area to another. Click the photos for additional views. The next step is to connect and install the inverter. An inverter transforms 12 volt DC power to 110 volt AC power so batteries can be used to run the AC items in the coach such as computers, comfort fan, charge the toothbrushes, phones, and other electronic devices (these can also be charged using the one DC outlet in the trailer), Gwen's sewing machine and a small iron. Don't confuse the "inverter" which changes DC power to AC power, with the "converter" which changes AC power to DC power. All modern RVs have two electrical systems, DC, used to power lights, furnace, exhaust fans, the entertainment center (in our trailer), electronics in the refrigerator, water heater, furnace, safety sensors (CO detector and propane detector). AC is used to power the air conditioning, microwave, all small appliances in the kitchen, television, and can be used to power the water heater and refrigerator. An inverter is NOT normally used to power these big appliances because RVs just can't haul enough batteries to store the power needed for the big appliances nor is there enough room on the roof of an RV for the number of solar panels needed to charge more than four batteries. (Yes, there are some RV travelers I've met who have many solar panels, usually spread out on the ground around the RV but these are VERY rare.)
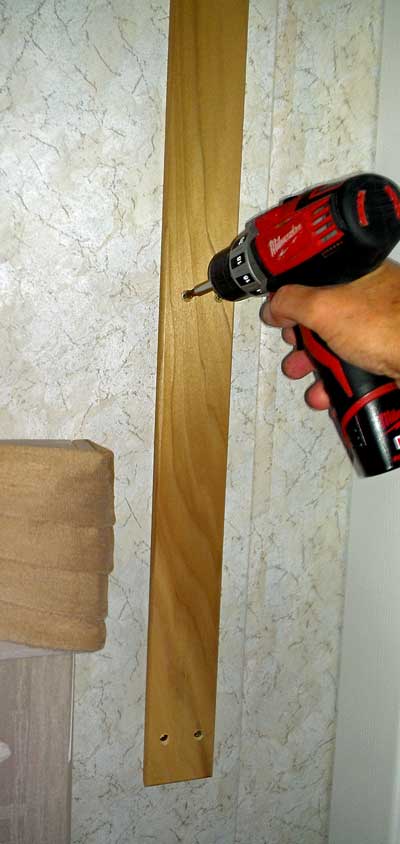

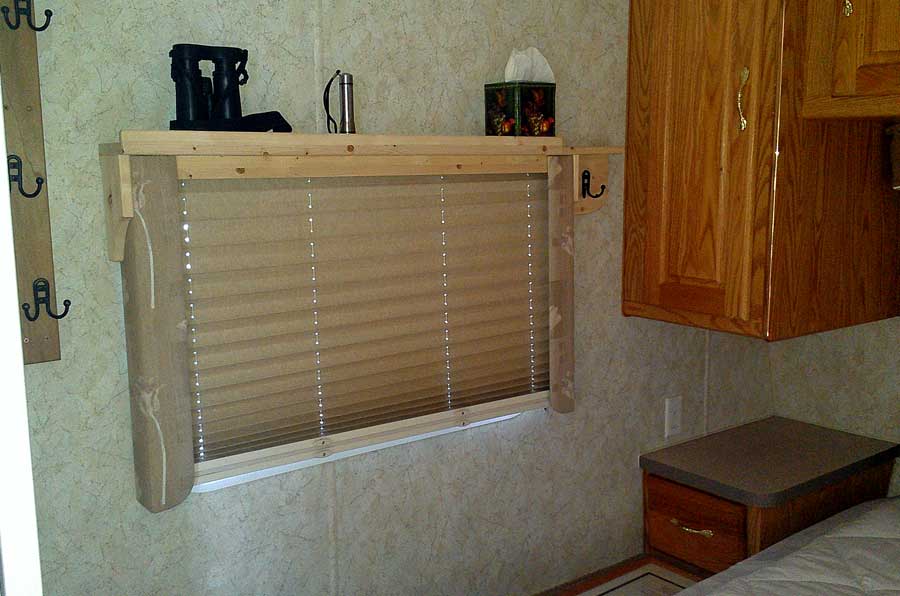
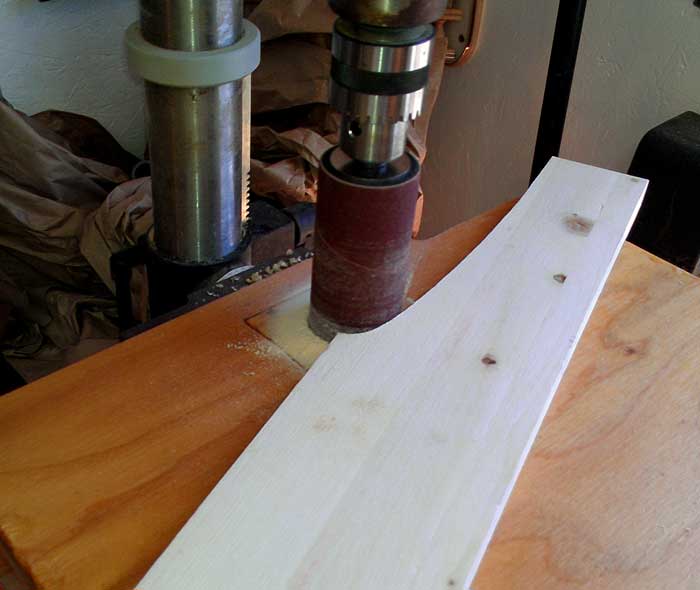


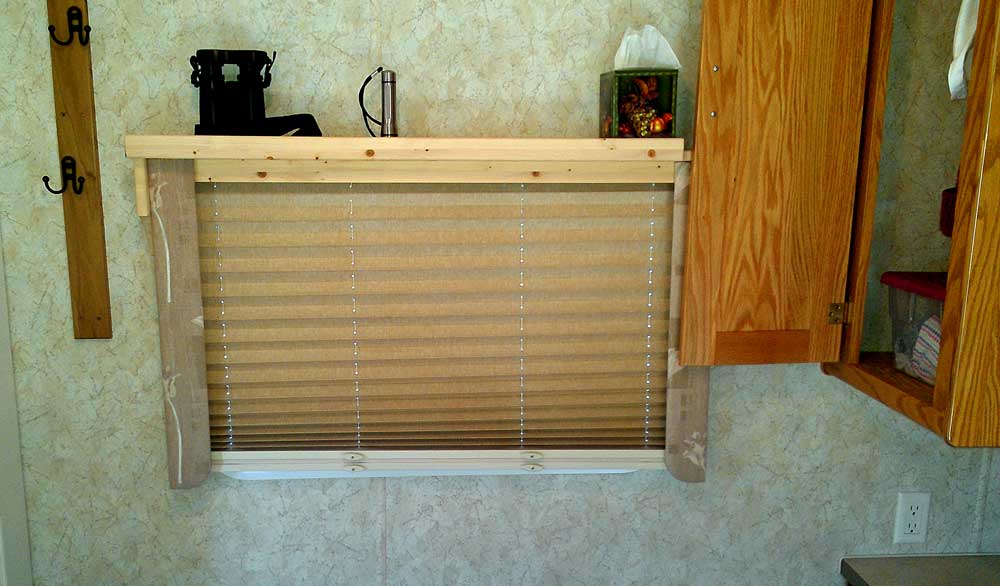 Once all the parts are cut and sanded, I routered (rounded) the edges. When it came time for assembly I was surprised how easily the old valance came off the wall. Only four screws held the entire assembly to the wall. Another four screws held the shade to the valence. I used the sides of the valence but threw away everything else. Gwen and I couldn't decide on a stain color and/or finish so we left it unfinished for now. The project really turned out nice and functional. I'm already imagining all the items I can put on the shelf when parked and I love having ANOTHER robe hook. The shelf is solid, I put considerably more than four screws to secure this assembly to the wall. Hopefully the part needed to finish the solar job will arrive tomorrow and I'll report on the completion of that job too. Click all the photos for additional views. Behind this photo is a view of the cabinet door open.
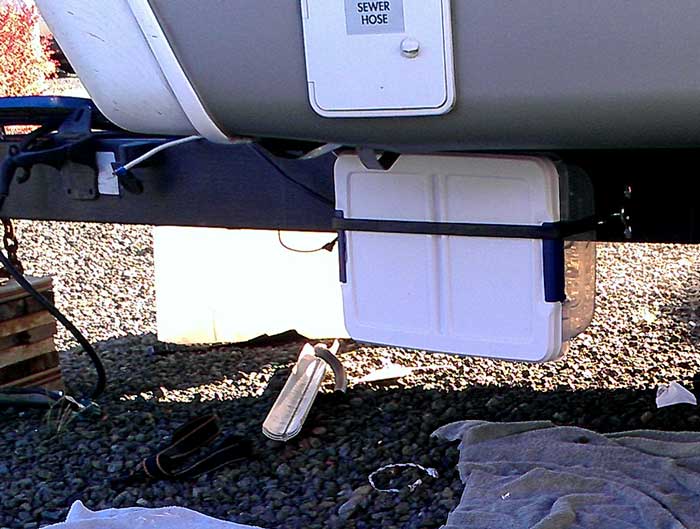
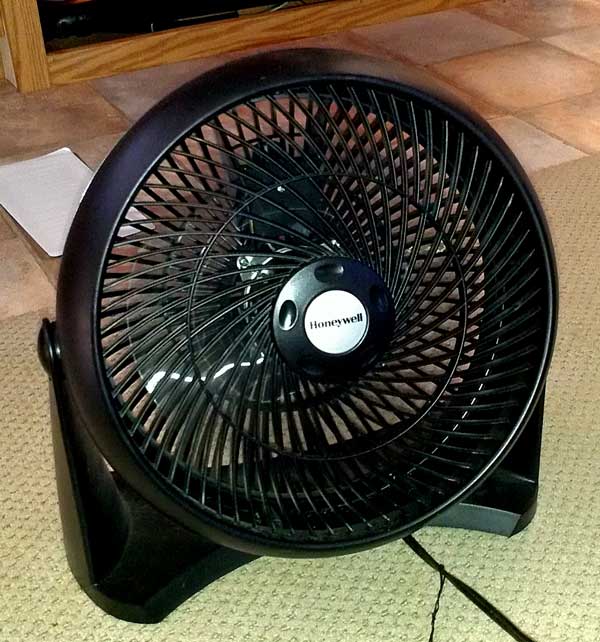
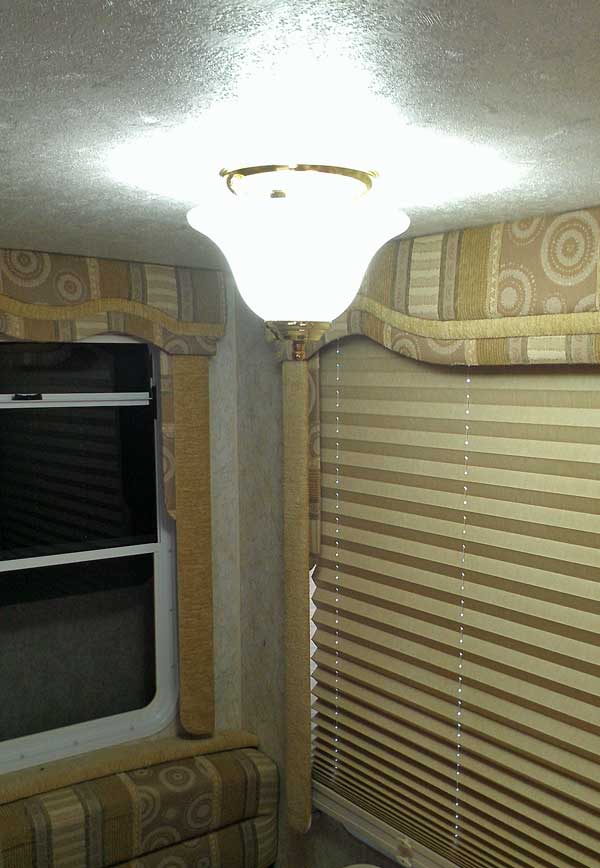
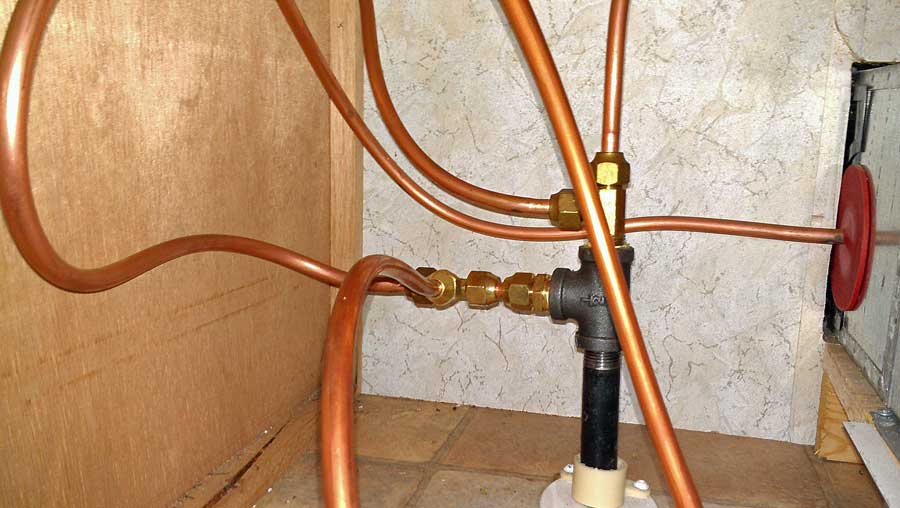
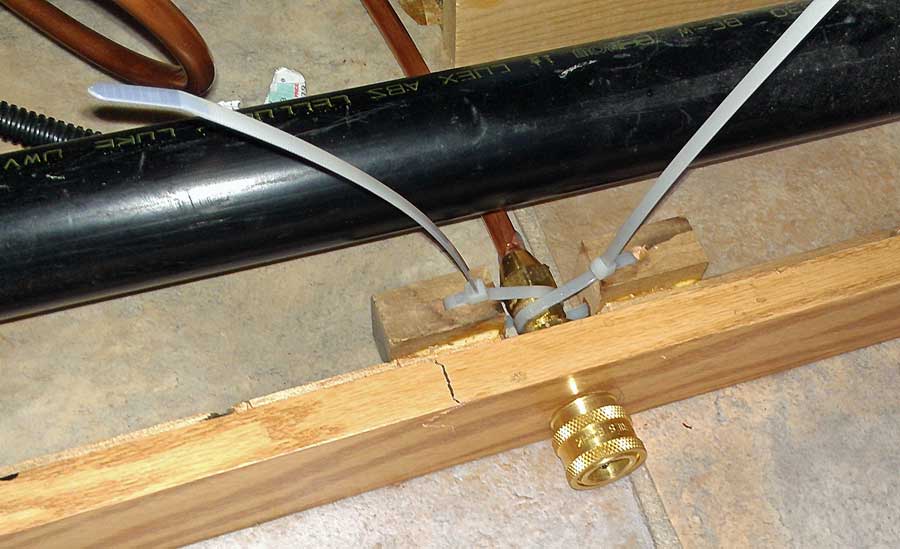
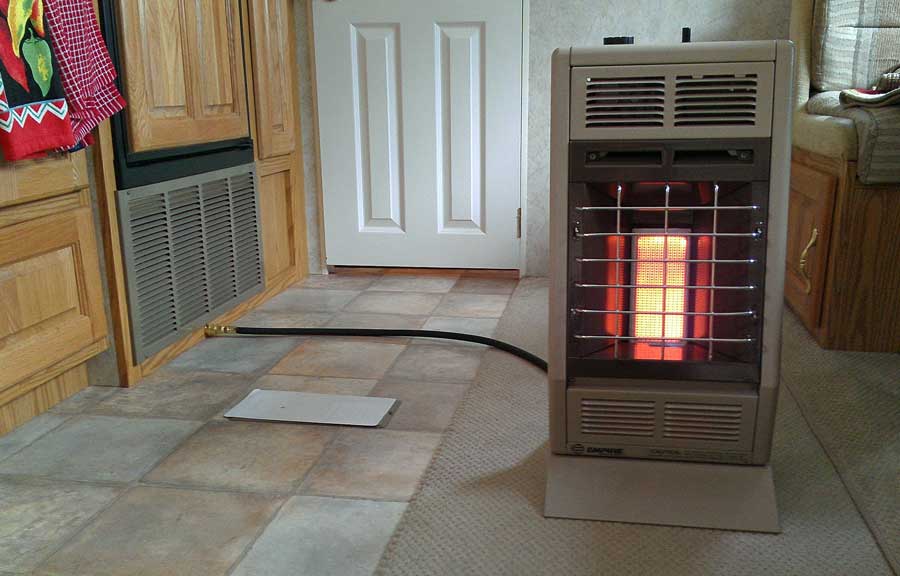
