Itasca Meridian 40U
"Mz Ruby"
| Wednesday, August 28, 2024: Finally, an Oregon couple found out motorhome and appreciate all that we have put into it. This is Donn and Leanna from Central Point, Oregon. They found my ad on RVTRADER and acted on it. They recently sold their fifth wheel and are anxious to upgrade. Gwen was told by Leanna that they like to ride the dunes on the Oregon Coast so I assume they will be towing some sort of dune riding machine behind the motorhome. |  |
 |
Monday, August 19, 2024: When we purchased this motorhome we noticed the clear coat on the roof beginning to peal. It has pealed more during our ownership. I drove the motorhome to Eugene today expecting to deliver to a consignment lot. Instead I was told they could not sell it with the pealing clear coat and wanted $8000 to fix it. They sent me to another dealer. That dealer said the same thing and sent me to a third dealer. The third dealer found more reasons they could not sell it. They recommend a lot in Salem who could sell it "as is". Scroll down this page and you will see everything we have done to this motorhome since owning it. None of that has value for resale. It's only for our comfort however the next owner will benefit but apparently not enough to pay for the value. |
| Sunday, August 6,
2023: Our time for leaving Sutherlin is growing closer
and there is much to do. Unfortunately, much can't be
done until the last few days before we leave. I spend
a few minutes each day looking through the list to
find chores which can be done now. Since this
motorhome will be stored without power I need to
insure the batteries will stay charged. I believe two
solar panels will be enough to keep the batteries
charged since there will be no draw on the batteries.
I climbed on the roof and raised two panels to face
the winter sun. That makes one less thing to do in
September. |
 |
 |
Wednesday, July 19,
2023:The time has come to clean the ceiling exhaust
fan. The dirt is caked on. I tried cleaning
without dissembling but quickly learned it wouldn't
work. I removed the screen, fan then rolled the lid up
for better access. After an hour of cleaning most of
the dirt has been removed. Click the photos for
another view. |
 |
 |
Sunday, May 14,
2023: After a bike ride I decided to clean the AC
filters since it was forecast to be in the mid-90s
today. I don't remember when they were last
cleaned but probably a long time ago. You can see they
are very dirty. The filters are mounted to the return
air ducts. There are a dozen return air ducks
stretching from the front of the coach to the back of
the coach to be sure the air is circulated through the
whole coach. I removed all and cleaned all. Today is
forecast to be the warmest day for the next 10 days
but now we are ready for more hot weather. |
| Monday, April 3,
2023: On the way to Home Depot for replacement parts I
decided not to replace the original parts with
identical parts. Instead I chose to redesign the wand
connection. We like to be able to control the flow of
the water without changing the water temperature. The
original valve did that for us but did not shut the
water off entirely. When boondocking it is important
to be able to take short showers. Wet down, turn off
the water, wash with soap, turn water back on and
rinse. The original valve would not shut the water off
entirely, just slow the flow. I decided to fix that
with my new design. This new valve will not only slow
the flow but will also shut off the water entirely.
The leaking parts have been replaced. After testing
and each of us taking a shower there are no leaks.
Hurrah! |
 |
 |
 |
 |
 |
 |
 |
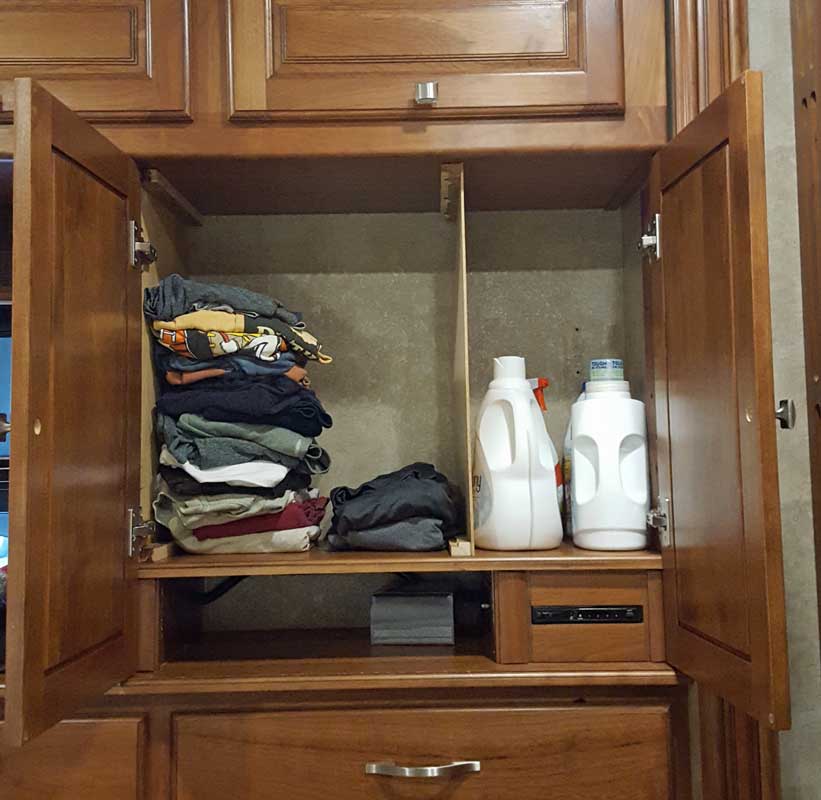
Tuesday, January 24,
2023: Since we are in a very nice resort with a
woodshop for those in residence, I needed a woodshop
project. I finally came up with a good idea. I keep my
t-shirts in a bedroom cabinet but it is very difficult
to organize them in a way making is easy to select
just the right shirt for the day. Additionally, they
don't balance well so often come tumbling out when I
open the cabinet door. Over the last couple of days I
built two shelves with full extension drawer slides.
This way I can pull the shelf out making it much
easier to select the right shirt. I also bought a
basket to fit the lower shelf. I pulled much of my
stuff out of the "junk" drawer and put it into the
basket. I'm already thinking this solves so many
t-shirt problems. I have put all my cotton short
sleeve t-shirts on the bottom shelf and all long
sleeve T's on the top shelf. I will likely do
something different during the summer months. It has
been cold enough lately in Tucson to wear a short
sleeve T under a long sleeve T. Click the photo to see
the organization. |
| Sunday, December 4,
2022: I made one of my few mistakes yesterday. I
always check the weather forecast before leaving for
any length of time. The forecast was 10 mph wind from
the south. South is not good because it would be
hitting the awning straight on so I took notice. Ten
MPH is not bad so I left the awning out. That was a
mistake because the forecast for wind is often off by
5 mph. When we returned the shade screen had
nearly unzipped the entire length due to strong wind
from the southeast, an unusual wind direction. I
finished unzipping and Gwen and I tried to roll in the
awning. It would not roll, probably because it
was binding on the motor side. Gwen yelled that the
awning was about to come off the motor side which I
had not noticed. About that time, the awning tube
parted from the motor arm and swung violently down
bending the other arm enough the arm broke. I took the
tube off the non-motor side and the awning hung
straight down with the arms sticking out. I spent the
day today repairing the broken arm. Then I rolled up
the awning and tossed it onto the roof. I pushed the
arms into the coach and tied them with zip-ties. Click
the photo to see what they look like now. Wendell
and I replaced this awning fabric last year so I
know how everything is attached. I need another bolt
to finish the repair tomorrow. Wendell and I used two
ladders but since I only have one, I will install the
tube while on the roof. I checked my weather station
to learn that the wind speed was 30 mph not 10 mph! I
should have rolled in the awning. |
 |
 |
 |
 |
 |
 |
 |
Thursday, September 15,
2022: Our 8 year old washer needs to be replaced.
The bearings on the drum have flat spots causing a huge
roar on a spin cycle. This is unrepairable according to
the manufacturer. The washer was delivered in late
August but since it weighs 156 lbs, I have hired Tanner,
a professional RV repair person to do the heavy lifting
and install. I did as much as I could to save time since
Tanner charges by the hour. I was able to move the dryer
to the bed. Then I removed the plates used to connect
the dryer to the washer from the old washer and
installed to the new washer. I removed the hold-down
brackets from the old wash so it was ready to move. When
Tanner arrived, he went right to work, disconnected the
hoses from the old washer and we each carried half of
the washer out the motorhome. It is sitting out front
ready for recycle. We then each carried half the new
washer into the motorhome and Tanner very quickly had it
installed. He than installed the dryer just as quickly.
I had a load of wash ready to go to make sure everything
was working. Click the photos above for more views. |
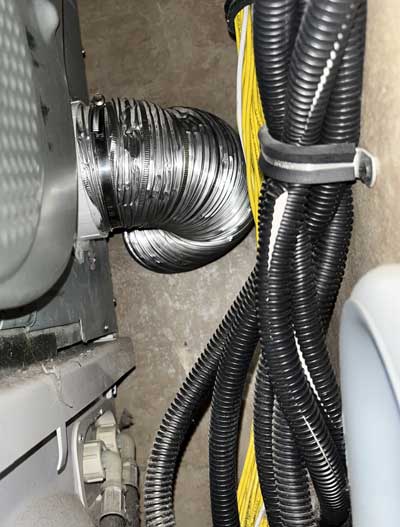
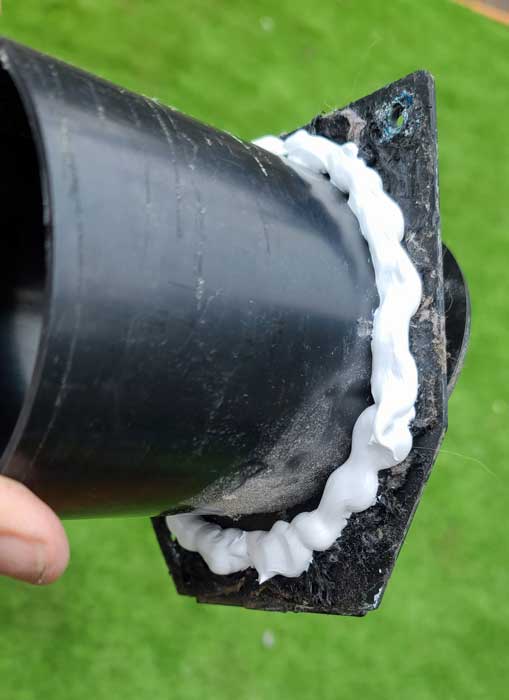
Thursday, April 21, 2022: I walked into our bedroom this afternoon and it felt like a sauna it was so humid. I knew immediately that something had happened to the dryer vent hose. I stopped the dryer and peered through the tiny opening behind the washer and dryer. The vent hose had separated at the back of the dryer so all the hot, moist air was being vented into our bedroom. The access is not easy to the back of the dryer. There are two small openings, both about 6 inches wide. Fortunately the break was only an inch behind the dryer. I was able to cut off the broken part and force the undamaged hose back onto the connection. The repair is complete.
Other happenings today: Abby went to the groomer again and looks pretty and smells good too.
My son, Ben, scheduled a Zwift meetup for this evening onto one of his favorite routes so we rode together for nearly an hour.
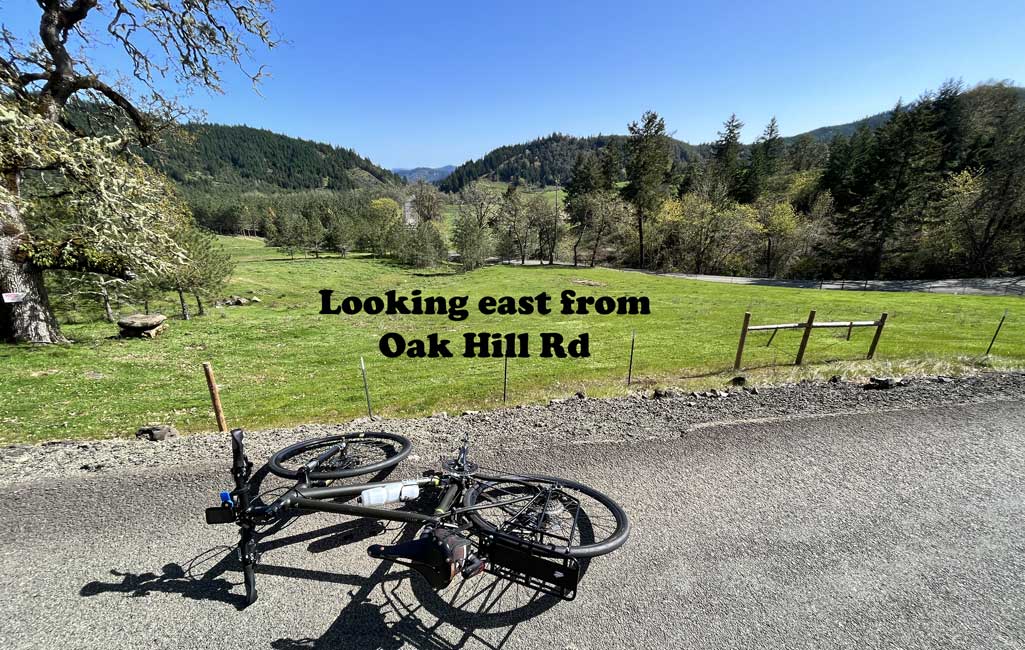

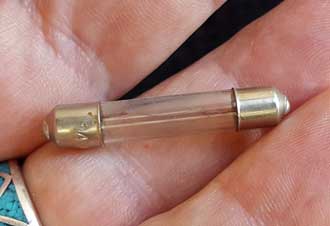
Wednesday, April 6, 2022: The lamp in the shower stopped working a week ago. I finally figured how to pry off the trim which revealed three screws to let down the lamp. Once I took off the glass lens I quickly found a burned out halogen bulb. I once had plenty of these on hand for our fifth wheel but now I had none. The local RV supply store had only LED bulbs which I preferred but this bulb has a yellow hue which I don't like. But, I have no choice. Once the new LED bulb was installed the lamp was assembled quickly.
After the lamp repair I took myself on another CoOp bike ride toward the west. One of our favorite climbs is up Oak Hill Road. Today was perfect weather reaching 70+. Tomorrow is forecast to be even warmer so I believe we will make a quick ocean trip.
Click both photos for more views.
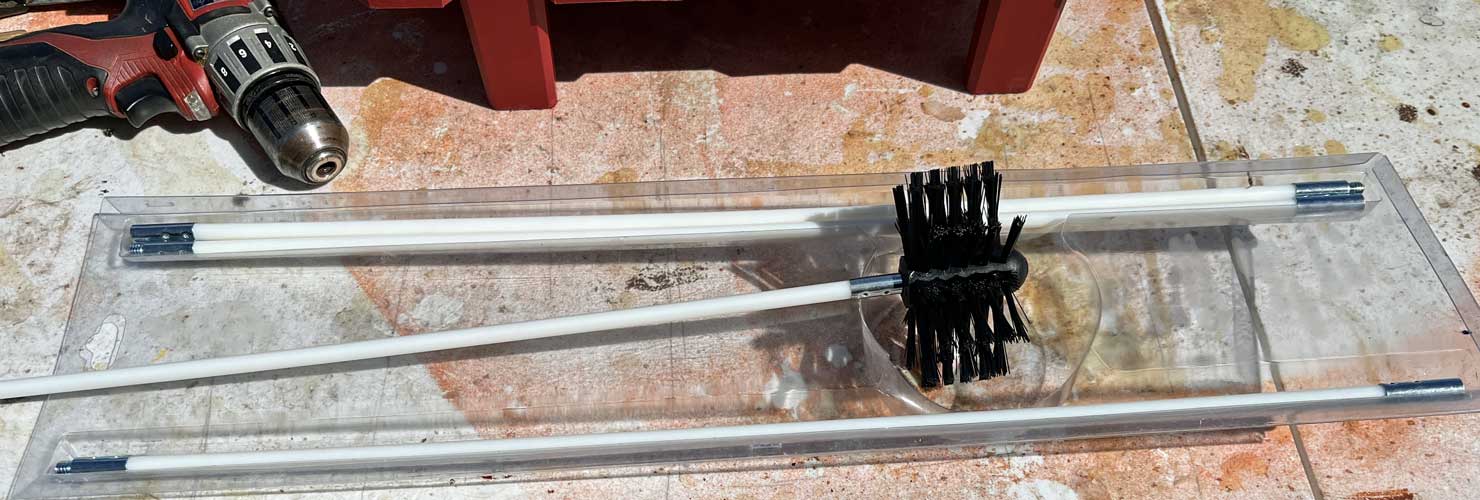
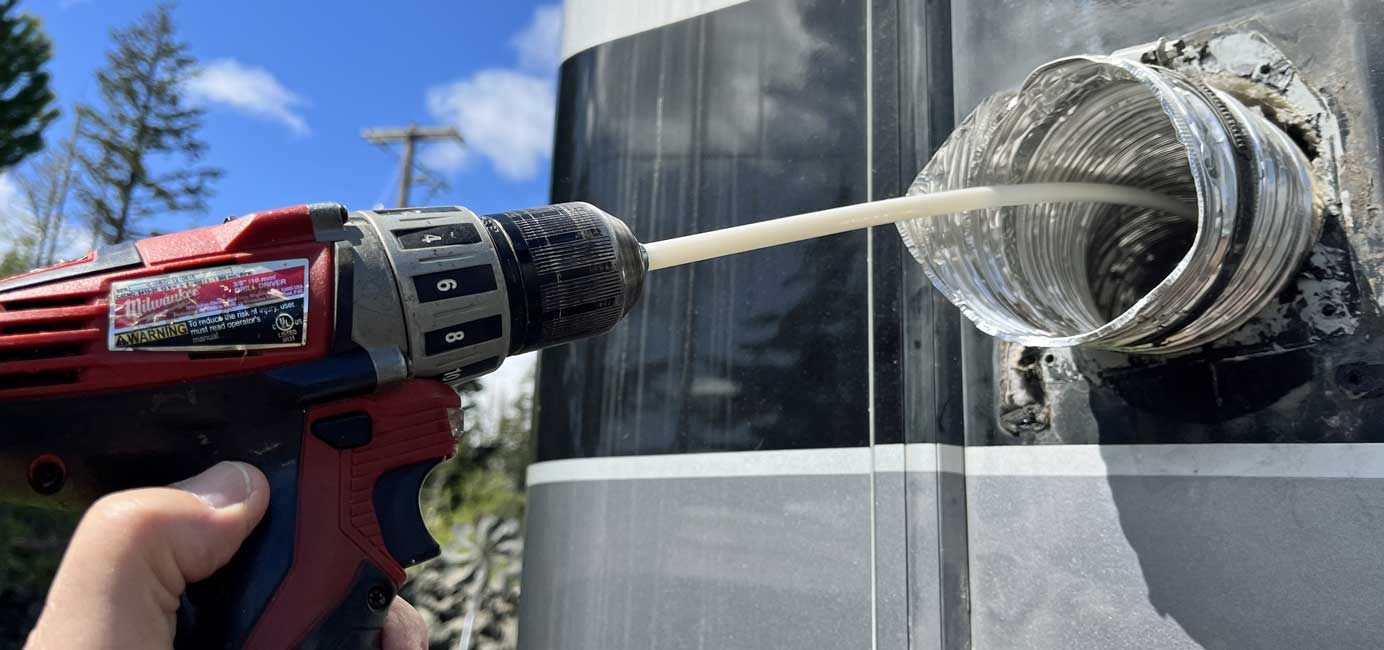
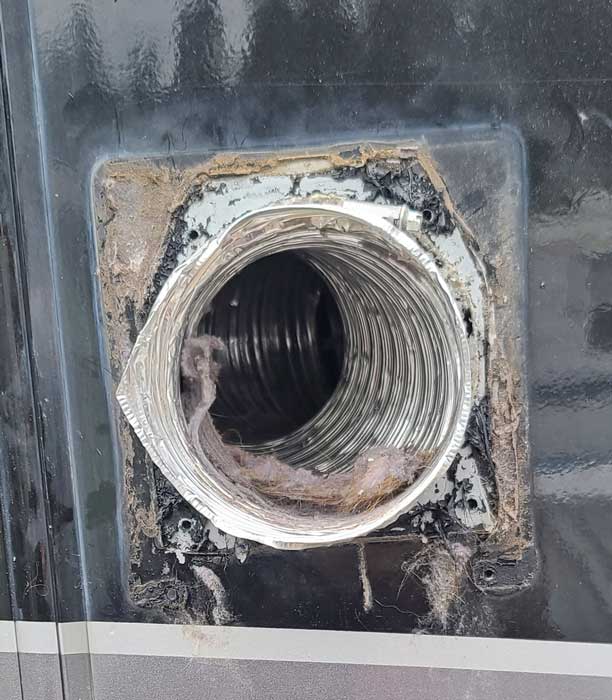
Tuesday, April 5, 2022: It is time again for a dryer vent cleaning.
I use a brush attached to a drill and send the brush inside the vent with the drill running and the dryer running. All sorts of lint comes flying out of the vent. The dryer is located just on the other side of this outer wall so only two rod extensions are needed.
This should be done once each year.
Click both photos for more views.
After cleaning the vent, I pulled my CoOp bike off the Wahoo Kickr Trainer and rode it for 20 miles. It is an unassisted bike and I plan to use it on a four day bikepacking trip in May so I need to get use to how it feels on the road.
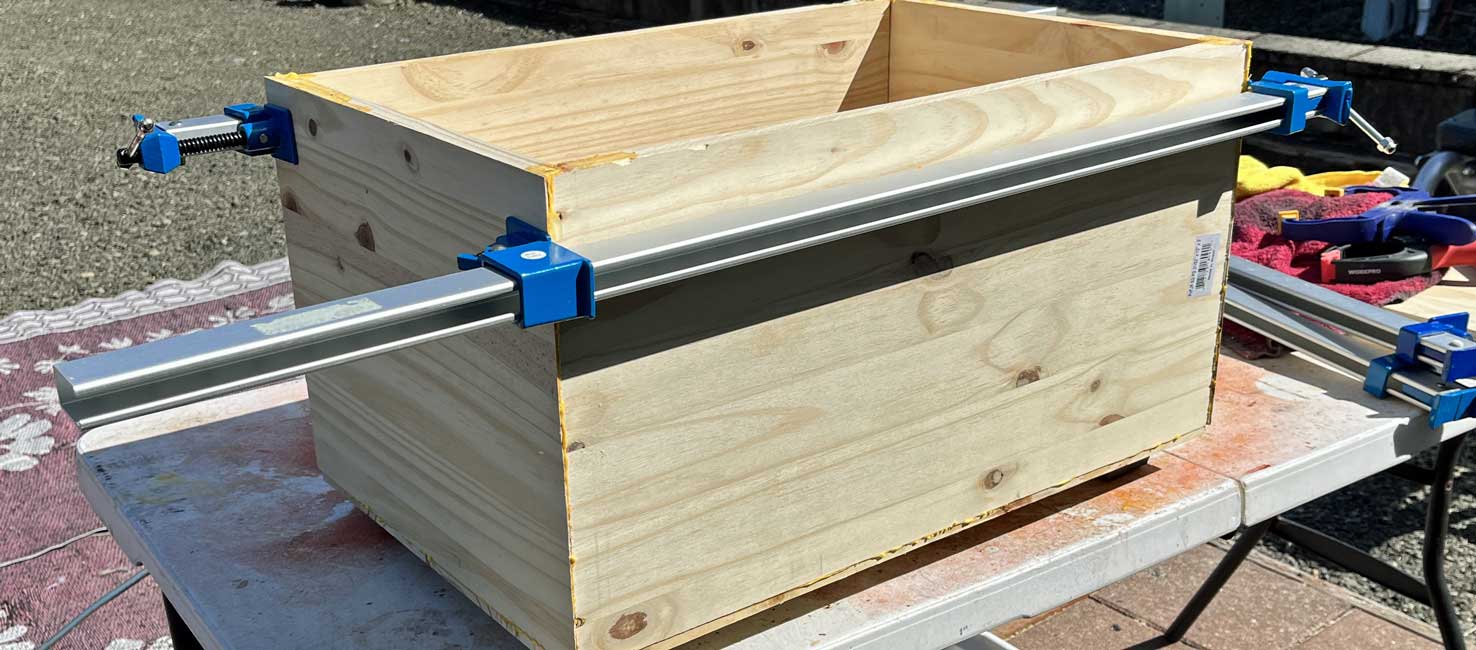
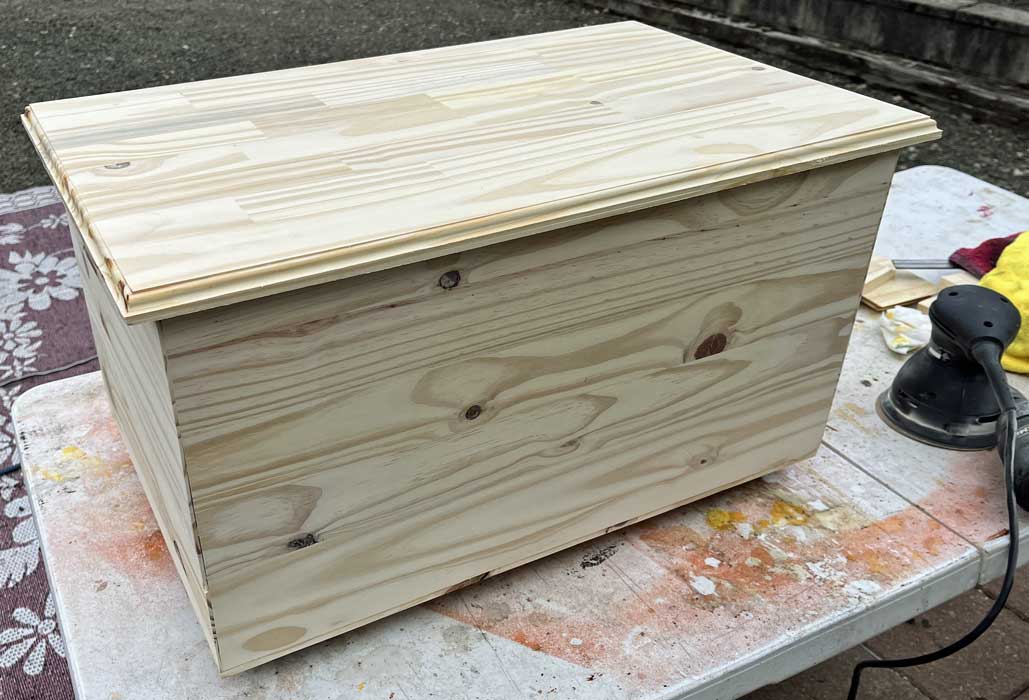
Friday, April 1, 2022: Gwen has grown tired of the two storage-footstools we have in the motorhome. She want the two of them replaced by a single table-storage-footstool. She also wants it to match the pine shoe storage cabinet. We found some interesting glued up pine boards at the Lowes store which will work perfectly to be the correct size for what Gwen wants. I took the feet off one of the storage-footstools to use on the new cabinet. All the woodworking was done today. What is left, the polyurethane, piano hinge and lid support. The two footstools together measure 3 feet. We decide to make this new cabinet 2 feet to take up less space. Click both photos for more views.
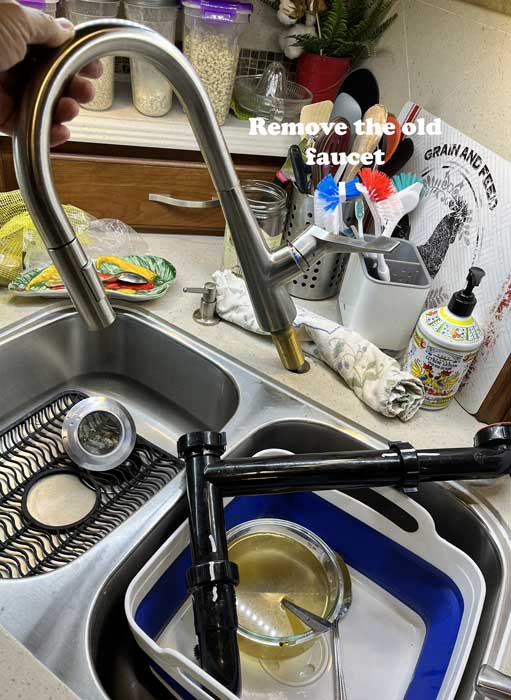
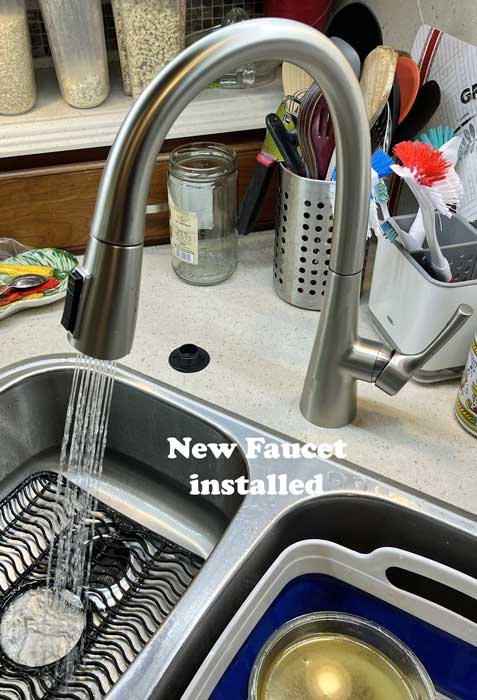
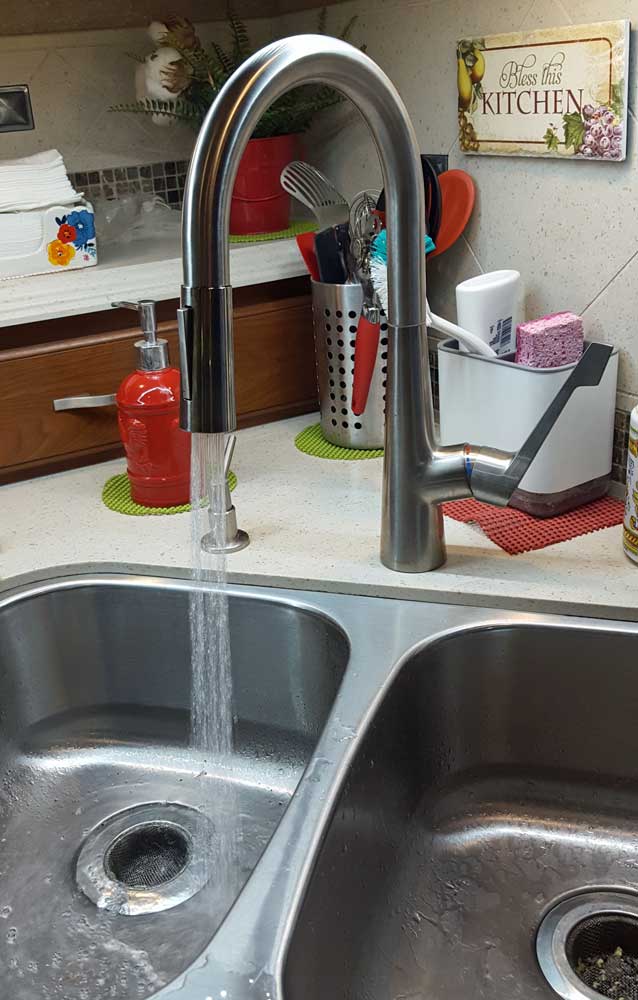
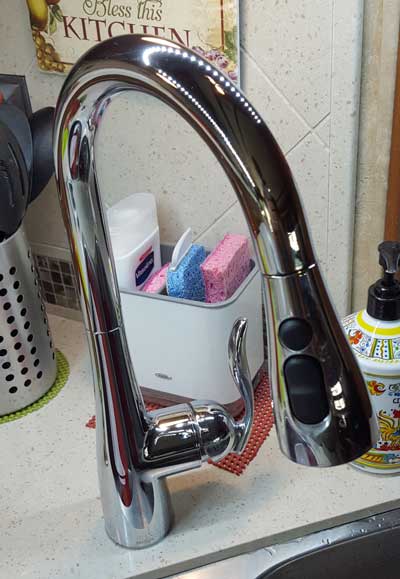
Wednesday, March 23, 2022: Three years ago I installed the kitchen faucet removed from our Cameo fifth wheel. I expected that faucet to last forever. However, the sprayer failed about a year ago. I replaced the sprayer and it worked well for a short time then it too began to fail. Costco had a $50 discount on this Delta faucet. It was a relatively easy install. I began with the soap dispenser because the location of the dispenser is hard to get to when the faucet is installed. The faucet was installed second. Actually, it is our fourth faucet is this rig. It came with one. We first installed a Moen from my son Joe's house but Gwen liked the Cameo faucet better. I removed the Moen and installed the Cameo faucet. Now that has failed so this fourth faucet is installed. Click both photos for more views.
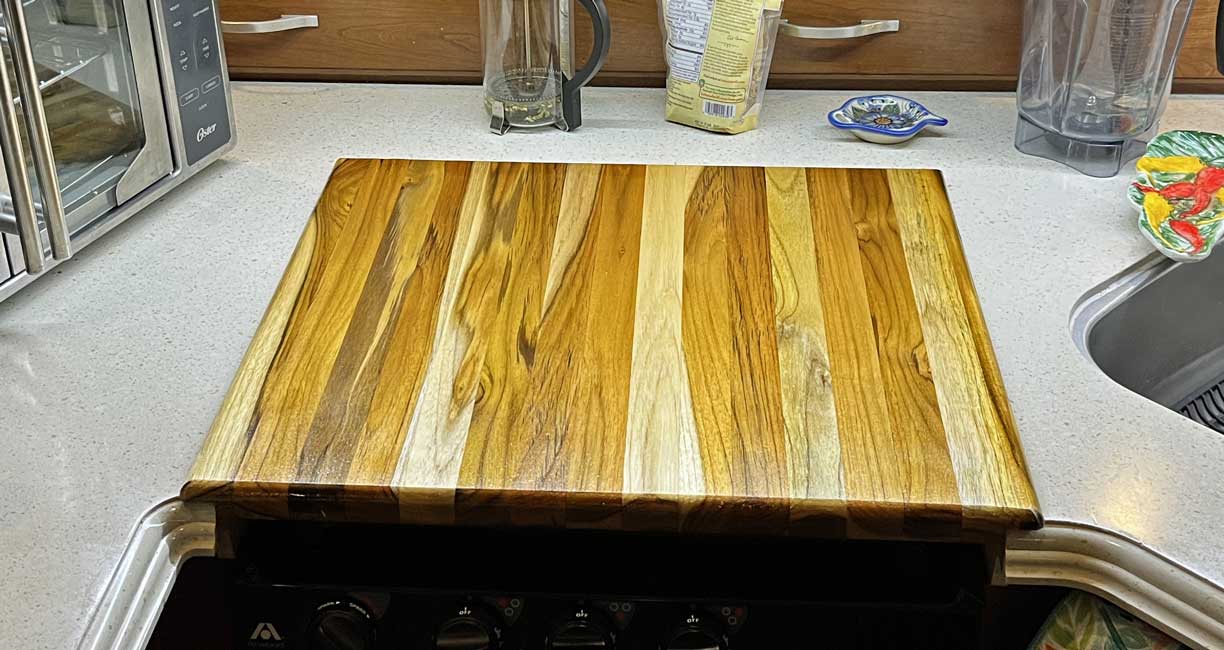
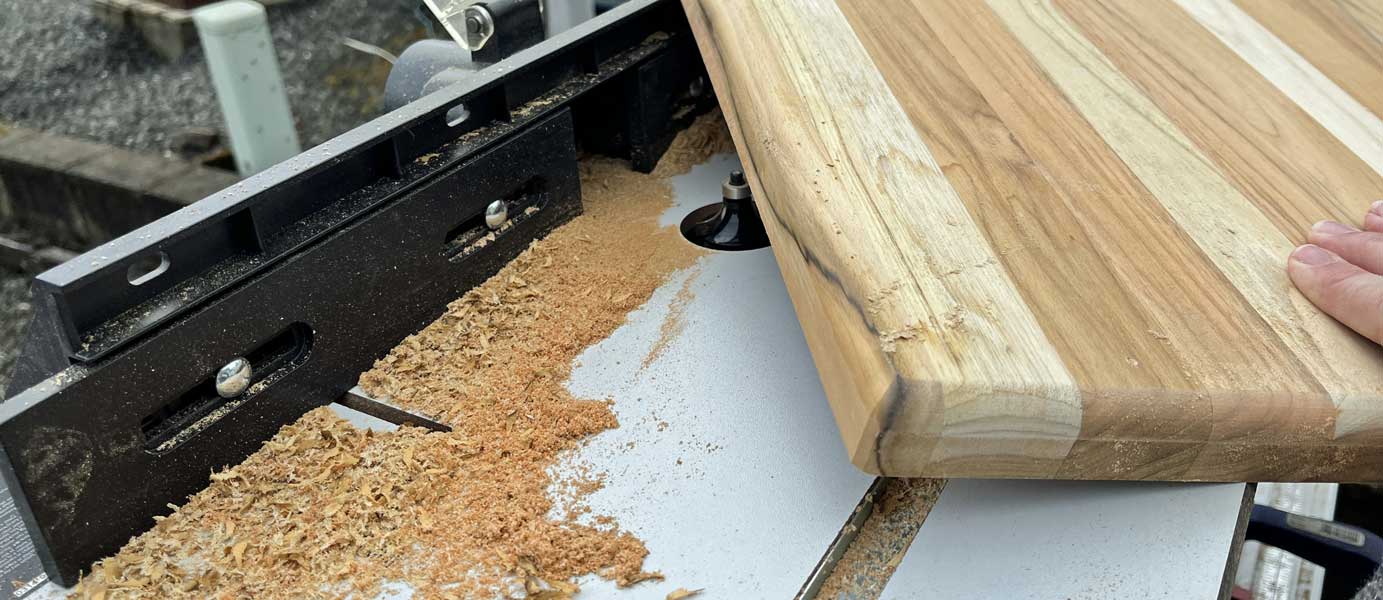
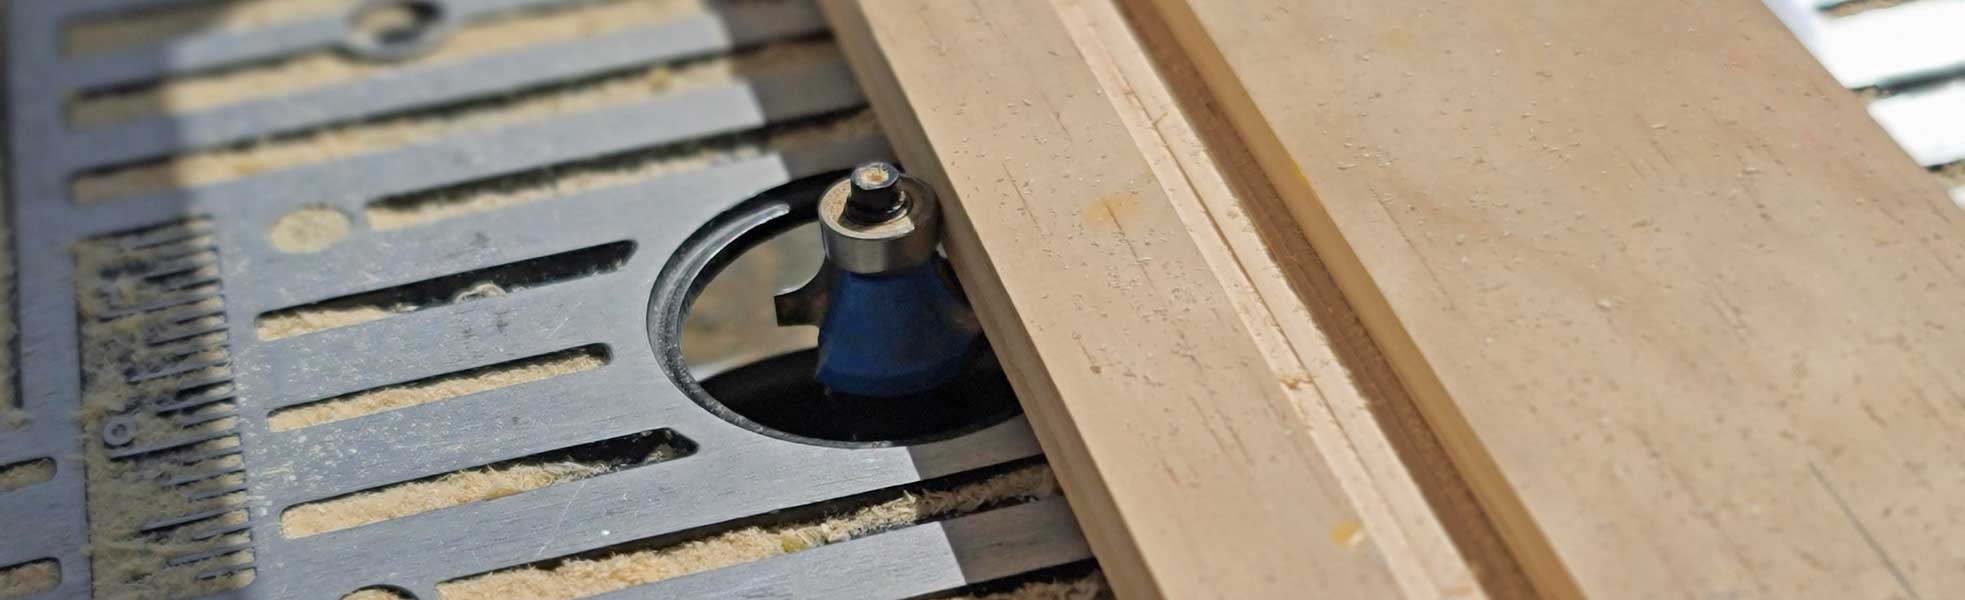
Thursday, March 3, 2022: Several weeks ago Gwen and I broke the Corian counter top which sat over the stove. I tried using epoxy to make the edge repair but we ended up breaking it a second time. The second repair made even a bigger mess. Gwen came up with a good idea to replace the Corian with a butcher block top. We searched and found several sources of what we were looking for but all were a minimum of four feet long. We only needed a piece two feet square. We found exactly what we were looking for at Lowe's for only $45. I trimmed the 2 ft x 2 ft piece slightly in both directions using my tablesaw to fit the opening. I then cut a rabbit on three edges so the butcher block would sit down into the stove cavity. I used my router to give the top a finished edge. It sat into the opening perfectly and only needed a sealer before we can use it. Click the left photo to see the routered edge. Click the right photo to see the finished, sealed top.

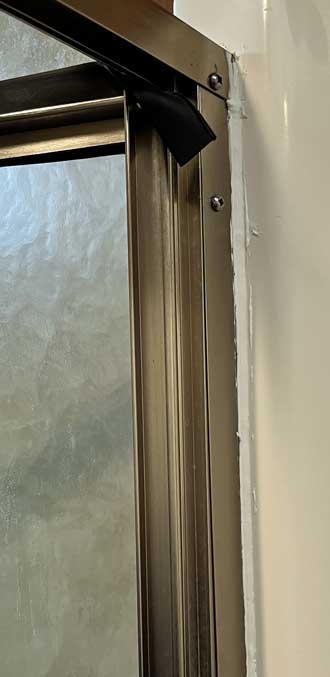
Wednesday, March 2, 2022: Our shower door has been loose, maybe for a year or more. It was obvious that the previous owner had made a repair by filling the gap with caulk. Now the caulk has broken loose and the frame moves with the door. The problem is, to make the repair correctly I need to remove the door to get at the screw which has come loose. Everything went well until I came to the last frame screw. It was corroded and stuck hard. I added some lubricant and was able to lift the opposite side of the frame which broke the corrosion. I filled the screw holes with caulk then seated the frame with caulk under the frame. I tightened the screws and the frame snugged up to the shower wall. I finished it off by sealing the outside edge of the frame with caulk. The glass shower door is repaired.
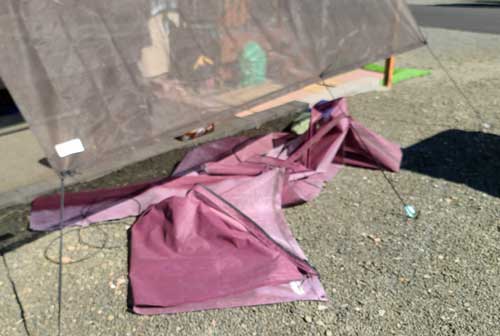
Thursday, September 23, 2021: The violet colored awning screen came with our motorhome 3 years ago. I assume the previous owner used it the 4 years before us. With the last storm, the screen has finally ripped out the grommets and needs to be replaced. Fortunately I kept the screen I purchased for our previous motorhome and it has been in storage for 3 years. It is in perfect condition but a different color, brown. I hope it also lasts 7 years.
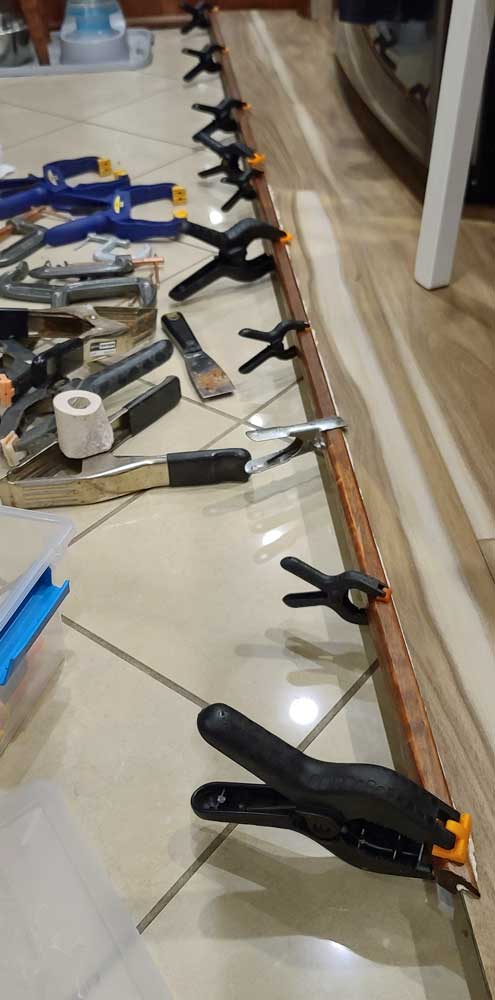
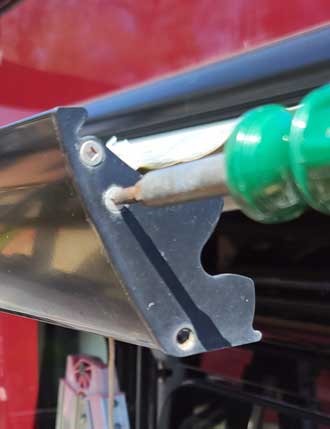
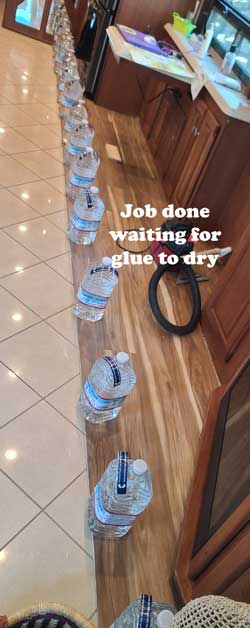
Monday, July 19, 2021: I installed a vinyl plank floor back in April and put a dense foam edge with my brad nailer. Well that didn't work very long. It worked for a short while but Abby and moving the slide loosened it. I couldn't find a suitable manufactured edge so I made my own. To the right is an exploded view of the trim. It will fit over the top and edge with glue to hold it in place. I installed foam window insulation to the bottom of the trim. The idea, when the slide moves to the extended position it will sit down onto the tile floor. The foam insulation will seal the slide edge against the tile. This will keep dirt and debris from going under the slide.
Click the photo to see how I have secured the trim while the glue dries. Speaking of glue, I needed a special glue to adhere to the vinyl floor. I chose glue meant for vinyl cove floor molding. The instruction say it will adhere vinyl to wood, I hope that's true.
 |
 |
 |
 |
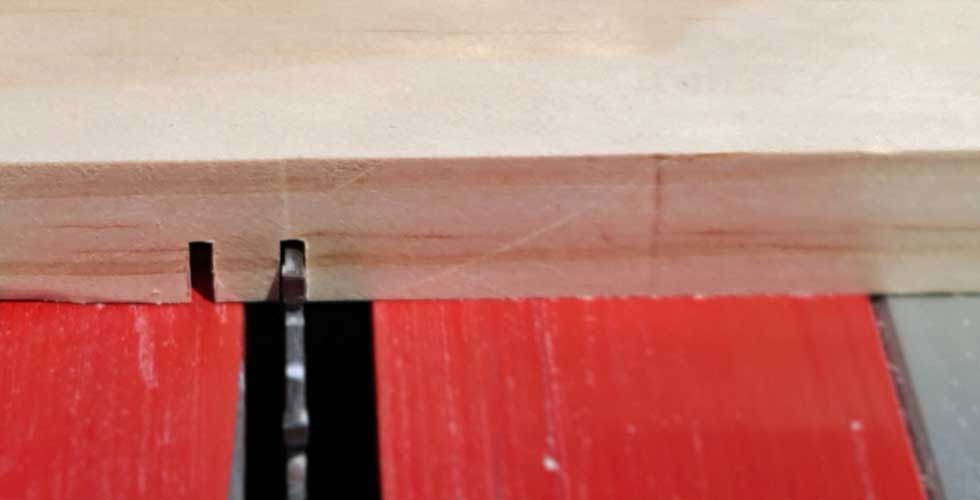 |
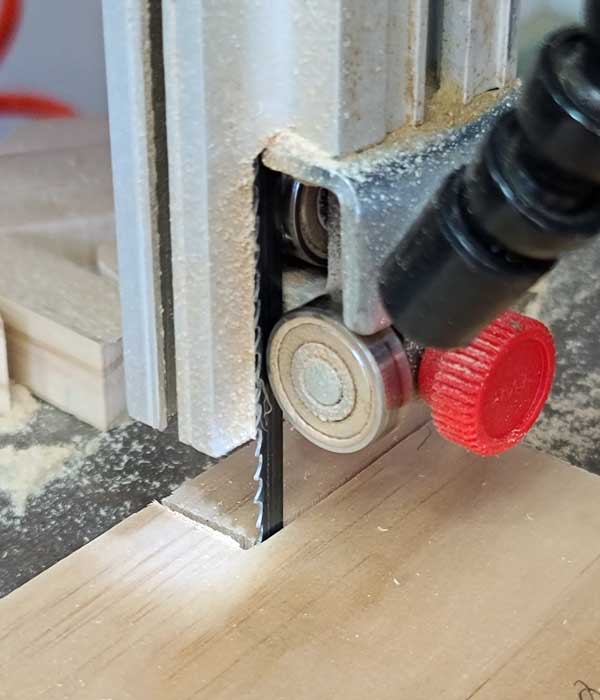
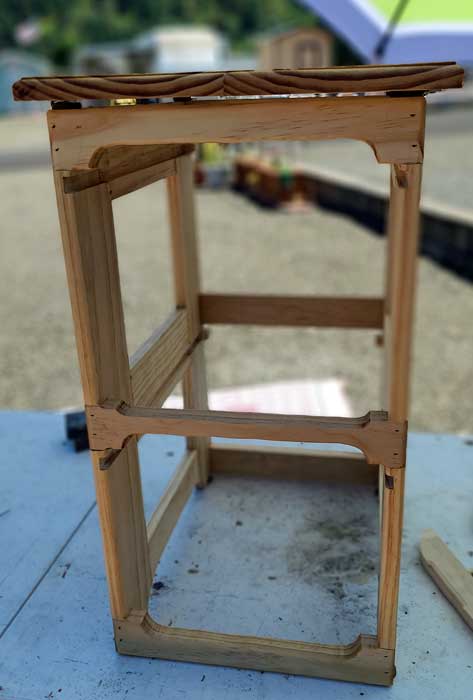
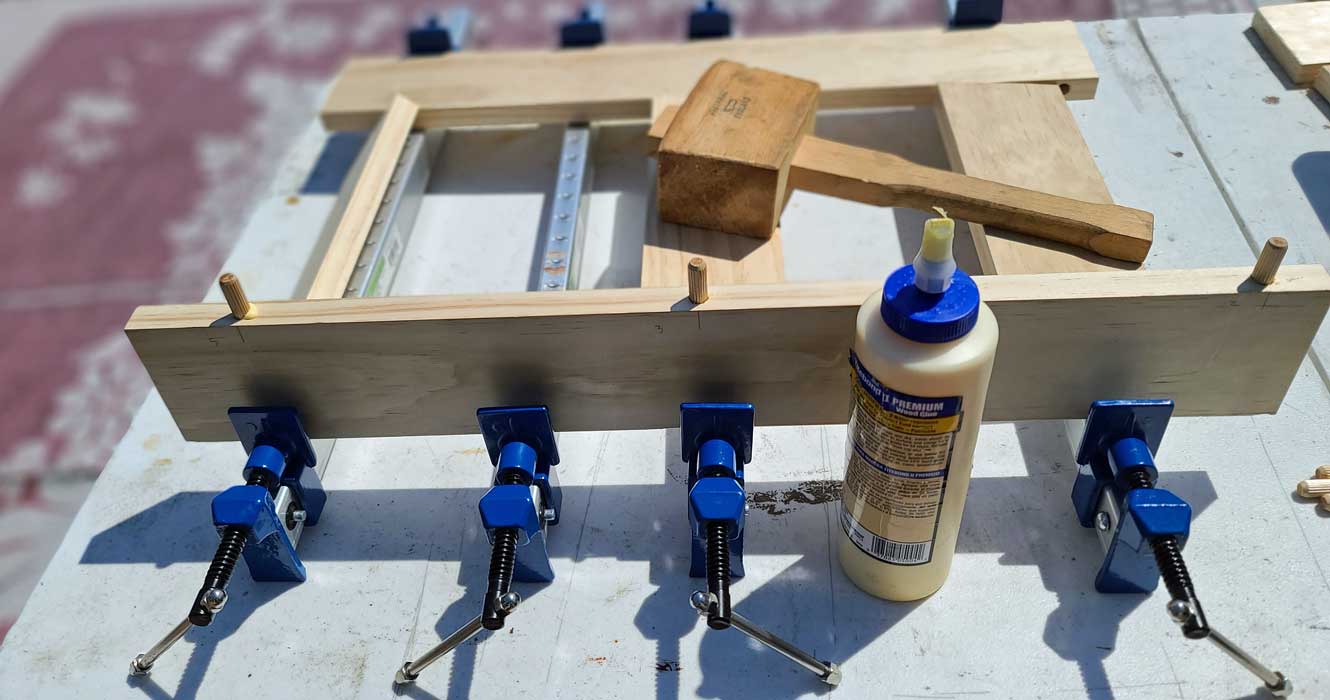
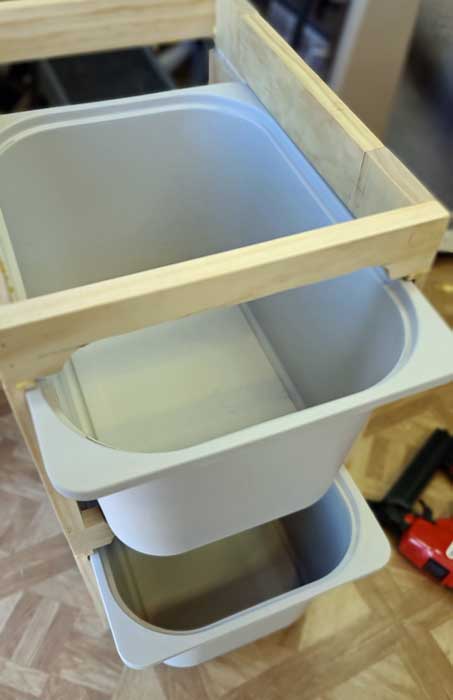 Tuesday,
June 22, 2021: This was a woodworking day for me. While visiting
IKEA we got this idea for a tray holder. We bought the trays at IKEA
and the lumber at Home Depot. Gwen wanted it made from clear pine,
lumber alone was $50. Had IKEA had the size we needed, I'm sure it
would have been less than $50. I got the chance to use my doweling
jig which I have not used in a very long time. I cut dados for the
trays to slide into the cabinet using the table saw. I assembled the
cabinet and tested the sliding trays. This project is not complete.
I need to add the top, router everything then figure out some sort
of finish. I'll do all that at a later date. I won't mention what
the trays are for just yet. Wait for the final photos. The photo at
the right is not hiding another but the other three are hiding
additional photos. Click those to see the hidden photos.
Tuesday,
June 22, 2021: This was a woodworking day for me. While visiting
IKEA we got this idea for a tray holder. We bought the trays at IKEA
and the lumber at Home Depot. Gwen wanted it made from clear pine,
lumber alone was $50. Had IKEA had the size we needed, I'm sure it
would have been less than $50. I got the chance to use my doweling
jig which I have not used in a very long time. I cut dados for the
trays to slide into the cabinet using the table saw. I assembled the
cabinet and tested the sliding trays. This project is not complete.
I need to add the top, router everything then figure out some sort
of finish. I'll do all that at a later date. I won't mention what
the trays are for just yet. Wait for the final photos. The photo at
the right is not hiding another but the other three are hiding
additional photos. Click those to see the hidden photos. 
 |
 |
 |
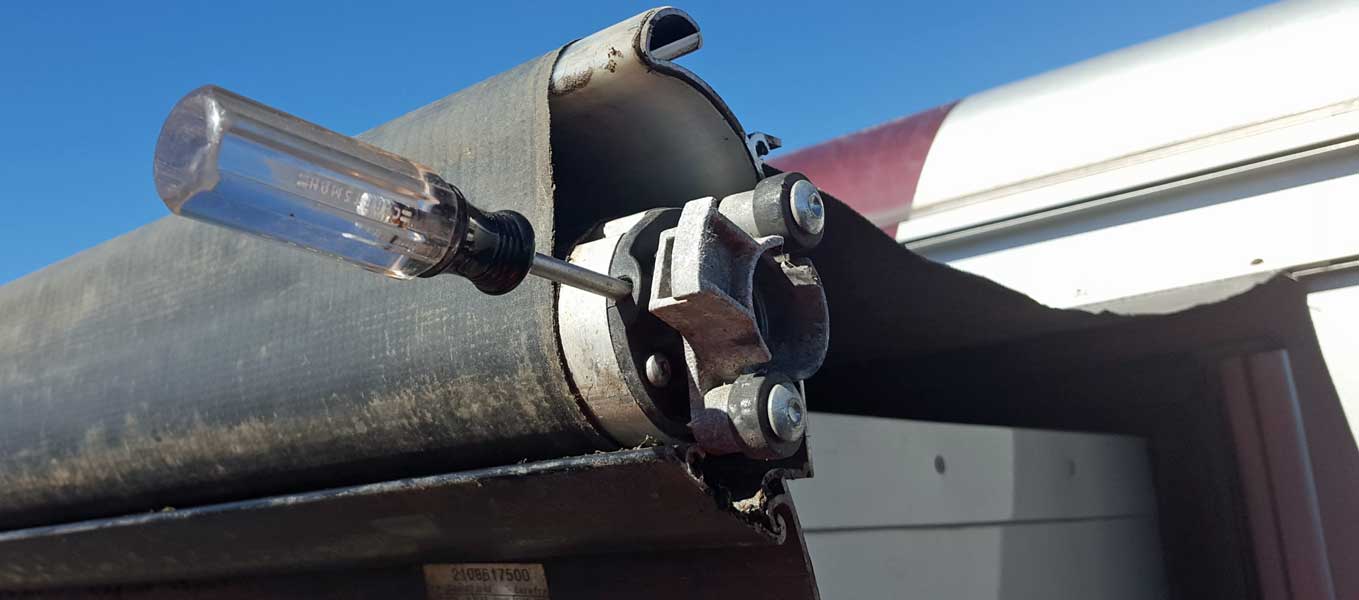
 Friday and Saturday, April 16 - 17, 2021: The
door awning fabric must be replaced. It already has tears on both
sides and I learned, with the slightest touch it tore completely
due to rotting fabric. I had no instructions and could find no
YouTube videos to help. I decided to pull the fabric and tube from
one side thinking the whole tube would pull loose. I loosened what
I thought was a set screw to release the tube. It turns out, that
set screw was a limit screw for setting the motor to run just long
enough to extend the awning. When I pulled on the tube, the fabric
and tube did come out the one side but left the motor hanging. It
still worked making it easy to remove the fabric and install the
new fabric onto the tube.
Friday and Saturday, April 16 - 17, 2021: The
door awning fabric must be replaced. It already has tears on both
sides and I learned, with the slightest touch it tore completely
due to rotting fabric. I had no instructions and could find no
YouTube videos to help. I decided to pull the fabric and tube from
one side thinking the whole tube would pull loose. I loosened what
I thought was a set screw to release the tube. It turns out, that
set screw was a limit screw for setting the motor to run just long
enough to extend the awning. When I pulled on the tube, the fabric
and tube did come out the one side but left the motor hanging. It
still worked making it easy to remove the fabric and install the
new fabric onto the tube.
Putting the tube back meant matching the keys in the motor. It was trial and error to match the keys with the slots perfectly.
This job took much longer than it should since I had no instructions or diagrams and experimented with procedure. For example, in the final step you can see the seam and tag ended up on top. At first that didn't make sense but the only way it would go. I checked the old fabric, and, indeed, the seem was on top. Obviously, the clean seam, then, is seen from below so makes sense. The set screw adjustment is another example of learning by doing.
Click all the photos for more views.
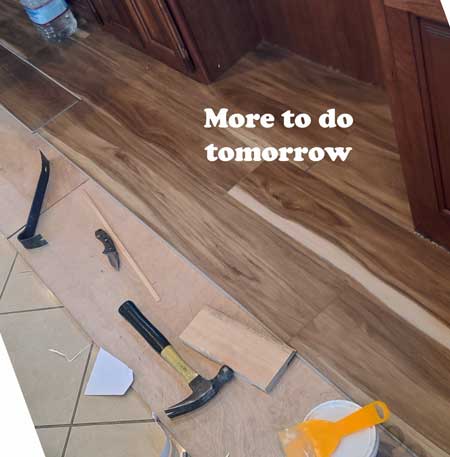
 Wednesday, April 14, 2021:
Another full day of measuring, cutting, fitting and gluing.
The project is 98% complete. Only trim and edging left. With
the time it has taken me to do this simple job, it may take
another whole day just to do the trim. I had to rip five
pieces for the final row. So I have five half planks and one
full plank left to fix any problems down the road. Wednesday, April 14, 2021:
Another full day of measuring, cutting, fitting and gluing.
The project is 98% complete. Only trim and edging left. With
the time it has taken me to do this simple job, it may take
another whole day just to do the trim. I had to rip five
pieces for the final row. So I have five half planks and one
full plank left to fix any problems down the road. |
 |
 |
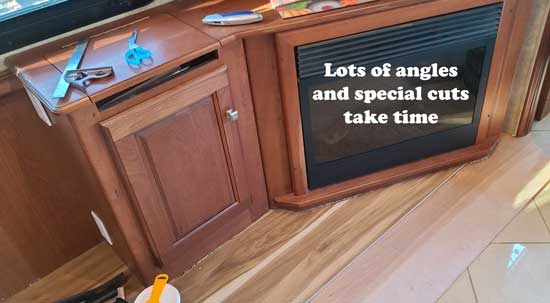
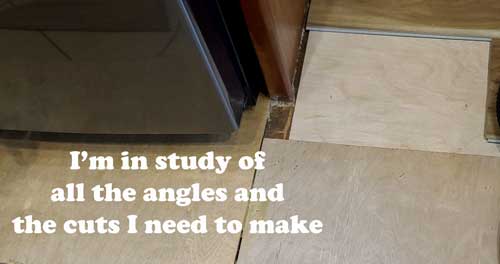
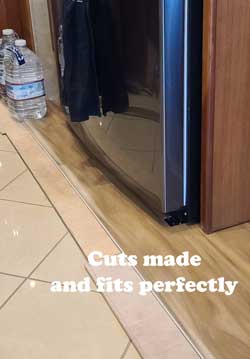
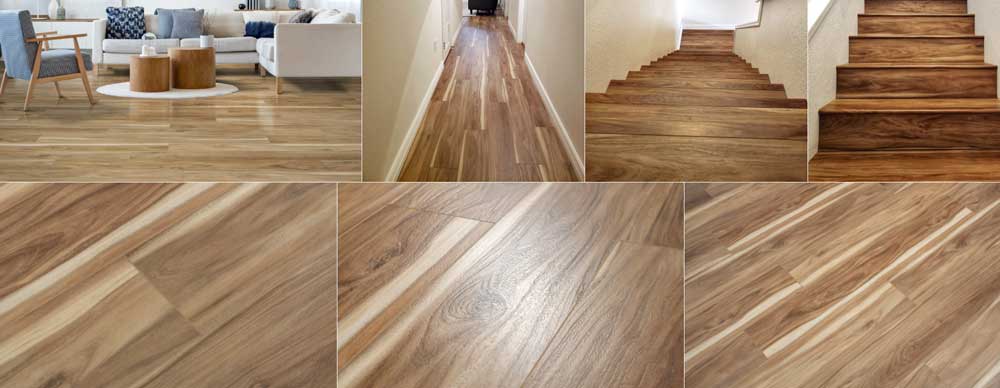
Tuesday, April 13, 2021: I have begun the installation of our new vinyl plank flooring. The angles of the cuts turned out to be very time consuming. I worked all day and finished only what you see in the photo to the right. I have more strange cuts to make tomorrow but now I know it won't go very fast. I'm expecting it will take most of tomorrow to finish this project.
 |
 |
 |
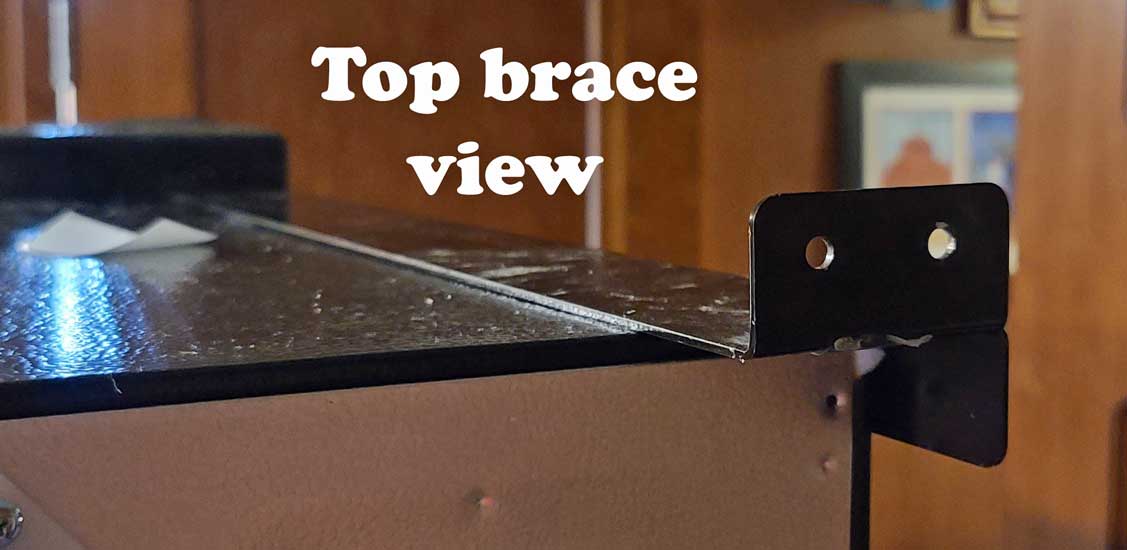
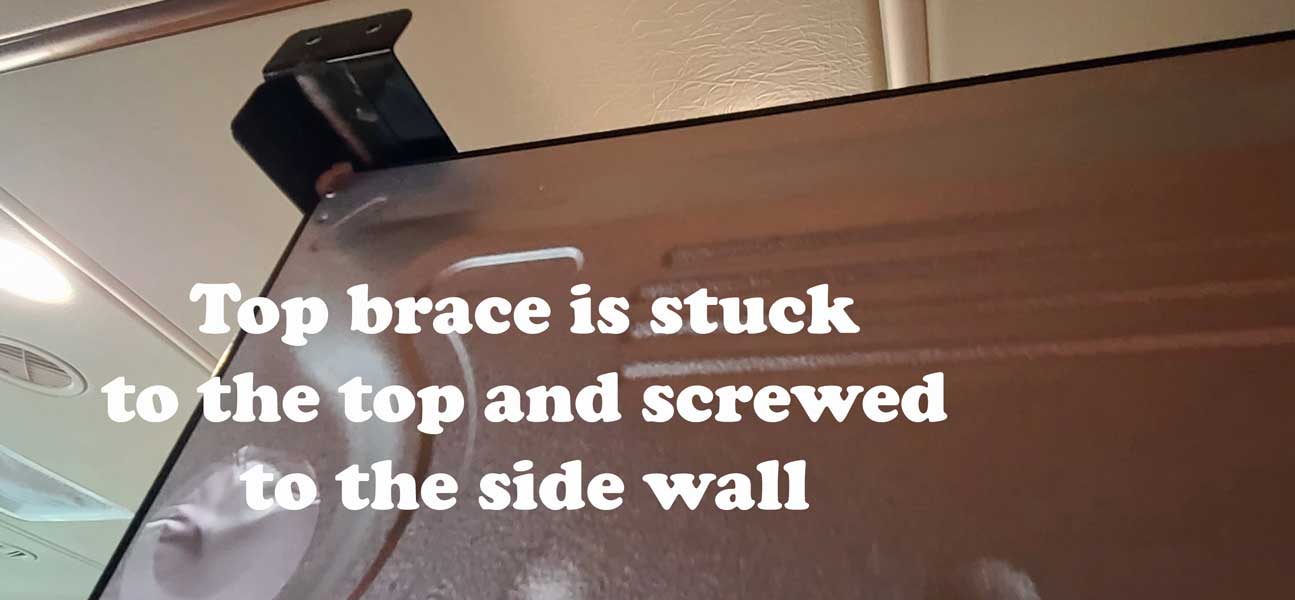
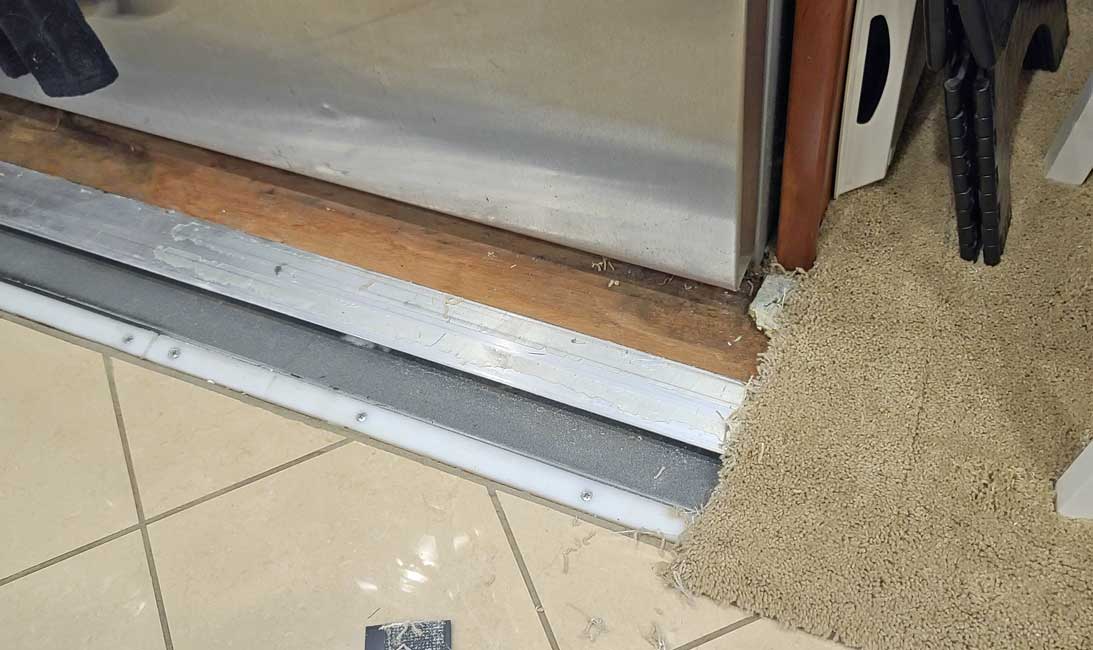
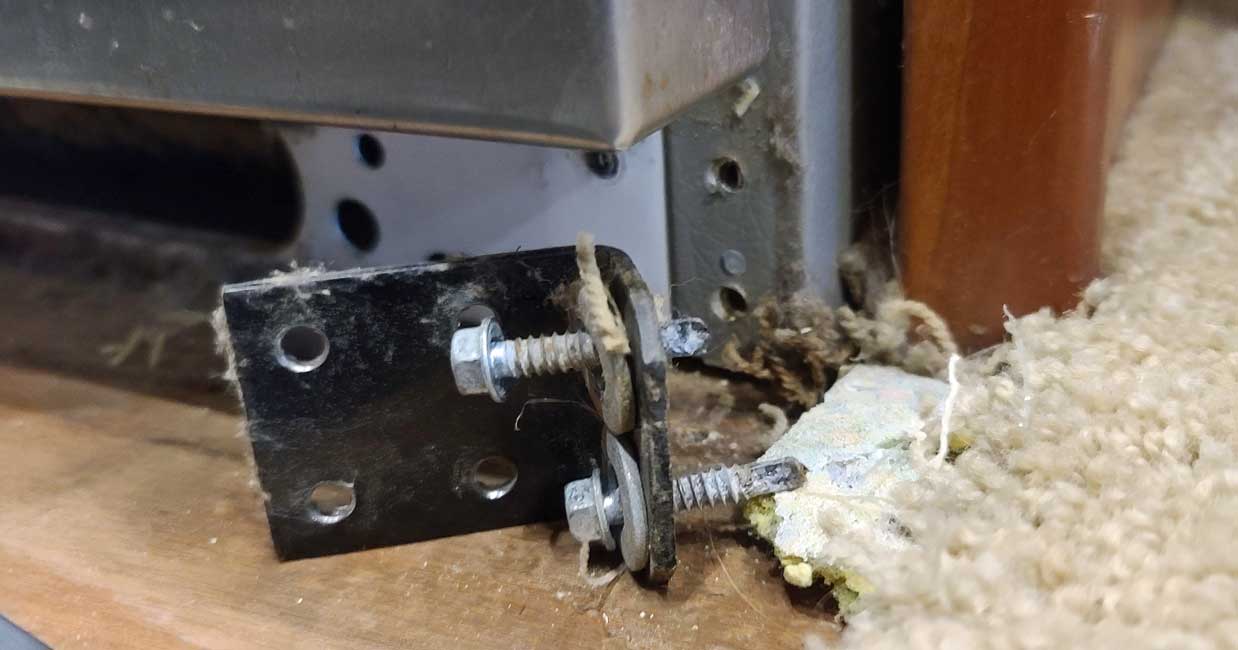
Tuesday, March 23, 2021: Almost a month ago, we replaced our refrigerator. We are taking Mz Ruby for an oil change on Thursday so it is time to secure the new refrigerator before moving. I saved the brackets from the old refrigerator.
The top of the refrigerator is secured to the back wall (side wall of the slide) using steel braces.
The bottom is secured to the floor using "L" brackets.
Of course, all this must be removed should we want to clean behind.
Click these photos for more views.
Note: we still don't have the backordered vinyl plank flooring. The underlayment will have to do until the flooring arrives.

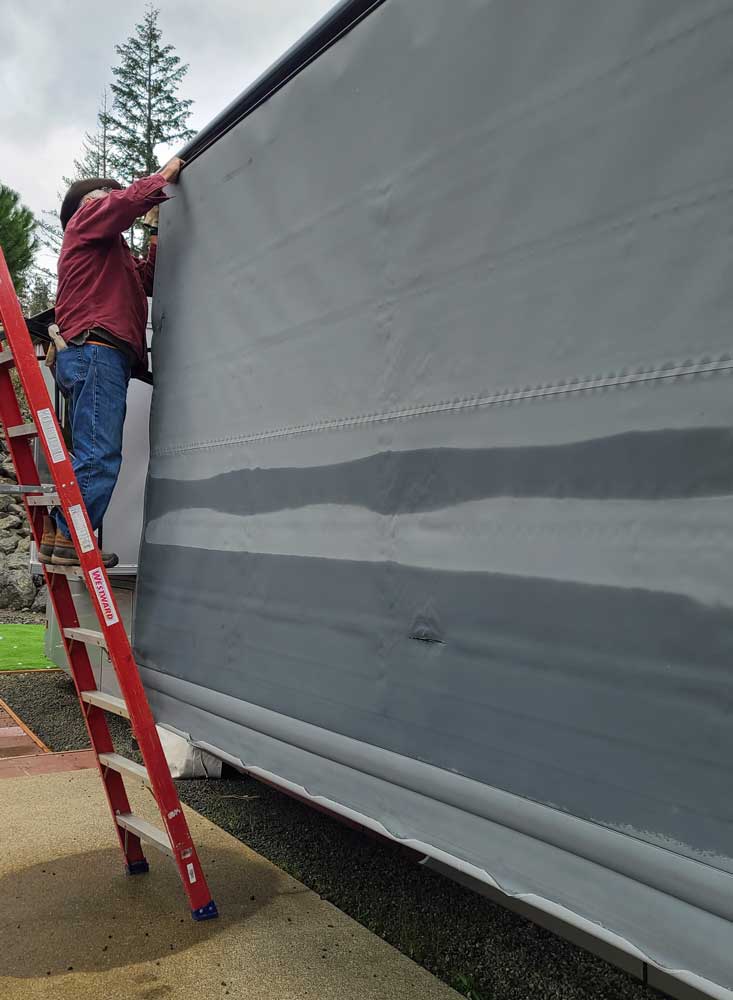
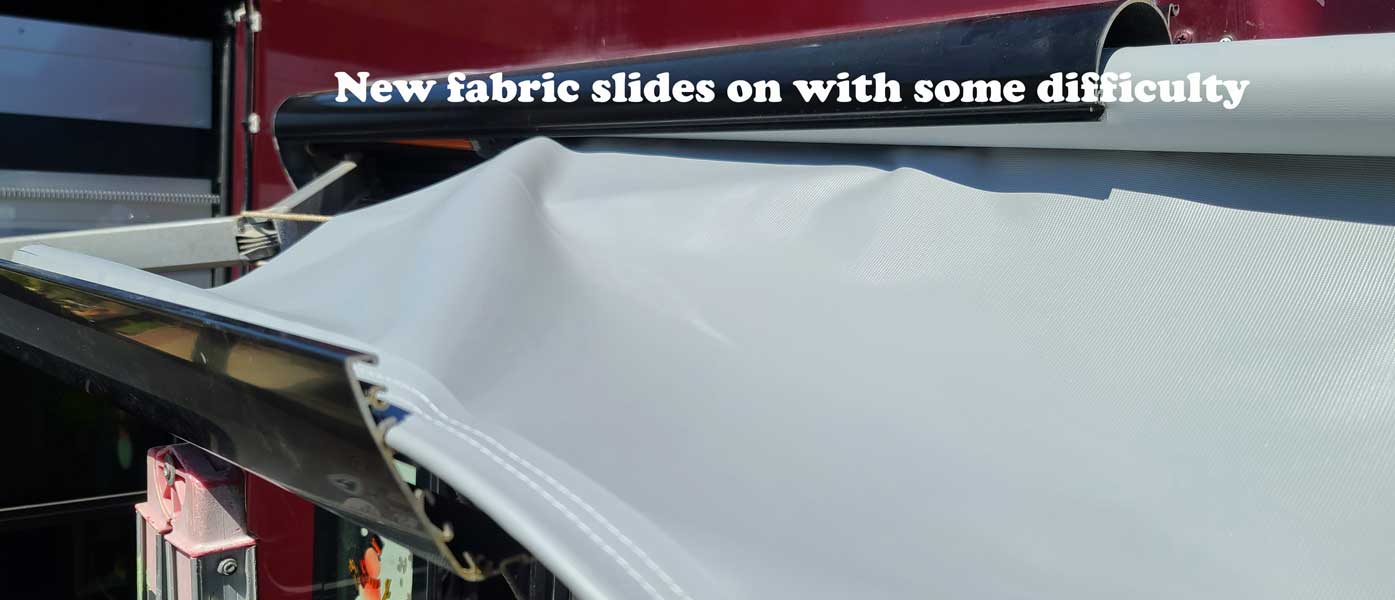
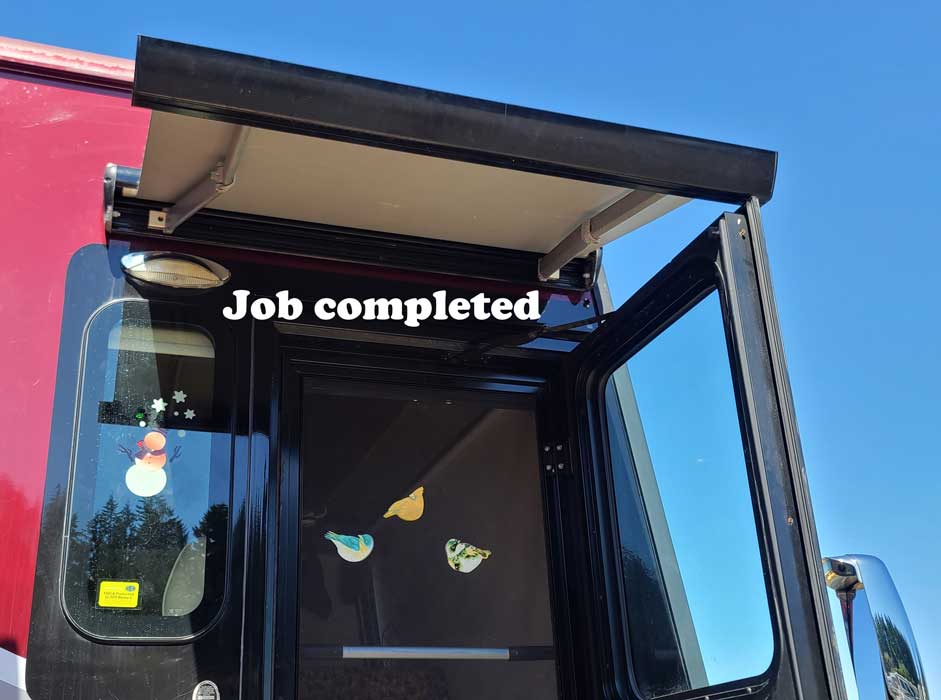
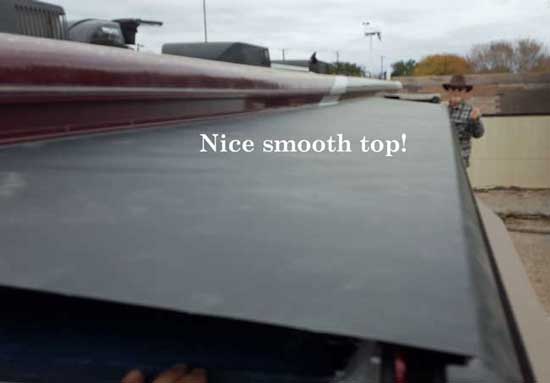
Sunday, March 21, 2021: I was hoping for a bit better weather but Wendell and I still got the job done in 1.5 hours. The old, torn fabric slid off easily. The new fabric was a little more difficult but with Wendell's help, we got the new fabric installed. This new fabric came from Tough Top Awnings in Vancouver, Washington. They are the folks I purchased the slide top awning fabric.
I have one more awning replacement. The door awning needs to be replaced and I have the fabric but I need to watch the video and roll in the door side slide for better access. That will happen this Thursday when I take Mz Ruby for an engine oil and transmission oil change.
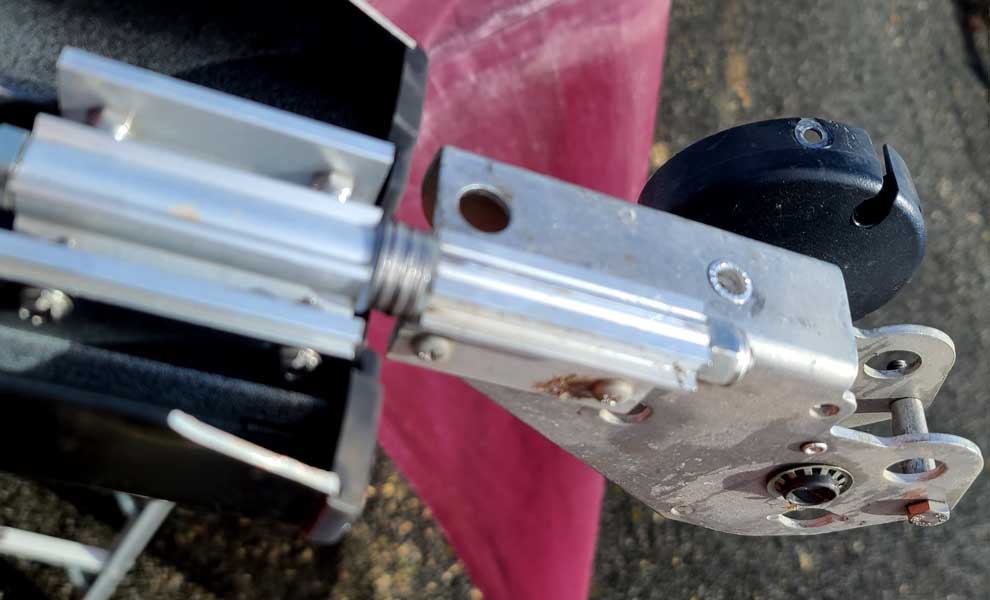
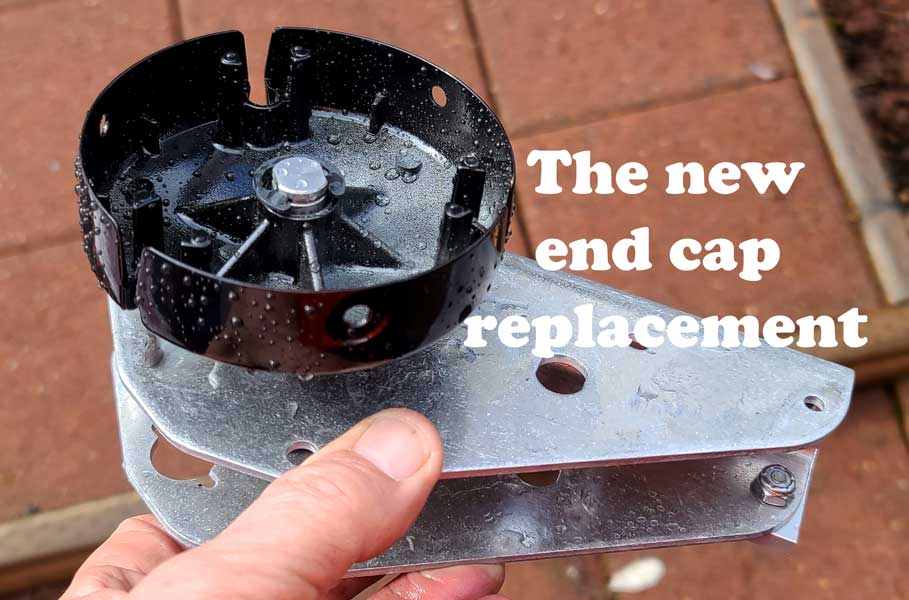

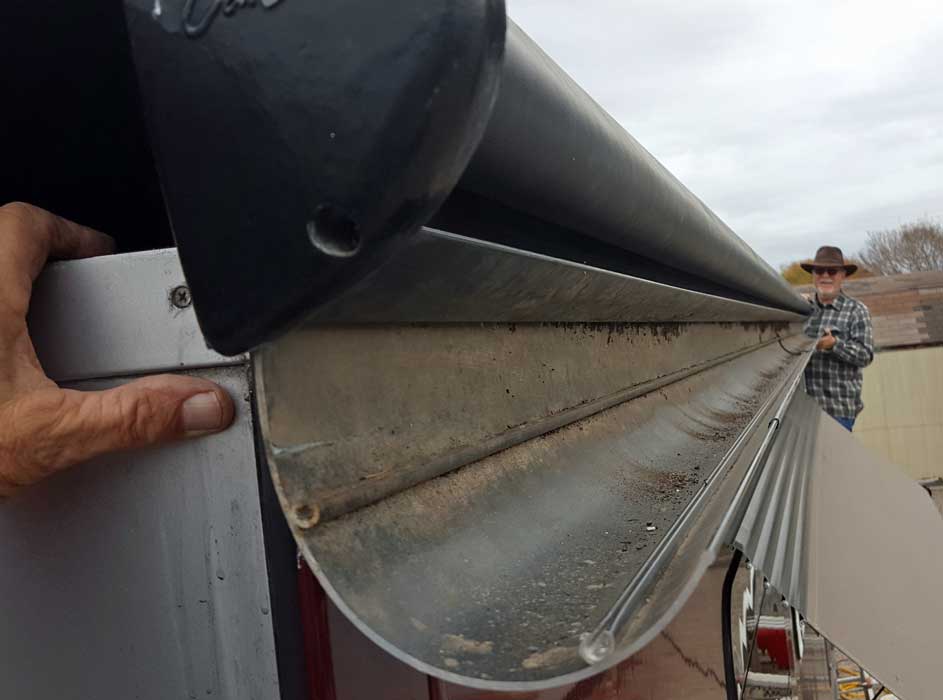
Saturday, March 20, 2021: Another project to finish before the fabric can be changed on the main awning, the non-motorized end of the awning has a broken end-cap. The end-cap is attached to awning structure which means all must be replaced, not just the end-cap.
This should have been a quick job but the plastic cover gave me grief. I tried different size screwdrivers, compressed air to clear debris and finally drilled out two screws which failed to move.
Once the cover was removed, the replacement of the mechanism and end-cap went quickly. A failed screw hole in the end-cap caused me to replace the part. However, I also learned the end-cap did not rotate easily. It caused a lot of drag which may be one of the reasons the awning extended and retracted slowly. The new end-cap rotated easily.
The weather is forecast to improve tomorrow so the plan is to replace the fabric tomorrow.
Click all photos for more views.

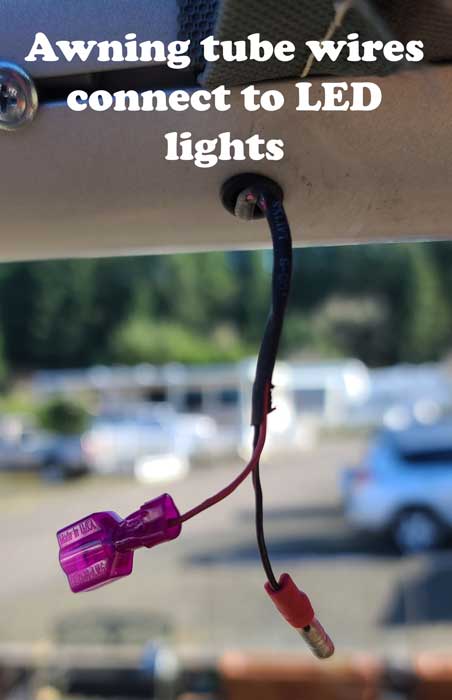
Tuesday, March 16, 2021: Our main awning fabric is beginning to tear and must be replaced. This awning has an LED strip along the awning tube. The wire to power the LED lights is in a seam along the edge of the awning fabric. Our new fabric has no seam so the wire to the lights need to move. The reason to run the wire with the awning fabric is to have the wire roll up with the awning when retracted. My only option for wire is to run the wire in the awning arm, then plug in the leads which means I must remember to unplug the leads when the awning is retracted. I'm not sure all this is worth the trouble since we haven't used this LED light strip very often, in fact, I don't remember the last time we turned them on. Oh well, this gives me the option to use them sometime in the future. I worked on this wire system most of the afternoon. The routing of the wire must be completed before we can begin to remove and replace the awning fabric. I tested the light after the new wire was in place, works like it should. Click the photos for more views.
Wednesday, March 3, 2021: I installed the underlayment today with glue and staples.
The underlayment was easy to cut. The only complicated piece was in front of the TV and fireplace. All the rest of the pieces were rectangles.
The floor is ready for the vinyl plank. I hope it arrives in a week.
Click the photos for more views.
 |
 |
 |

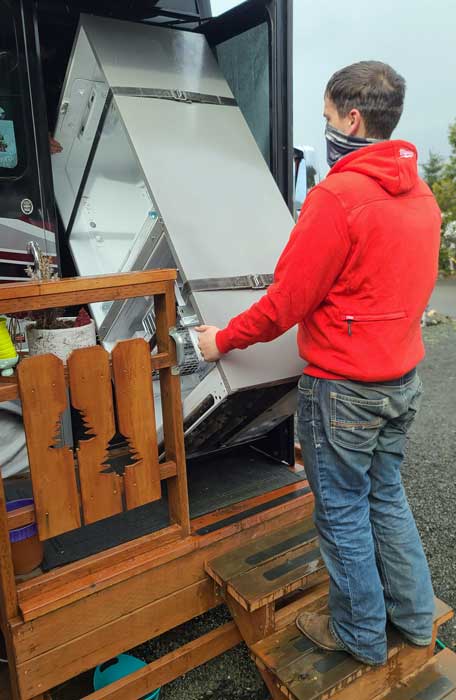
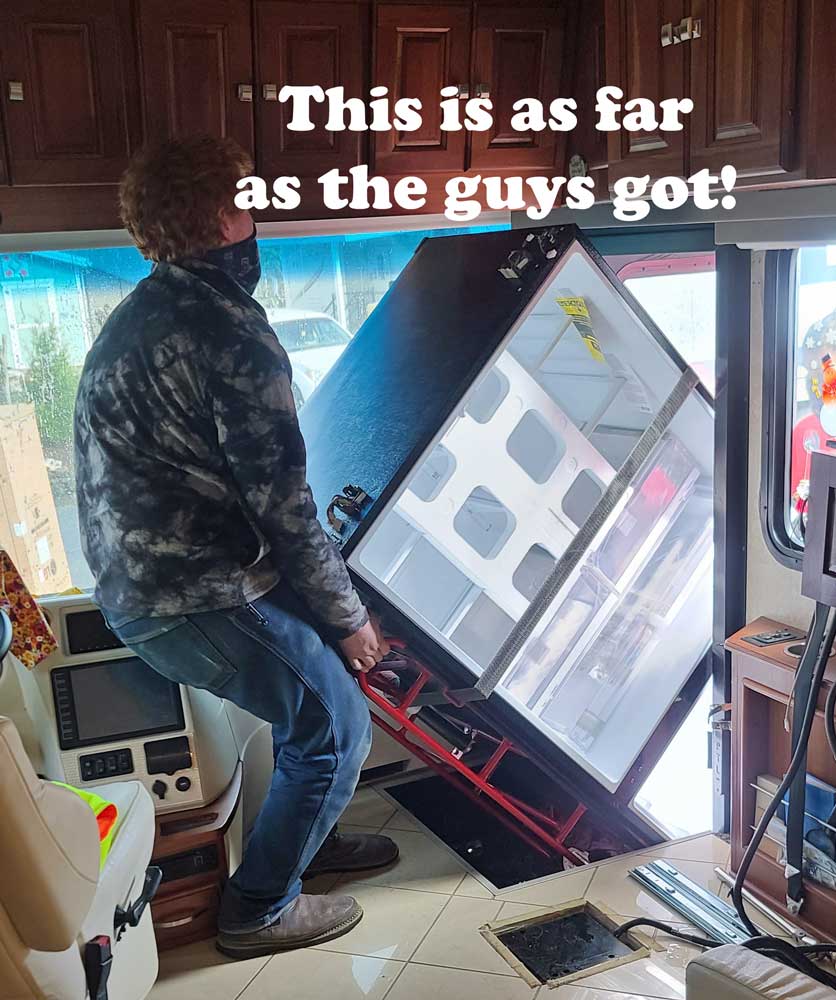
Saturday, February 27, 2021: Glen visited this morning and helped me get the LG refrigerator into the kitchen. The wind brace on the door and the deck had to be removed. We thought about using a dolly but decided it would never fit with a dolly. I took the bottom and Glen took the top and we carried, well ... squeezed the LG into the motorhome. There wasn't an inch to spare. Click the photo to see the LG in its new home. It took the rest of the day to put the LG back together, get it connected to water and set in its place. Glen also helped me put the passenger seat back in its place. I had to crawl under and hold the nuts to the bolts as Glen turned the bolt. After Glen headed home, I replaced our deck making some minor adjustments so it would work better than before. I replaced the screen door and wind brace. Gwen loaded the new refrigerator. We had stored refrigerator items under the gazebo overnight. It was refrigerator temperature outside. The water spigot works in the door, now we wait for the first ice. We haven't started the freezer ice because we expect to get ice from the door. That gives more freezer space. Finally, the refrigerator connects to our WiFi network. I'm still learning what the WiFi lets me do remotely. Maybe I can send a text to refill my glass with ice.
 |
 |
 |


Thursday, February 25, 2021: I did a couple of things to get ready for the refrigerator arriving tomorrow. I removed the screen door. It must be removed to squeeze through the door. I disconnected the water from the refrigerator then tested the water pressure since the water trickles from the filtered water outlet on the inside of the refrigerator. Click the left photo to see the results of the test, plenty of water pressure.
We picked up some vinyl plank flooring to learn if we liked the pattern and to get an idea of how vinyl plank flooring might look when we replace the carpet. Click the photo for an enlarged view. We chose to return this flooring and continue looking for a different pattern.
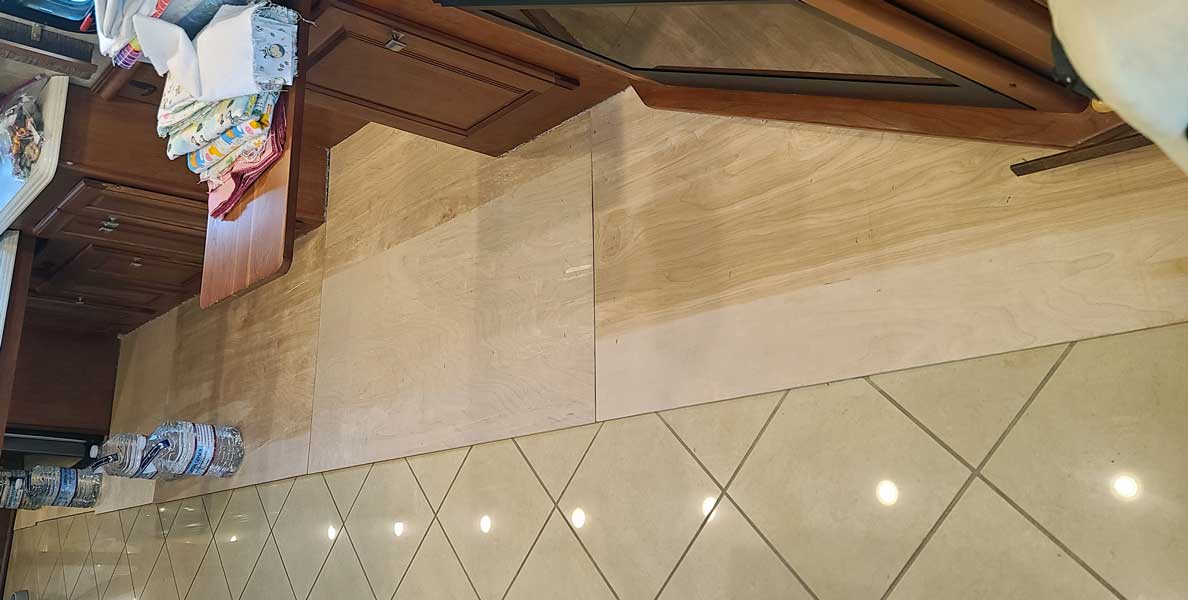
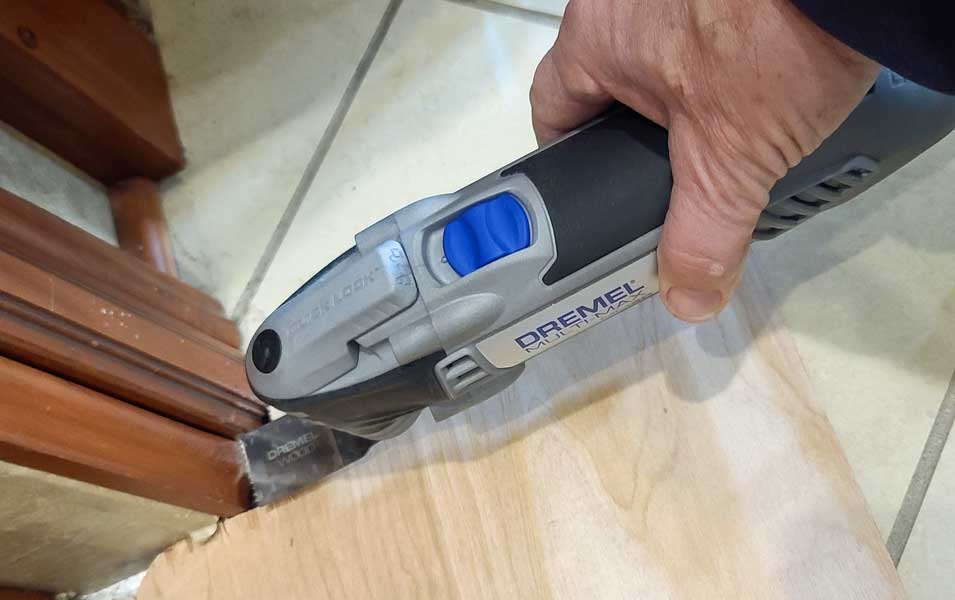
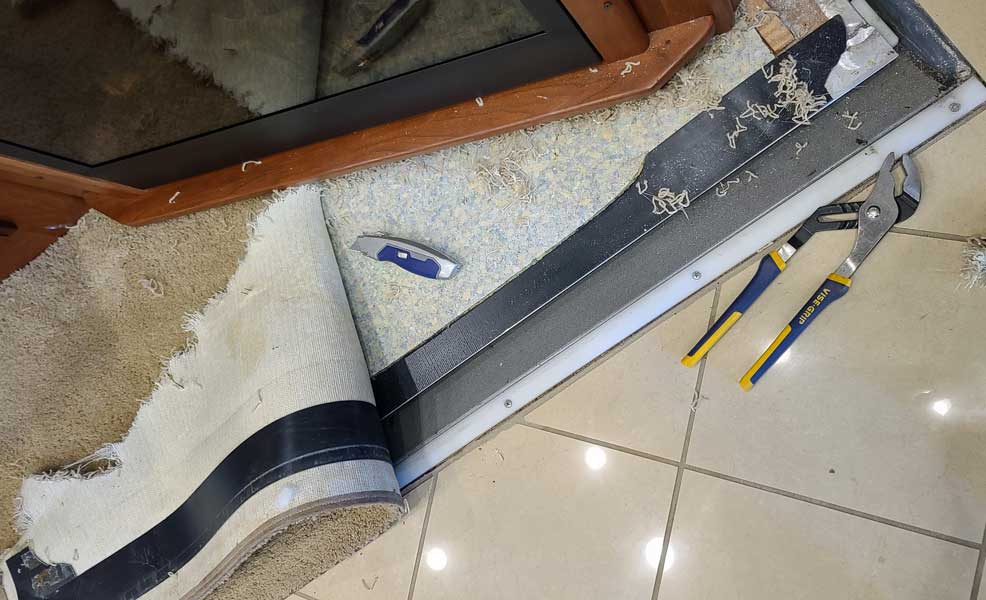
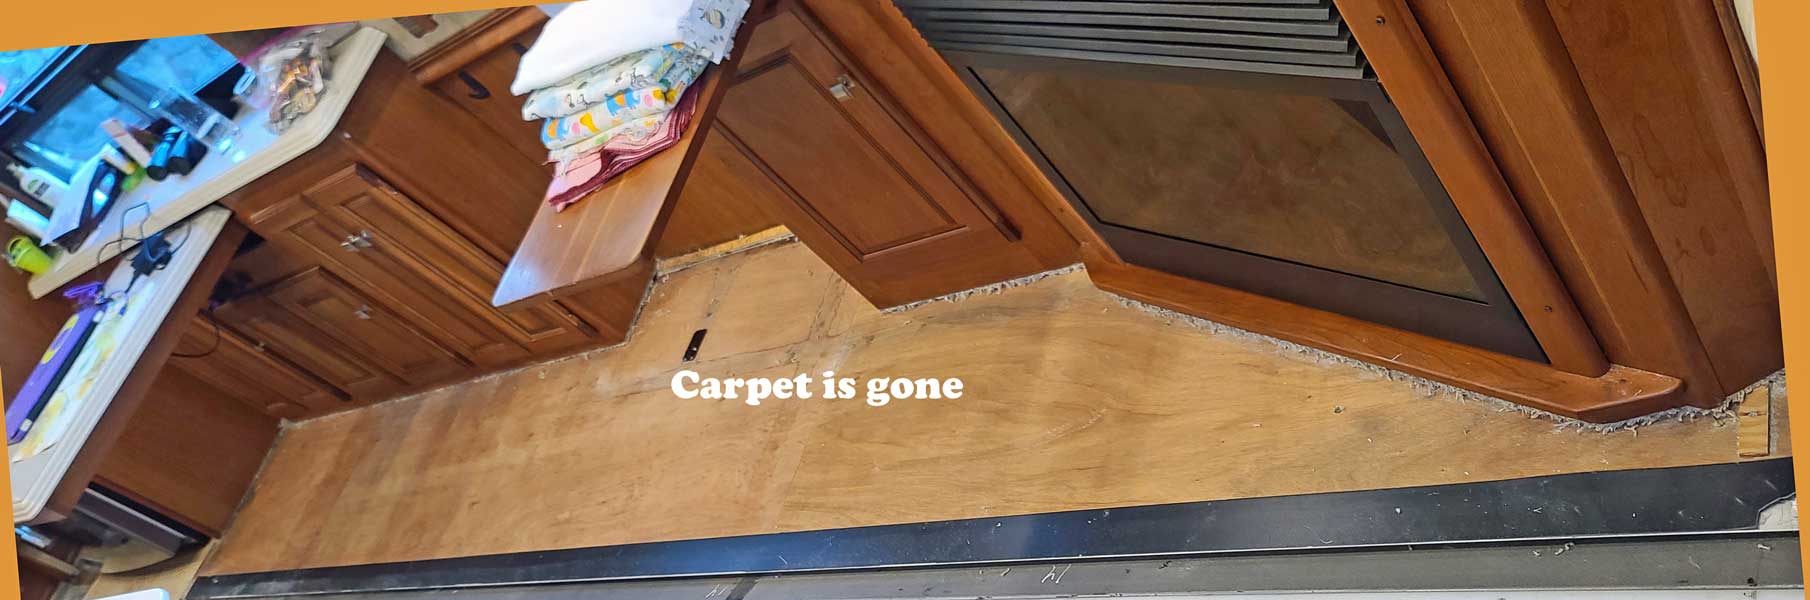
Wednesday, February 24, 2021: We are preparing to replace the refrigerator. I ripped out the carpet in front of the refrigerator with the idea of putting vinyl plank flooring in that area. Once we saw what was under the carpet, we decided to take out ALL the carpet and replace with vinyl plank flooring. The refrigerator, because this is an RV, is bolted to the floor and the back wall. I had to buy a three foot bit extension to reach the phillips screws on the back wall. I don't see any rollers on the bottom of the refrigerator so I'm expecting this to be a real beast to move from this tight location. The doors will have to be removed to get it out the motorhome door. I won't know if I can move it until it is unloaded on Friday. I plan to put underlayment in this space to help protect the sub-floor. It is obvious the old refrigerator has been leaking worse than we had imagined. Click both photos for more views.
 |
 |
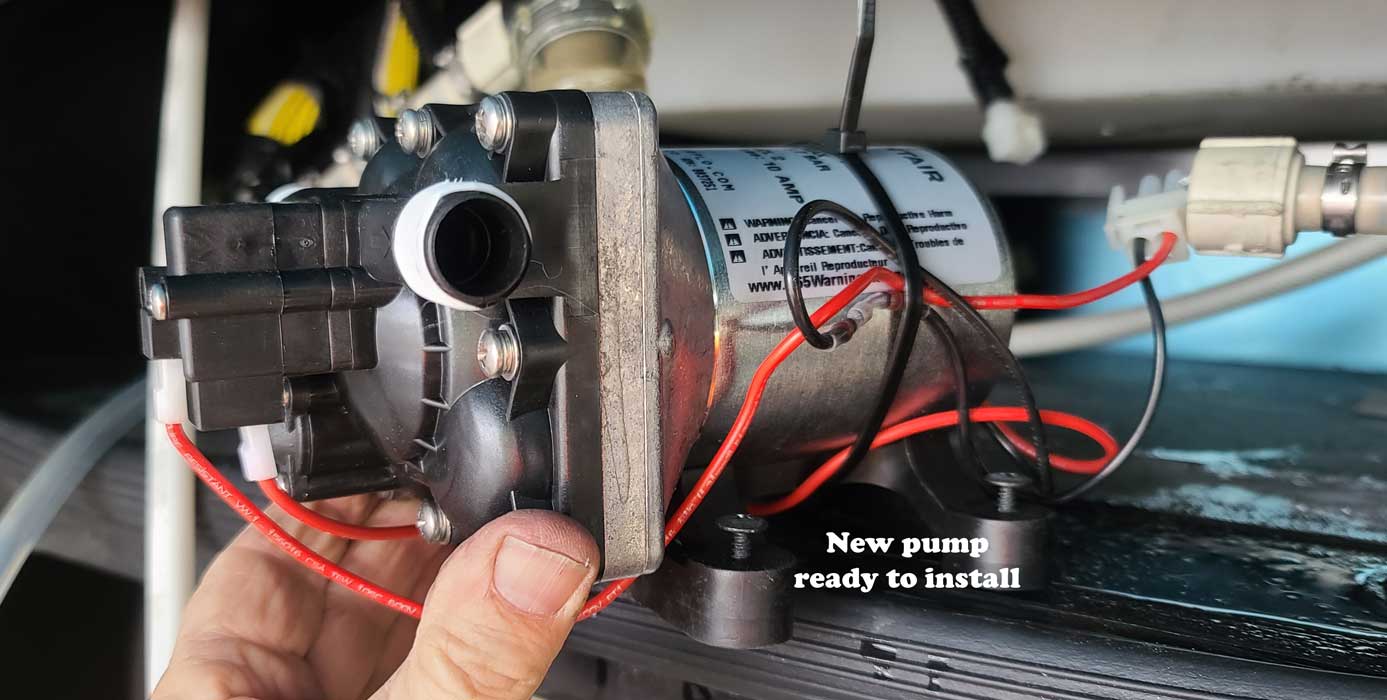 |
Tuesday, February 23, 2021: I did a couple of plumbing projects today. The kitchen under-sink water filter has expired so we will bypass it rather than replace it to make much more storage room. Without the filter all the water supply lines can be moved out of the way.
The water pump must be replaced. It has failed and is leaking. When connected to water, we don't use it but when we are camped in the Arizona desert, we use it constantly. I purchased the identical model to replace it which made installation of the new pump easy. Click all photos for more views.
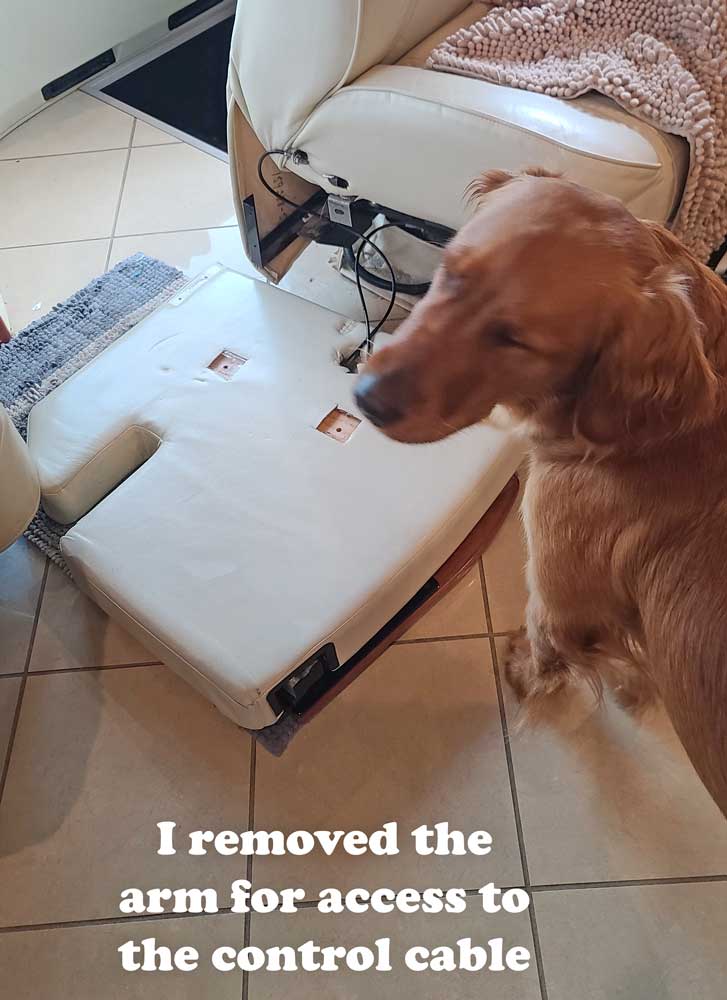
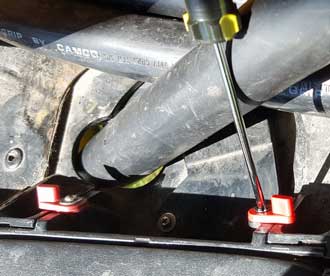
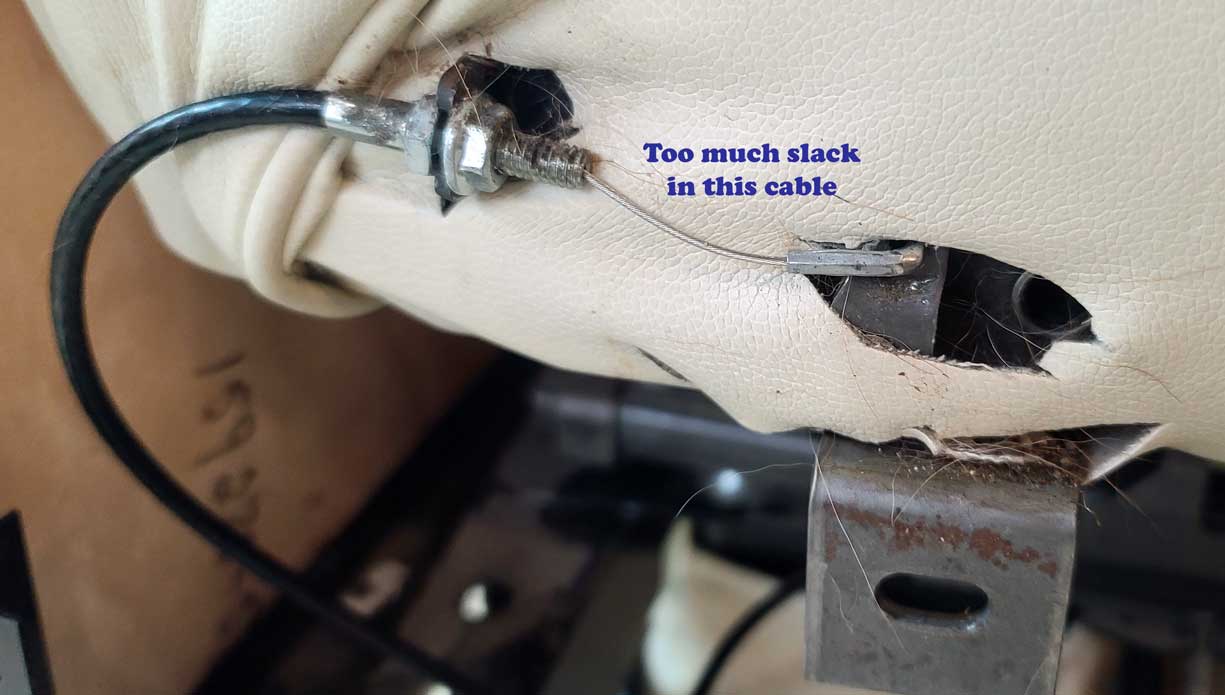 Friday, February 19, 2021: Today's adventure
began with Abby thinking there was some treasure down the side of
the right arm on the chair. I was able to pull out some old slimy
lint and a few unidentified objects. I reclined the back all the
way laid down for easier access but then it would not return to
the upright position. I ended up taking out the four screws
holding the right arm in place. I learned the cable controlling
the release for the recliner had too much slack. Click the right
photo for a close up of the cable. I made the adjustment to the
cable (it's similar to adjusting a bicycle cable). The arm
actually reattached easily. Now the recliner action works again.
Friday, February 19, 2021: Today's adventure
began with Abby thinking there was some treasure down the side of
the right arm on the chair. I was able to pull out some old slimy
lint and a few unidentified objects. I reclined the back all the
way laid down for easier access but then it would not return to
the upright position. I ended up taking out the four screws
holding the right arm in place. I learned the cable controlling
the release for the recliner had too much slack. Click the right
photo for a close up of the cable. I made the adjustment to the
cable (it's similar to adjusting a bicycle cable). The arm
actually reattached easily. Now the recliner action works again.
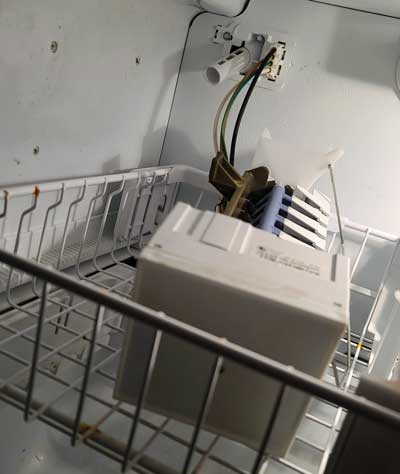
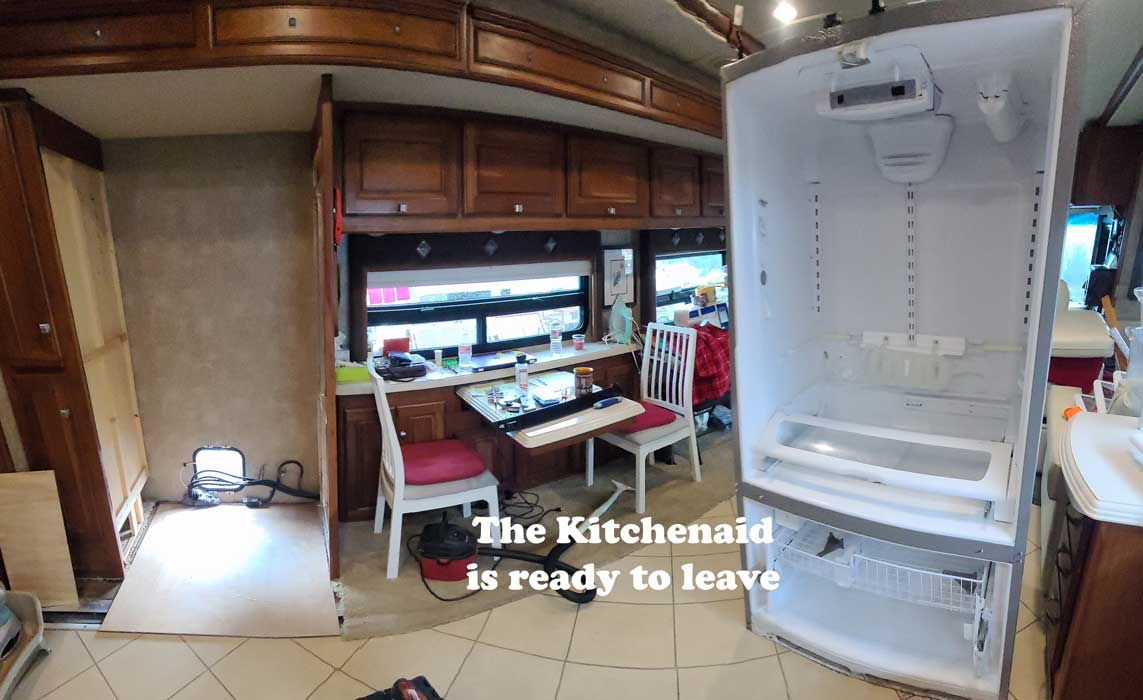
Wednesday, February 17, 2021: Our Kitchenaid refrigerator ice maker is not getting water. I watched the YouTube videos and most are saying the feeding tube in the back is frozen.
I followed the video instructions for removing the ice maker. I checked the feed tube and found no ice blocking the tube. The next solution is to check the water valve in the back of the refrigerator. That means pulling it out. Well it's bolts to the floor so not as easy as it sounds. Normally, a refrigerator sits on wheels and you simply pull it away from the wall for access behind. This will be more difficult than that.
There are other problems with the Kitchenaid so we are considering a replacement. Many of the videos I watched did not think highly of the Kitchenaid brand, just a warning in case you are buying a refrigerator.

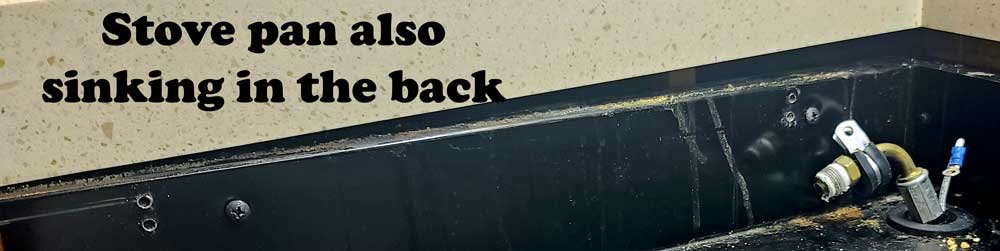
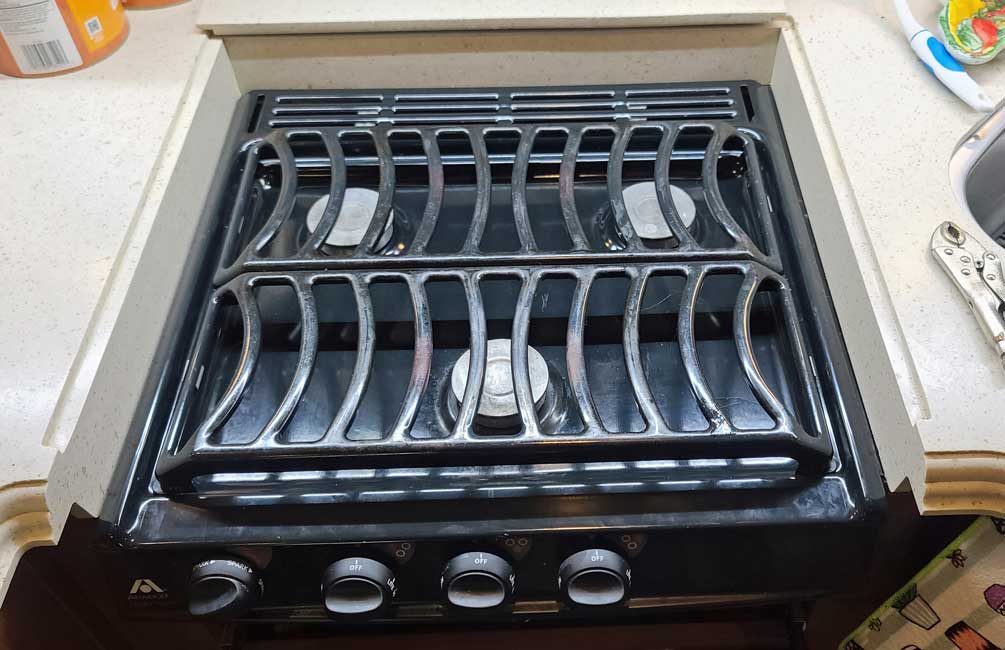
Monday, February 15, 2021: For some reason, the back of the stove is almost an inch lower than the front. I took the stove off the cabinet to learn what is happening with the stove. I learned the frame had come apart in the back. I found a small brace which I attached to the bottom of the frame to bring it back to level with the counter.
Gwen helped to clean all the parts and I reassembled the stove. It is back to perfect with the counter. Now the pans will sit level and the eggs won't be sliding to the back of the pan.
Click the photos for more views.
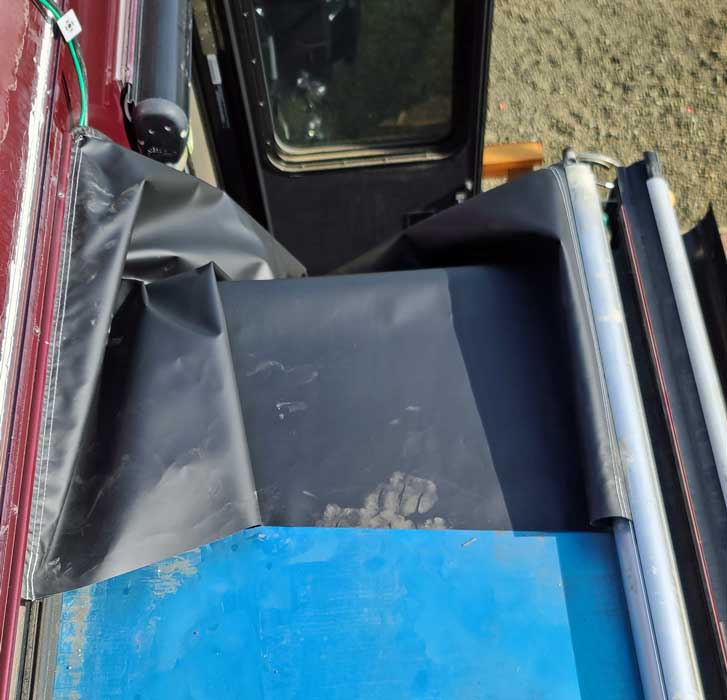
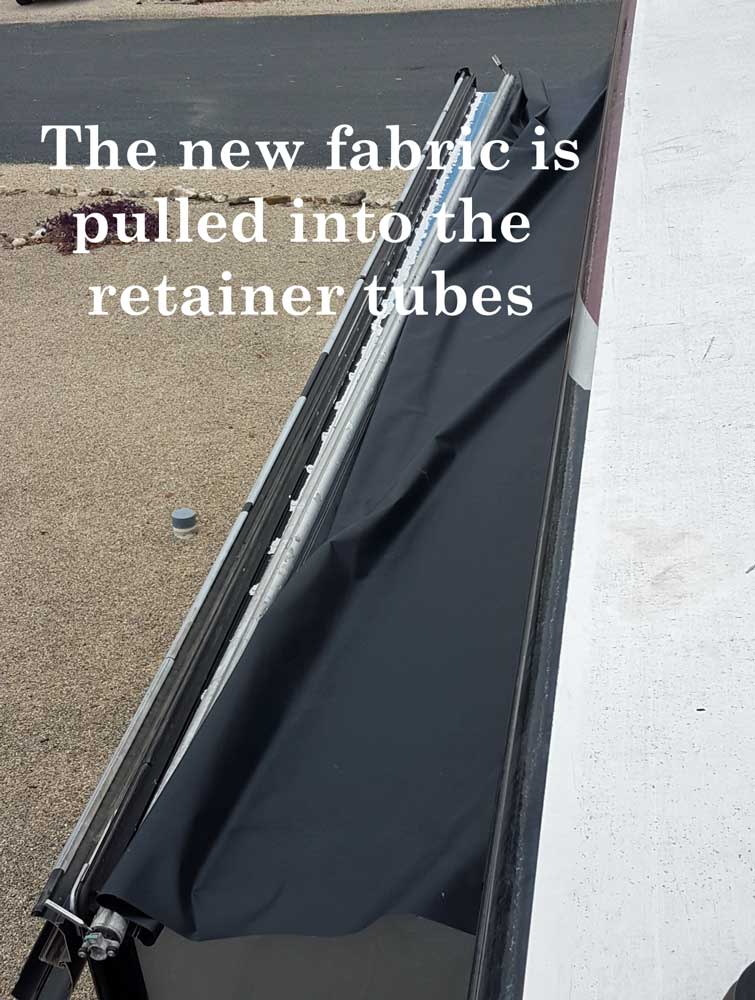
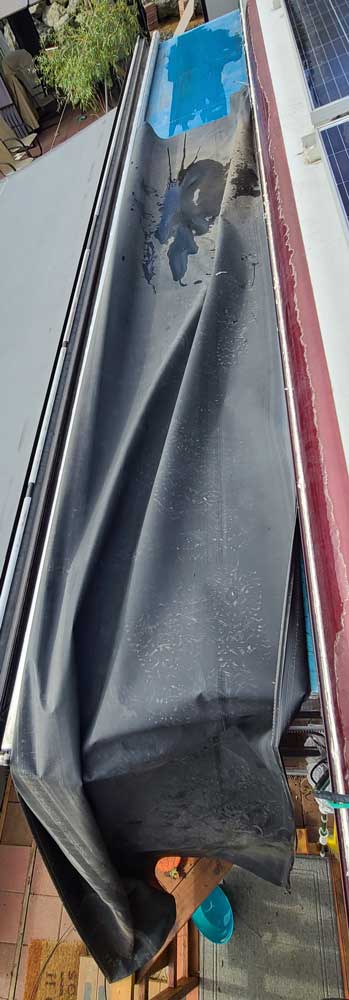 Tuesday, October 20, 2020:
Another work day on Mz Ruby. The door side slide topper
needs to be replaced. This isn't the first
topper I've replaced. Actually, when replacing the
first topper, I noticed this topper was also failing but
decided to wait until I returned to Oregon to do the work.
Today is the day. With the first topper, I had the help from
Ray. This time I thought I could do the job alone but I got
to the point of dragging the new topper into the tubes on
each side and realized it couldn't be done alone. My friend
George agreed to give me 30 minutes of his time. It's a good
thing because he has done this before too. I got to the
point of putting in the last couple of screws and it
wouldn't fit. George told me to roll the slide in a couple
inches, that worked. "So why didn't I think of that." George
answered, "Because I watched the experts do it." It took a
bit more of George's time than 30 minutes but we did finish
in less than an hour. I'm glad this job is over. The other
two toppers are much smaller so should be easier. The door
awning needs to be replaced too ... sometime. Tuesday, October 20, 2020:
Another work day on Mz Ruby. The door side slide topper
needs to be replaced. This isn't the first
topper I've replaced. Actually, when replacing the
first topper, I noticed this topper was also failing but
decided to wait until I returned to Oregon to do the work.
Today is the day. With the first topper, I had the help from
Ray. This time I thought I could do the job alone but I got
to the point of dragging the new topper into the tubes on
each side and realized it couldn't be done alone. My friend
George agreed to give me 30 minutes of his time. It's a good
thing because he has done this before too. I got to the
point of putting in the last couple of screws and it
wouldn't fit. George told me to roll the slide in a couple
inches, that worked. "So why didn't I think of that." George
answered, "Because I watched the experts do it." It took a
bit more of George's time than 30 minutes but we did finish
in less than an hour. I'm glad this job is over. The other
two toppers are much smaller so should be easier. The door
awning needs to be replaced too ... sometime. |
 |
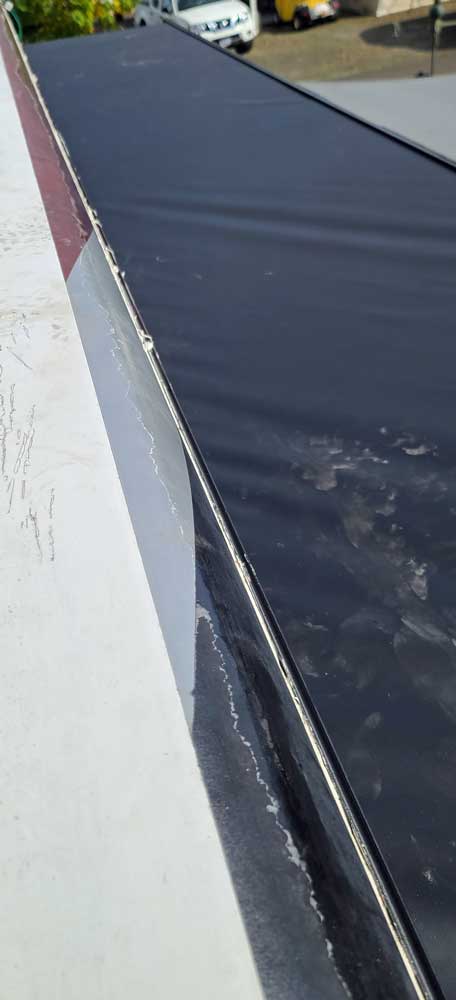 |
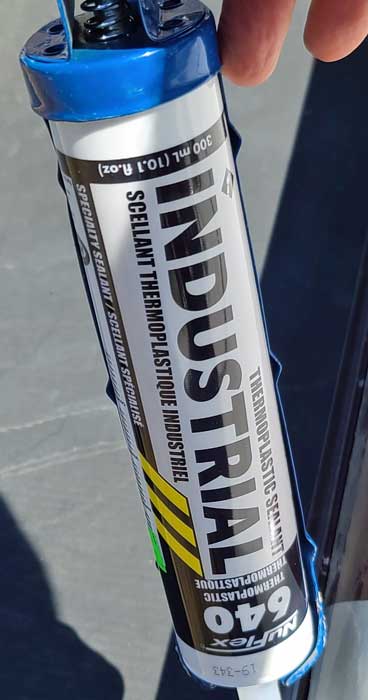
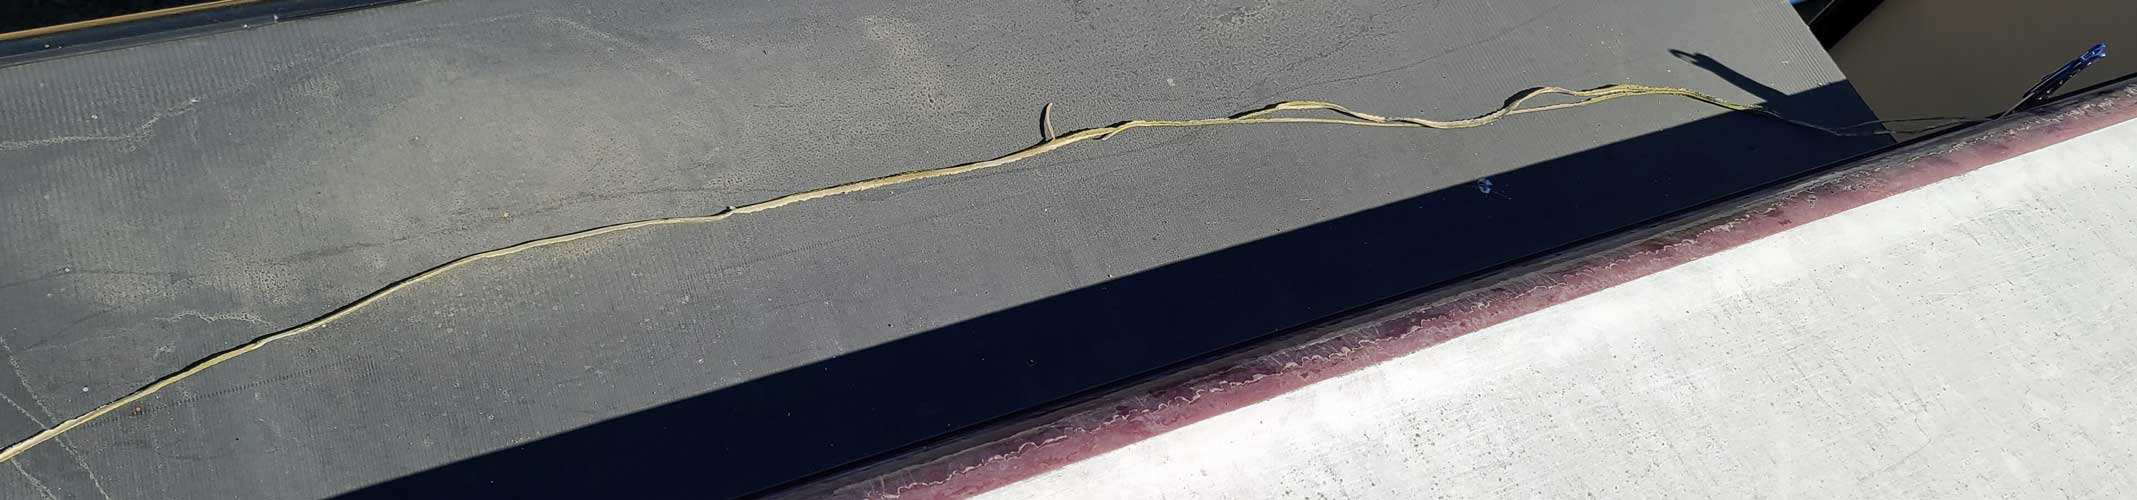
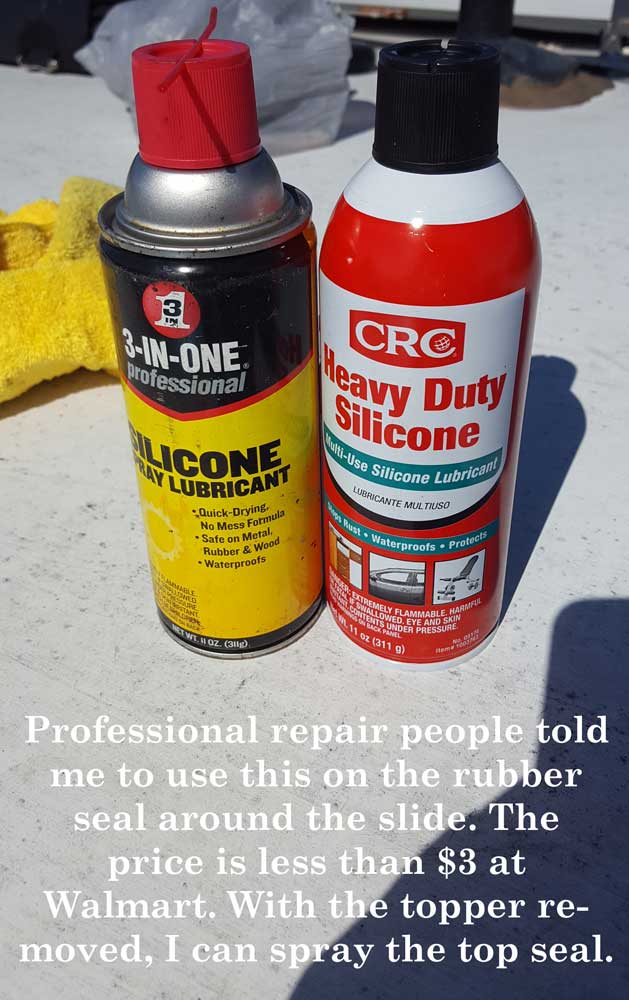
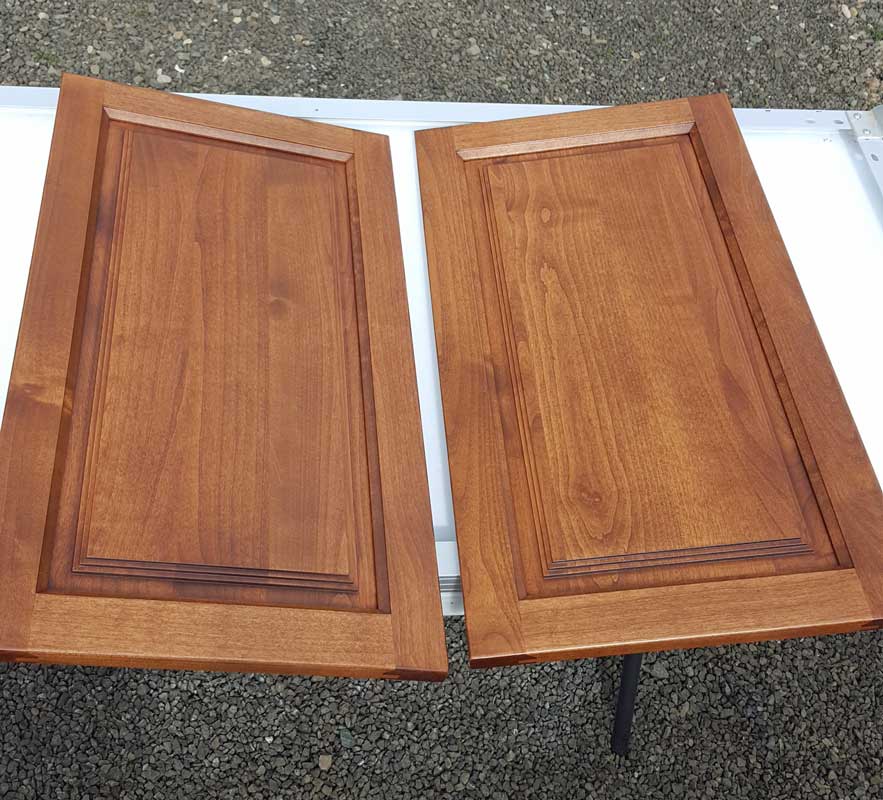
Thursday, August 27, 2020: Recently I watched a video on RV roof maintenance because our motorhome has a fiberglass roof, not a rubber roof like many RVs. I learned NOT to use Dicor, it is for rubber roofs. I also learned the products mentioned in the video above are not available in the USA. With research, I learned to use NuFlex 311 as the self-leveling sealer and NuFlex 640 as the sealer to the awning rail. The guys in the video above give a good demonstration of what to look for when inspecting a fiberglass roof and how to make the repair. I highly recommend watching that video before attempting the repair yourself. Removing the old caulk is not an easy job. If you can get a ribbon going so you just slowly pull this string of silicone caulk out of the channel you are lucky. There must be a special tool which makes it easy but I made due with a knife and gardening trowel. Here is a short video showing the fiberglass pulling away from the awning rail. Abby was not happy that she couldn't be on the roof with me. Click both photos for more views.
 |
 |
 |
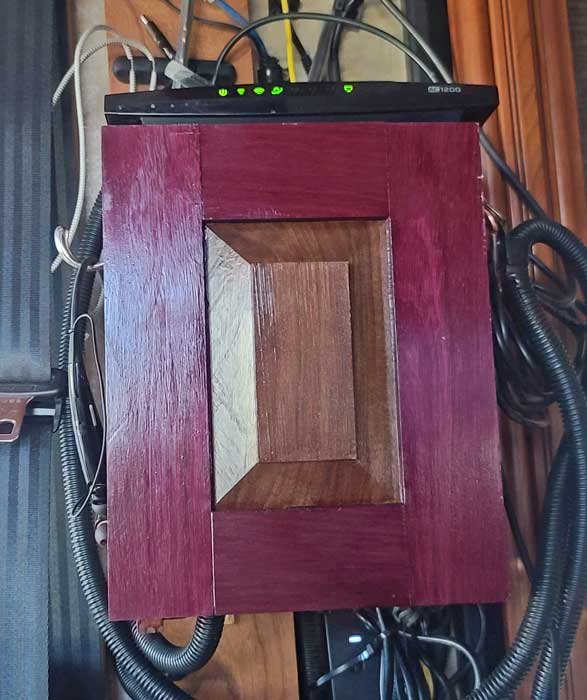
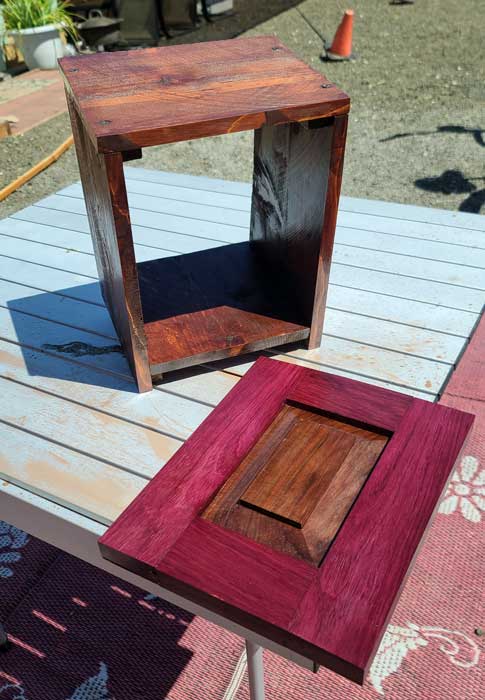
Thursday, August 13, 2020: Months ago while traveling I built a small cabinet of the cedar I had on hand. The cabinet was to hold electrical connections and the electronic gear which wouldn't fit anywhere else. It also helped to organize the wires. It was pretty crude because I had few woodworking tools to work with. Once at home base where I have more woodworking tools, I decided to keep the cabinet but hide how crude it is with a cabinet door. I happen to have some Purple Heart and a small piece of Walnut to use for this project. It took about three hours to make the parts for the door and glue it together. Then it took another three hours to finish and put two coats of polyurethane to bring out the colors in the wood. It's now back in the motorhome. There are still lots of wires but it looks better than it did yesterday. Click the photos for different views.

Wednesday, December 11, 2019: Our bedroom slide has always made a lot of noise in the wind. It sounds like the awning spring making the noise so I'm thinking it needs to be tighter. Using the lesson I learned in replacing the awning over the large living room slide, I decided to try tightening the bedroom awning spring. Each end has three screws. I removed one screw from each side which allowed the metal covering to drop. I cleaned out all the leaves and sticks inside the cover. Then I removed two more screws from the right side and the retaining screw/washer from the inside. That released the end cap. Since I had already blocked the spring tension using a screw driver there was no tension and the end cap popped off. I connected the locking pliers, took the tension off the screwdriver, removed the screwdriver and wound the spring much tighter. I inserted the screwdriver again, removed the locking pliers and replaced the end cap. After removing the screwdriver for the last time, I replace the cover. I ran the slide in and back out to tighten the awning. I hope this fixes the noisy awning. Click both photos for more views.
 |
 |
 |


Monday, November 18, 2019: Several weeks ago I noticed the Carefree slide topper on the largest slide had pulled away from the main motorhome body in the center of the topper. It was still attached at both ends due to the screws at each end. I couldn't order a replacement because I had no place to have it shipped. I learned of "Tough Tops" and watched their video showing how to replace the top. Watch the first half of that video and you will know how far I got today. The old top has been removed and thrown away. I ordered the replacement today and expect it to be delivered next week. We expect to be at The Lone Star Escapee Park long enough to receive the replacement and install it. Also, I want to spend some time on top of the slide resealing the seams and hydrating the rubber. The topper stops any maintenance opportunity. Click both photos for additional views.

Thursday, August 22, 2019: This has been a long and frustrating day. Our Kitchenaid refrigerator has been forming ice on the floor of the freezer for months and it was getting worse. I found this video which described how to fix the problem. To do a complete repair I needed accessed to the front AND back of the refrigerator. I knew getting the to back was going to be tough. I called Winnebago to learn how they had bolted it into the cabinet. The video and Winnebago instructions seemed do-able. I decided to do everything from the front end first they try to get to the back side. What I found once I got into the inside of the refrigerator was exactly what the repair video showed. I did everything they suggested which took about four hours. I then unbolted the refrigerator from the floor and back wall so we could move it. I had a small pry bar to lift the refrigerator but Gwen and I could not budge it. We discussed it and thought, "if we get this out, we must also put it back". We decided it was just too much for us. We are going to need help or more tools to move this refrigerator. I was hoping pouring boiling water down the clogged drain tube would clear the obstruction but no such luck. We expect to begin accumulating ice on the floor of the freezer again soon. We will simply continue to clear the ice until we get back to Oregon for more help and the right tools. It will be a simple fix once we have access to the back of the refrigerator but until then, we must deal with the problem. Click the photo to see the removal of the ice maker.

Sunday, August 11, 2019: We received two packages yesterday as "General Delivery" in the Spring Valley, Wisconsin Post Office. The first one was from eTrailer.com. It was a replacement motor for our MaxxAir ceiling exhaust fan. The current motor has stopped working. A fellow traveler on Facebook suggested it could be the control board but I diagnosed it as motor problem. I failed to wire the motor directly to DC to double check my diagnosis. After receiving the new motor, I DID wire the old motor directly to DC and learned it showed the same symptoms. The new motor, when wired directly to DC, works perfectly. Yeah! It IS the motor. So I installed the new motor and the fan works perfectly again. Click the photo to see fan parts hanging from the ceiling.
The second package is a Gazelle Bug House I ordered from Amazon taking the chance it would be delivered to this campground. The box should be at least five feet long so I figured it would be shipped by UPS. I gave them the street address of the campground. NOPE, they shipped via USPS. I checked with the host and NOPE, no USPS street delivery at the campground. I drove to the Spring Valley Post Office and checked with Bobbie, the postmaster. She told me Amazon would deliver to them at 6:30 am Saturday morning and the post office is open until 10:30 am. I told her I'd "be back". She was right, I got a text message from USPS tracking and from Amazon telling me the package was ready for pickup.
The Gazelle advertises a 45 second setup time so I made a video of my first time to set it up. I was impressed. I hope it is as easy to pack it away.
Saturday, July 27, 2019: It has been a busy week for me at the 50th Winnebago GNR (Grand National Rally). I'm right next to the factory so all the parts I need to replace are available. There are also vendors at the rally who have fixed the Atwood water heater and the MCD Windshield shade. I've also fixed the dash vent and the passenger chair broken cable. Here is what else I have done this week.
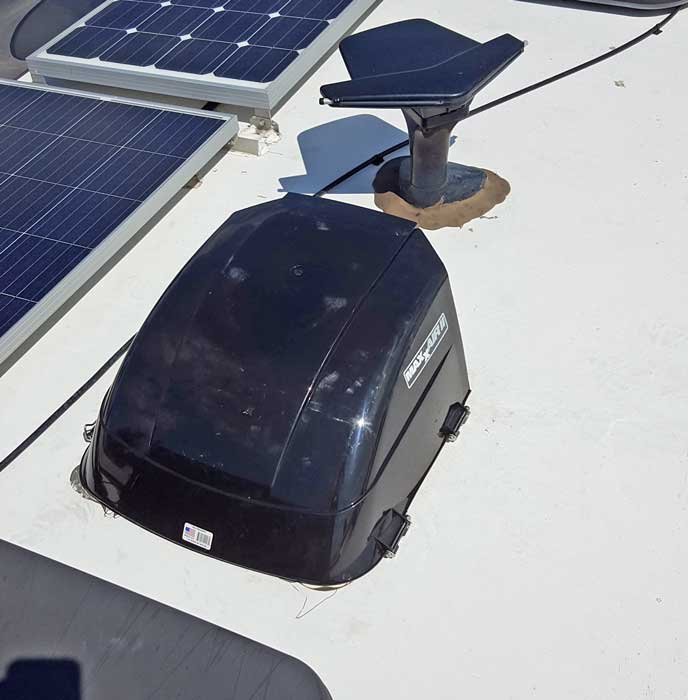
In the mid-west it can be raining but still hot enough to need the roof exhaust fan. Our high speed exhaust fan has a rain sensor which closed the lid if it is raining. We want it to stay open but still be safe from the rain so a cover is needed. I purchased and installed a cover this week. Click the photo.
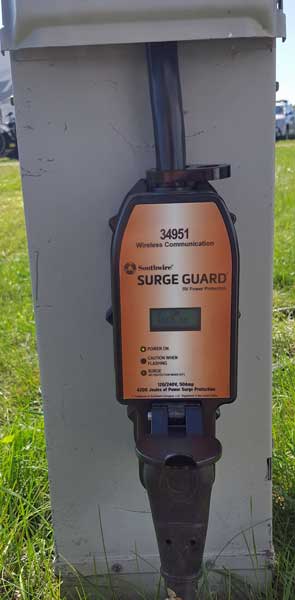 I learned an exterior
surge guard is needed to protect Mz Ruby from an electrical surge,
poor RV post wiring, and poor voltage caused by various problems.
Southwire had a show special in this one so I purchased and began
using it right away.
I learned an exterior
surge guard is needed to protect Mz Ruby from an electrical surge,
poor RV post wiring, and poor voltage caused by various problems.
Southwire had a show special in this one so I purchased and began
using it right away.
It's just a little thing, but one of the locking knobs was broken on the access door to the electrical hatch. Winnebago parts had a bag of two for only $1.60. I replaced the broken latch and have a spare in the case another latch breaks.

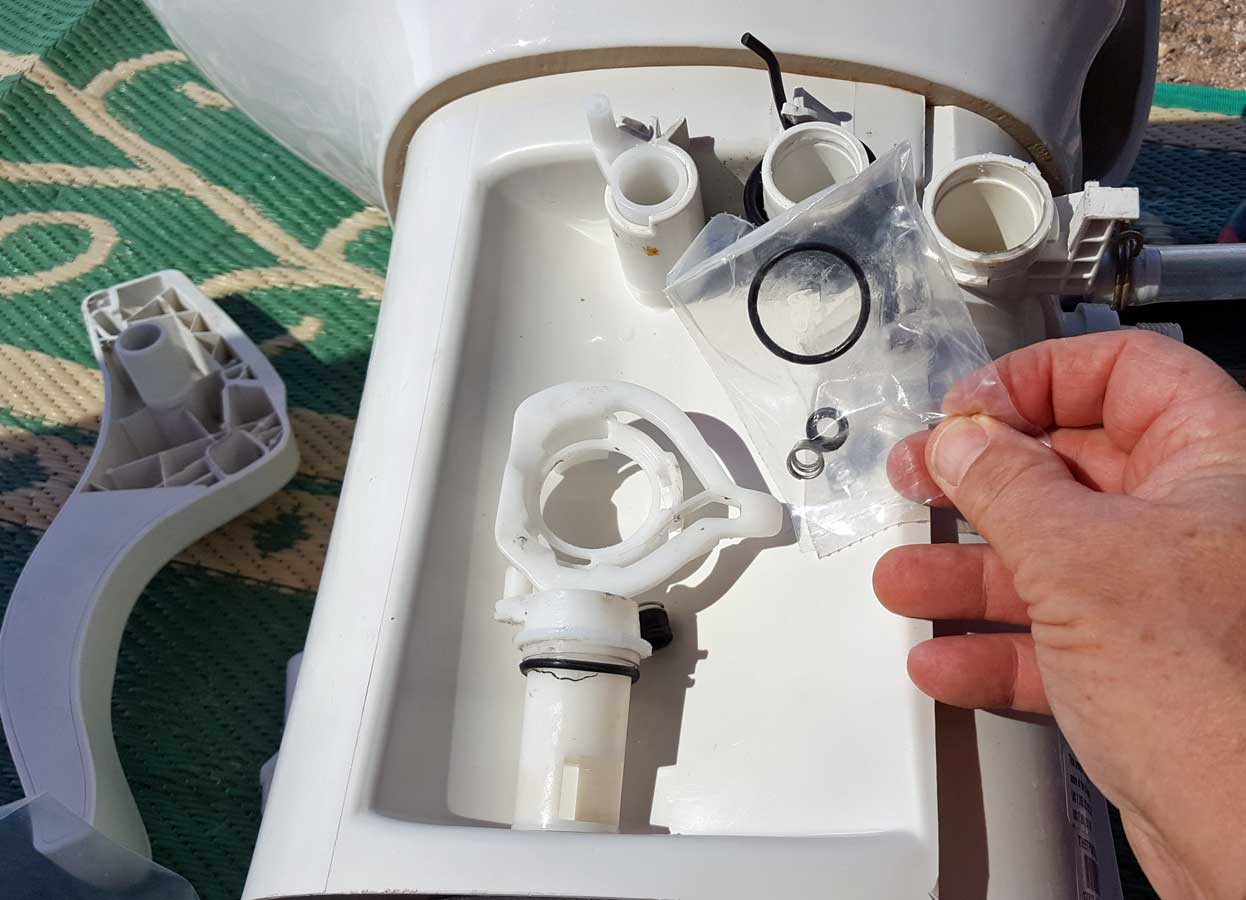
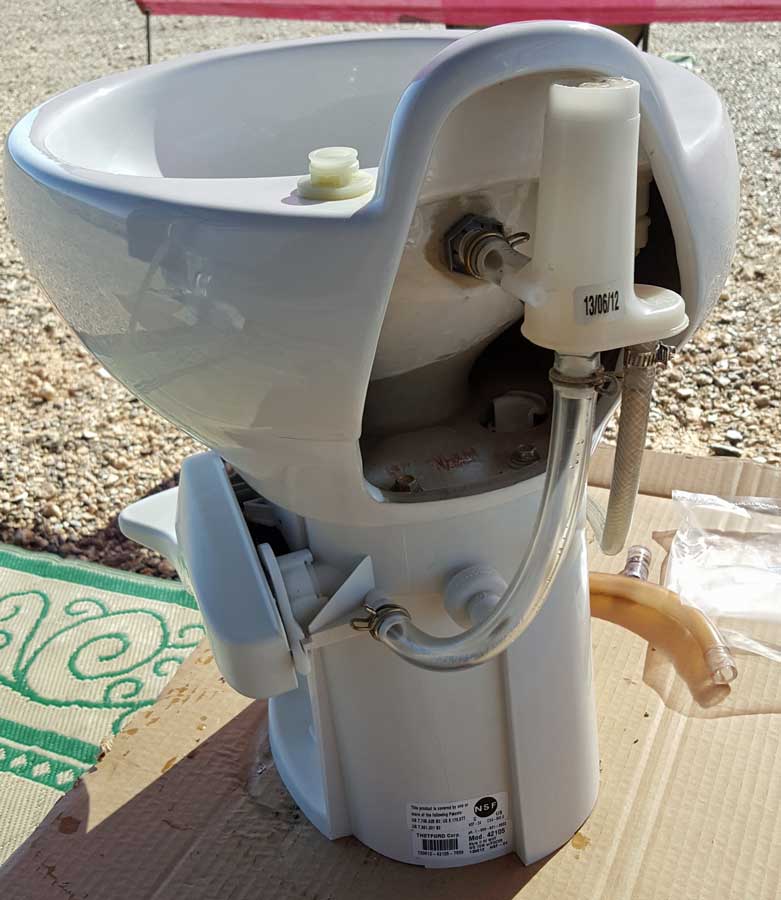
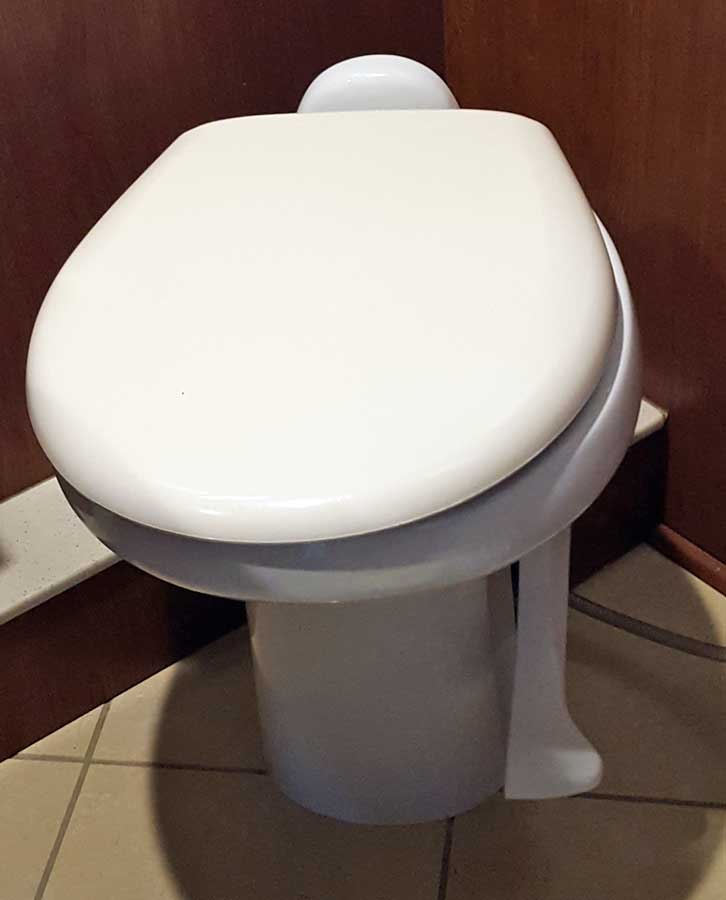
 We have been fighting
with the Mz Ruby toilet since we picked her up last fall. I've
replaced parts and removed the toilet three times. We chose to
replace it with an upgrade and start over. Gwen approves of the
new toilet. It will just take time to learn that the foot pedal is
now in front rather than the side.
We have been fighting
with the Mz Ruby toilet since we picked her up last fall. I've
replaced parts and removed the toilet three times. We chose to
replace it with an upgrade and start over. Gwen approves of the
new toilet. It will just take time to learn that the foot pedal is
now in front rather than the side.
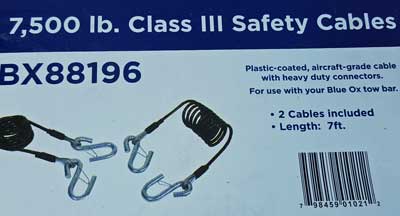
Finally, one of our safety cables broke. Blue Ox, the source for these cables is present at the rally. They sell the cables only as a pair so now I have one extra cable.
All of these fixes plus all the seminars I attended has made this a wonderful rally. We will be moving across the rally field tomorrow because I will be attending the Freightliner Camp. It is a two full day instruction of how to take care of the chassis for Mz Ruby. Winnebago lets us stay parked on the field with 50 amp connection without charge for this workshop.
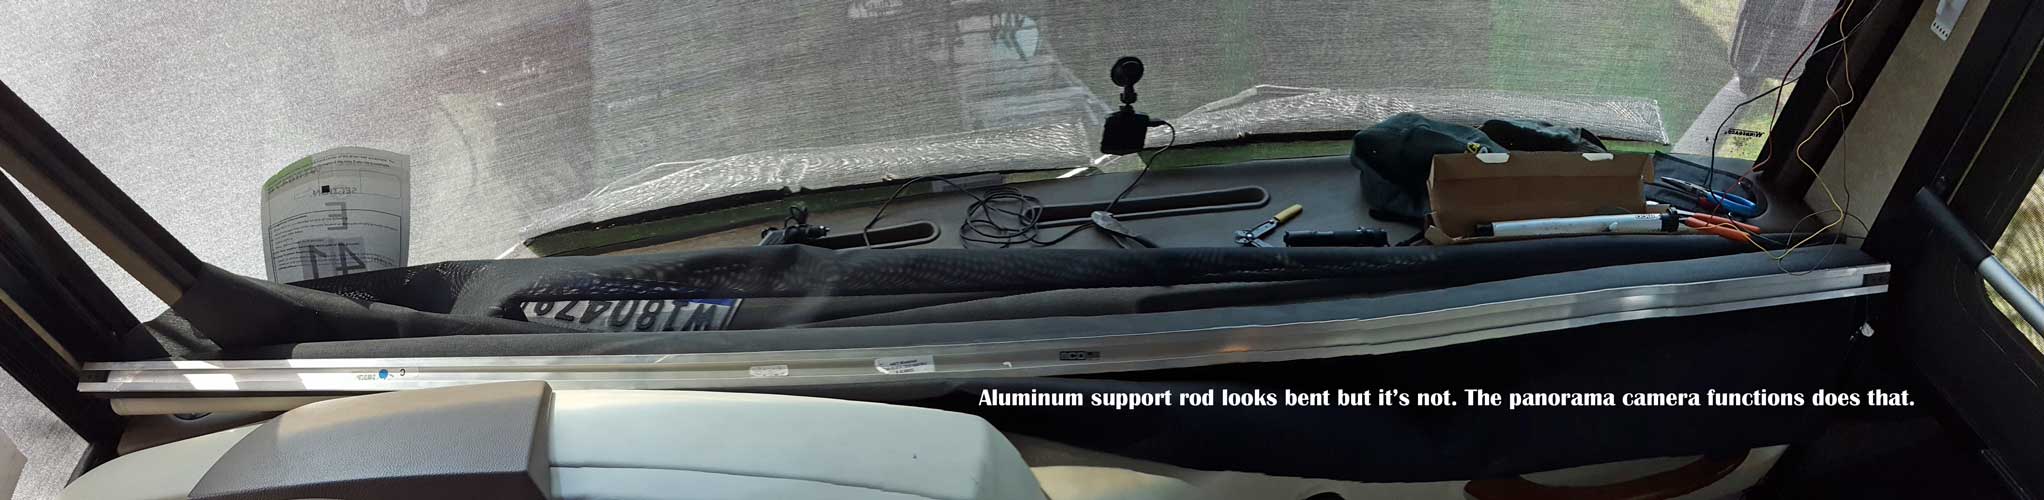
Friday, July 26, 2019: Calvin from MCD roller shades showed me how to replace the motor in our windshield solar screen. He left me with the motor and other parts I needed and promised to return if I needed help. I removed the shade from the windshield, click the photo, then quickly removed the old motor. I tested the rotation of the new motor before installing to make sure it rolled "UP" on the "UP" button. Once the new motor was inserted into the tube, it looked like I might need to make other changes so I called Calvin to ask questions. I decided to come back to check my work. In the meantime, I decided to get the shade back into location so he could check the operation. When he arrived, he approved of what I had done. He stayed and helped set the shade limits. It would have taken Gwen and I hours to figure out how to do that but he had it done in five minutes. It is wonderful to have the solar shade working for the first time. The fee for all the parts he gave me was nothing.
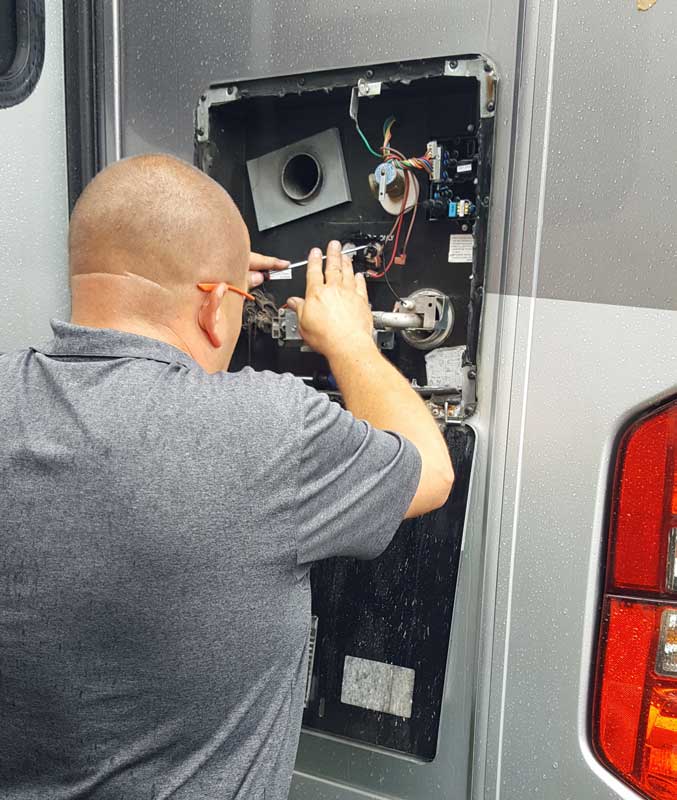
Thursday, July 25, 2019: While attending the Atwood hot water heater seminar at the GNR I learned that several of the circuit boards were defective. I wanted to make sure my circuit board was not one of them so asked that a service technician visit us. Randy showed up today at 3 pm. After testing the circuit board, he decided to change it. He also found other parts which were not performing well and replaced those too. The whole visit was thirty minutes and I got a rebuilt Atwood hot water heater. There was no fee and Randy felt the heater was now working perfectly. Thank you Randy and Atwood!
Click the photo for another view.
 |
 |
 |
 Thursday, July 18, 2019: While at
Winnebago in Forest City, Iowa I need to find the parts to make
repairs. The first is the lever to control the seat back on the
passenger seat. The lever has broken, so no back control. I was
hoping to replace the lever but the lever and cable is what is
sold. The new cable needs to be slightly longer, perhaps, with
time, it will stretch enough to make a better fit. Click the left
and right photos for more views of this repair.
Thursday, July 18, 2019: While at
Winnebago in Forest City, Iowa I need to find the parts to make
repairs. The first is the lever to control the seat back on the
passenger seat. The lever has broken, so no back control. I was
hoping to replace the lever but the lever and cable is what is
sold. The new cable needs to be slightly longer, perhaps, with
time, it will stretch enough to make a better fit. Click the left
and right photos for more views of this repair.
One of the dash vents is broken. It should be an easy replacement except the dash must be removed and I haven't figured out how to do that yet.
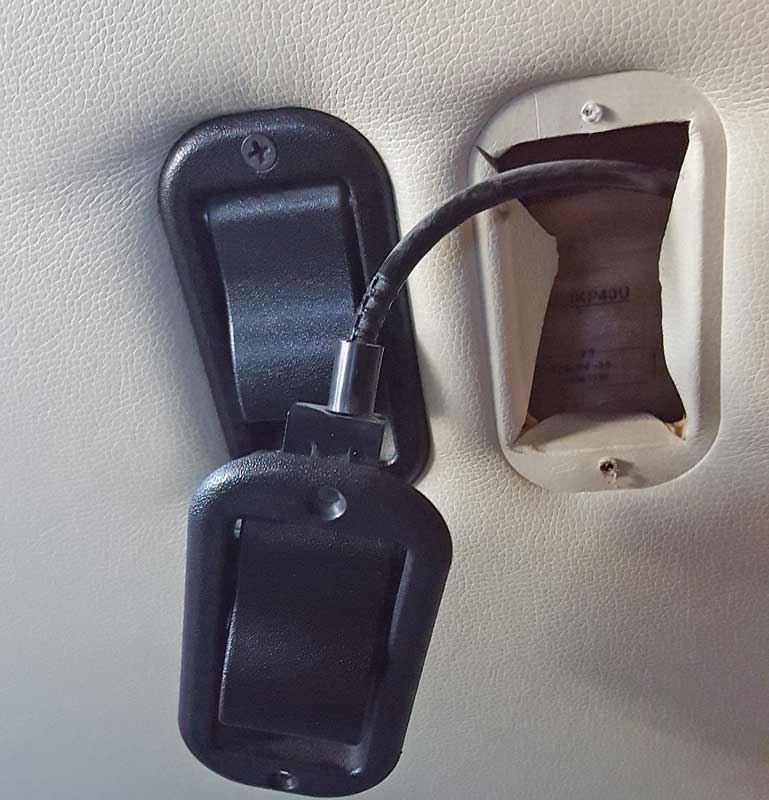
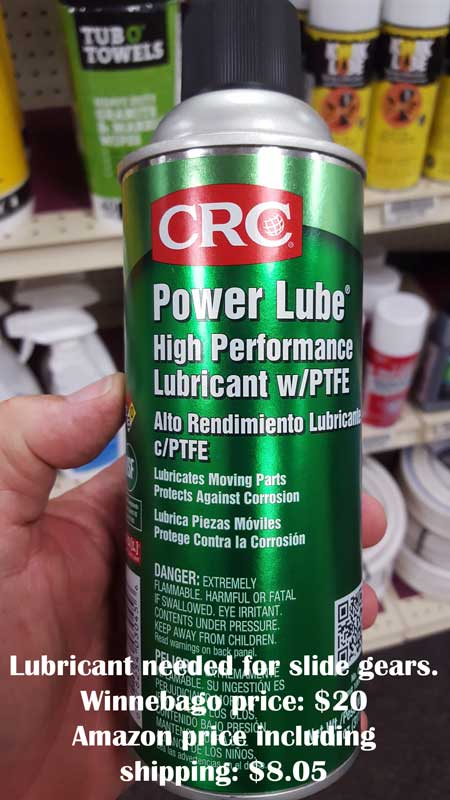
There is an metal elbow which should keep the entry door open. When the door is open, the "U" fits into the knob. It should fit tightly enough to keep the door open. There is a plastic ring around the knob to supply the tension to keep the door open. It is worn so no longer works. It might be best to replace the whole elbow. Click the elbow photo to see what Winnebago offered me. I will try a different repair.
Winnebago thinks a lot of their parts. Click the center photo above to see CRC lubricant. This lubricant is required for Lippert slide gears. Winnebago wants $20 for a can. I checked Amazon and found it for $8.05 including shipping. I can't trust Winnebago for prices on parts which might be available anywhere else.

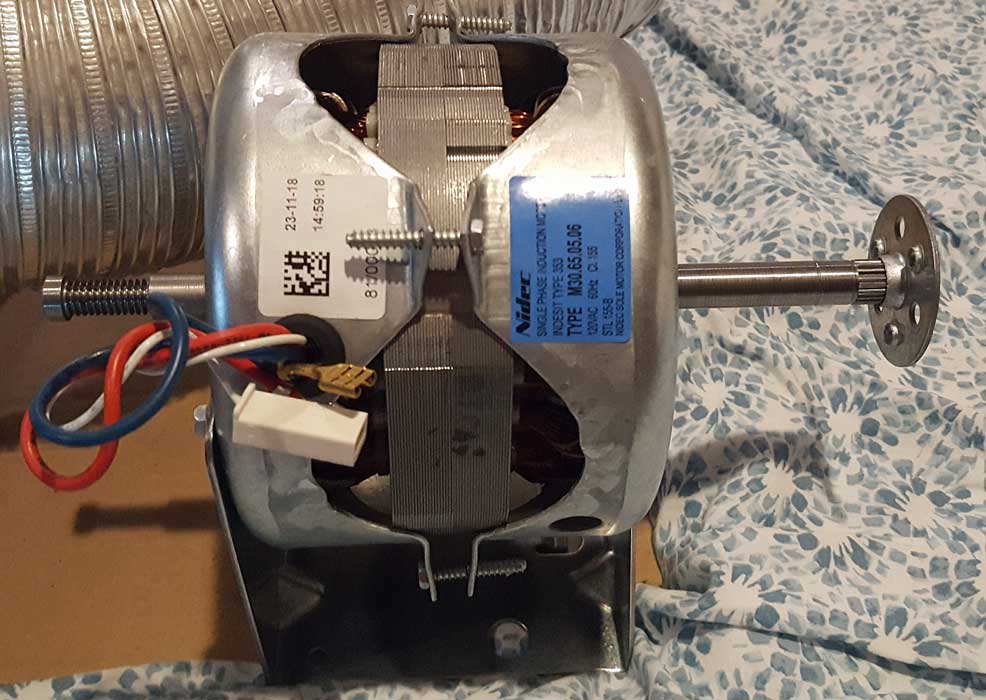
Sunday, June 16, 2019: We began our "next adventure" on June 13 going directly to the Splendide distributor and service center in Clackamas, Oregon. Our dryer was making a loud noise and had been since the day we took delivery back in October. Fortunately, Gwen put up with it until June 14 when Mike and Chad diagnosed the problem then made the repair. The problem was the motor bearings. Apparently it is not possible to just change the bearings or if it is, the labor to do so would be more than replacing the whole motor. We were told the problem is a tension belt around the drum puts sideways pressure on the motor shaft. Eventually the bearings begin making the noise we were hearing. Chad suggested it would happen again in time and the practice is to put up with the noise until you can't stand it any more, then change the motor again. Hopefully only once each five years since the dryer is five years old. It took the two workmen exactly an hour to remove the dryer, remove and replace the motor, then reinstall the dryer. The fee was $85/hour for labor (two workmen for $85) plus $170 for the motor. Seeing how much labor was involved, I was glad to pay the $85 for labor. Additionally, a special tool is needed to replace the drum belt around the motor arbor. Chad said the most difficult part of the job is removing the dryer vent hose. So I did that before they arrived to make the dryer repair and I replaced the dryer vent hose once they were finished. Click both photos for additional pictures.

Wednesday, May 29, 2019: OK, I must admit to an embarrassing mistake. I made assumptions about this new combiner module which were incorrect. I believed one side was for positive and the other for negative and the red strip marked positive side. I thought this without checking (big mistake). NOPE! Each of the ten connections is linked across to the opposite side (a surprise) also the red bar did not indicate the positive side, instead, it was a long connector bar to connect the modules along a side. That means the positive lines can be connected on both sides of the two bars and the negative on both sides as well. The red strip had to be cut in half to link the positives and negatives. So, four lines are connected to the negative on the right (yes one red is a negative because I needed the MC4 connector on the other end). The small red line on the bottom and all three lines on the top are positives (yes, one of those is black because the combiner box is so close to that panel I went directly from the panel to the combiner box). After three days of no sun and then when sun arrives, it's not working. That got me on the roof again where I took my volt-ohm meter and found the problem. Don't tell anyone what an idiot I was! Oh, I was expecting 38 volts but saw 40.5 volts (because of the wiring in series), that's OK with me. Click to enlarge the photo.

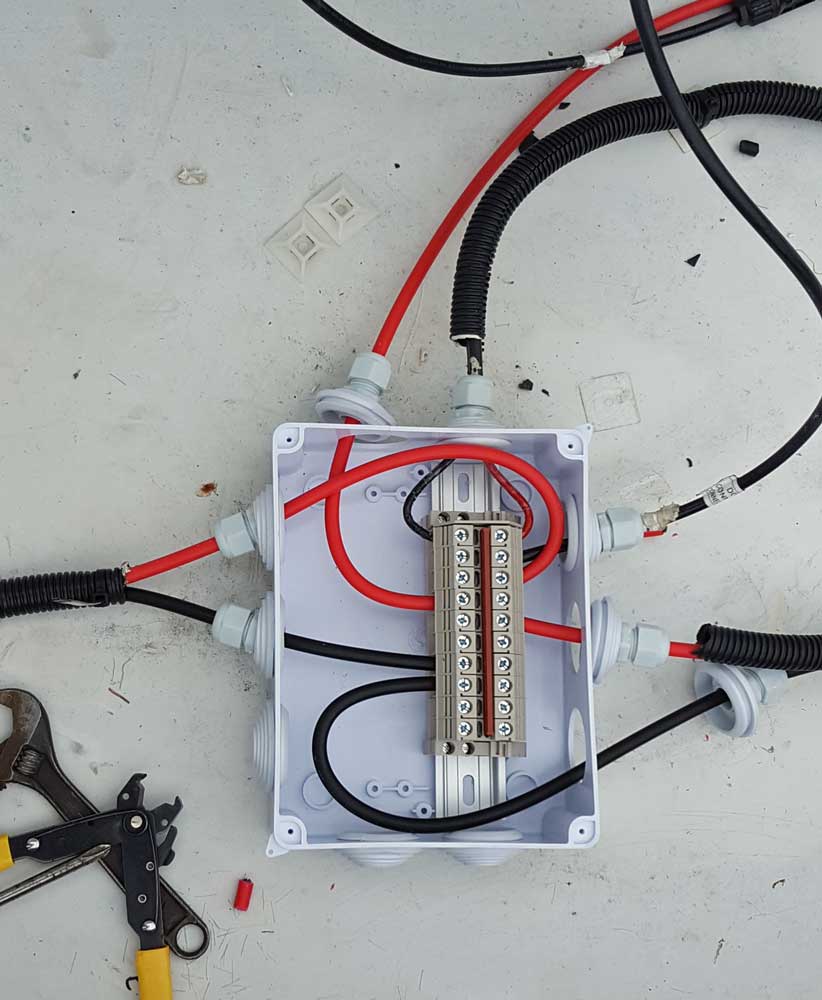
Sunday, May 26, 2019: Today was the final day for solar assembly and wiring of the new panels. I had considered making my own combiner box as I did with Miss Dory. I also did a combiner box when I first wired this solar charging system. This time I decided I wanted something a little cleaner so I ordered some parts off Amazon to make a more professional box. If you click on the combiner box you will see more wires coming into the box. Don't worry about red wires on both sides of the box. I ran short on MC4 connectors so had to use what I had. I was careful to be sure positive and negative wires were connected correctly. Of course a professional would never do this but they have an endless supply of MC4 connectors.
I learned from my friend Gary how to use the MC4 connectors and the crimping tool to assemble them. Click the crimping tool to see the MC4 tighteners.
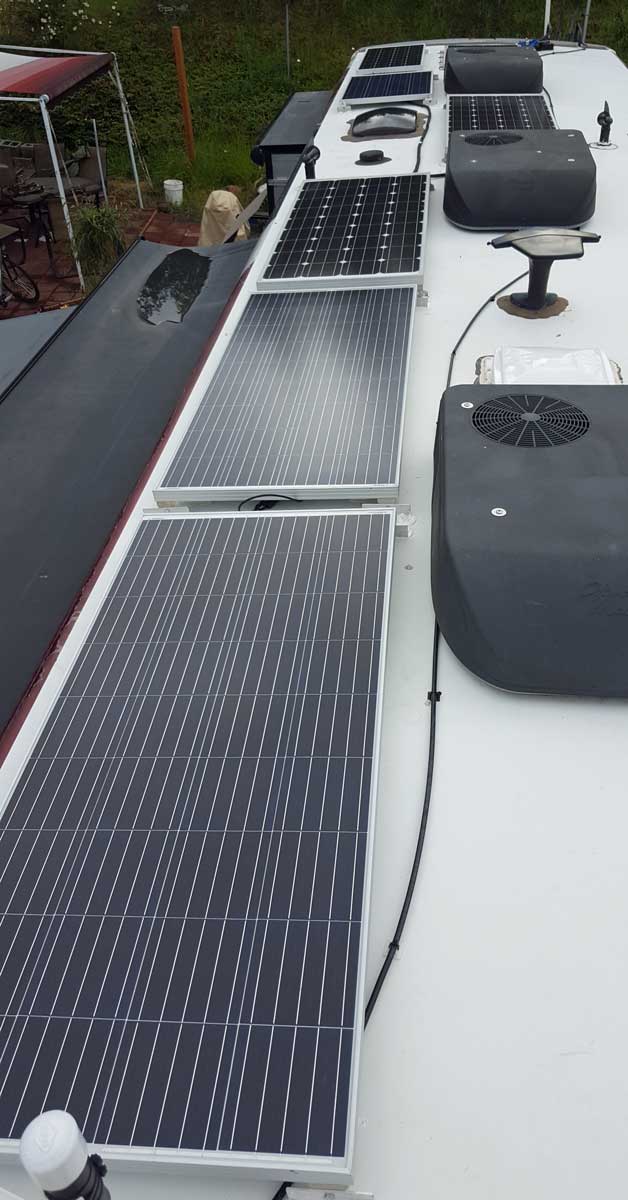 This makes the solar installation much easier
and more professional. My friend Stan helped me hoist the two new
panels to the roof yesterday. All panels are tilted up to make the
wiring easier. I'm also making sure they will tilt for the winter
sun in Arizona. When Stan and his wife walked by today they
commented on the panels since they are all tilted. They wanted to
know if the panels had been wired yet. I told them, when they see
all panels down, that will indicate they have been wired. Click
this photo for all panels now down. I'm off the roof now,
hopefully until fall. There was zero sun today so no way to learn
if the system is working.
This makes the solar installation much easier
and more professional. My friend Stan helped me hoist the two new
panels to the roof yesterday. All panels are tilted up to make the
wiring easier. I'm also making sure they will tilt for the winter
sun in Arizona. When Stan and his wife walked by today they
commented on the panels since they are all tilted. They wanted to
know if the panels had been wired yet. I told them, when they see
all panels down, that will indicate they have been wired. Click
this photo for all panels now down. I'm off the roof now,
hopefully until fall. There was zero sun today so no way to learn
if the system is working.
I now have four 160 watt panels rated at 8.9 amps each plus two 100 watt panels rated at 5.5 amps each. In direct sunlight I should show 46.6 amps charging the batteries minus whatever the refrigerator is taking when it is on. Earlier this year I saw as much as a 6 amp boost due to "edge of cloud" effect. I figure there may be as much as 10 amps edge of cloud effect after adding the two new panels giving a total of 56.6 amps. The new charge controller is rated at 60 amps, chosen to handle the maximum charge to the batteries.
We will be leaving home base on June 12 and not returning until mid-May next year. At least 80% of our travels will be off-grid so we will be depending upon the solar charging system for much of our power.
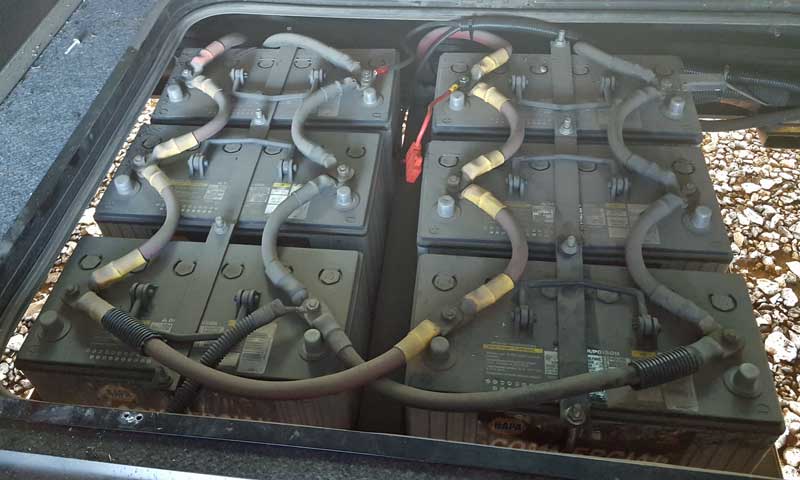
In addition to my six panels charging the six house batteries, Winnebago installed one 100 watt panel in the rear charging the two chassis batteries. That panel acts like a trickle charger keeping those two batteries healthy.
It has been ten years since I installed my first solar charging system. I have had a solar charging system on every RV since that first one. That would be the Alumascape bumper pull, Lazy Daze Class C, Miss Dory Class A, and now Mz Ruby Class A.
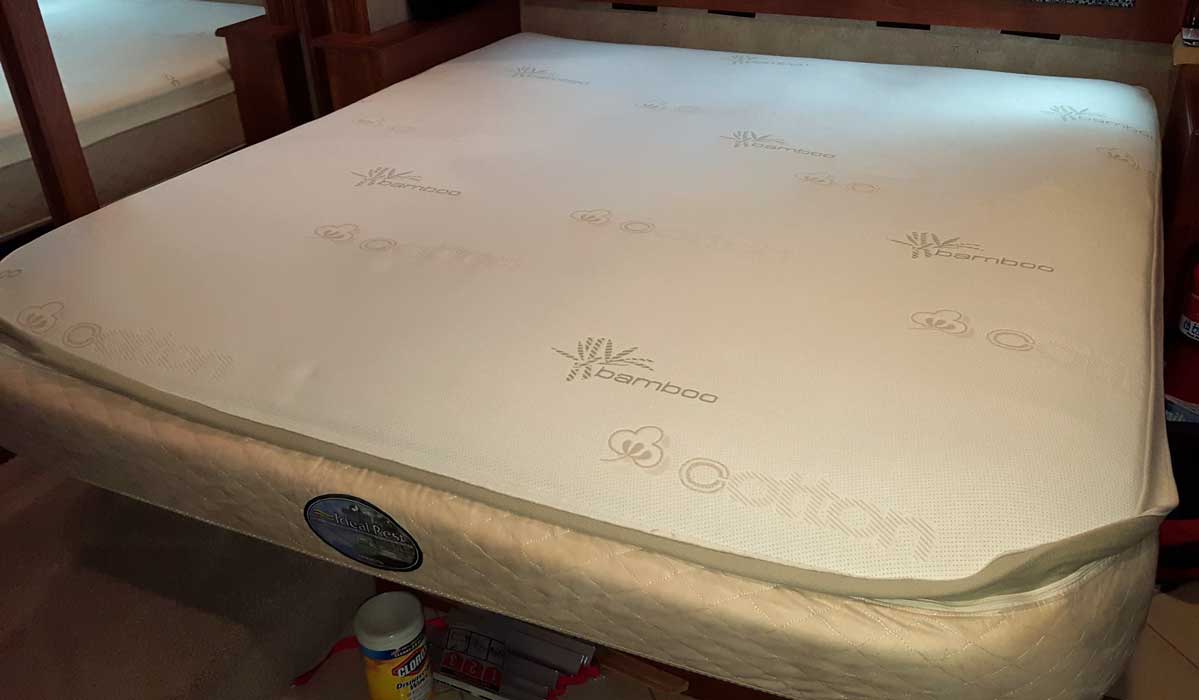
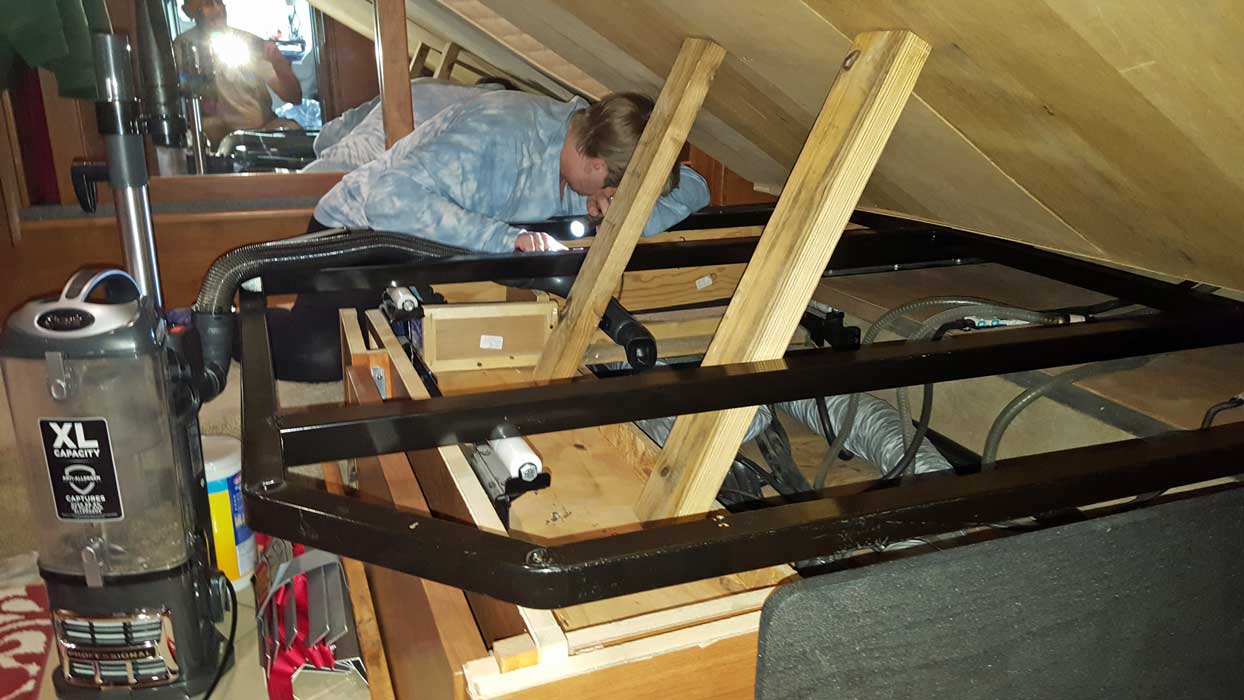
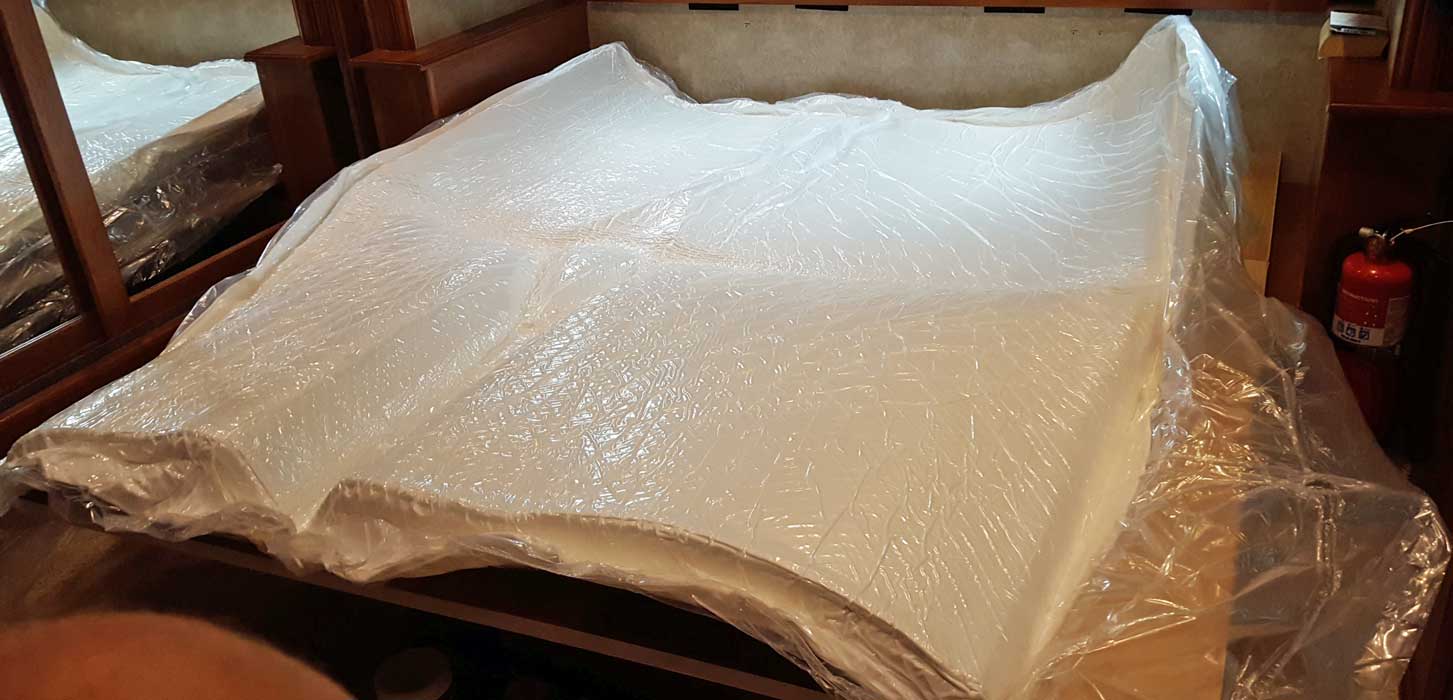 Saturday,
May 25, 2019: A $1200 option for Mz Ruby was the "Sleep Number Bed",
Mike and Mary ordered it and paid for it. We thought we would like
it but Gwen was not happy with this mattress and I was indifferent
so we chose to get a mattress much like the mattress we bought for
Miss Dory. That meant getting rid of the "Sleep Number Mattress". I
first put an announcement in our mailroom for the others in the park
to take notice. But no calls for the mattress. I put a notice in
Facebook Marketplace and within 3 minutes had my first inquiry. She
promised to come look at the mattress at 4 pm so I told her I'd hold
it for her. I NEVER do that because people often never show up. I
took three more people of interest before turning the Facebook
announcement to "Pending Sale". During the waiting time, I took a
call from someone in the park who was interested. No one showed up
at 4 pm so I sent a message telling her she had until 4:30 to
contact me. Nothing happened so I called the person in the park and
they wanted the mattress. Our new mattress arrived today. It
promises to be exactly what Gwen likes and felt very comfortable to
me too. Our first night will be tonight. Click all the photos for
more views.
Saturday,
May 25, 2019: A $1200 option for Mz Ruby was the "Sleep Number Bed",
Mike and Mary ordered it and paid for it. We thought we would like
it but Gwen was not happy with this mattress and I was indifferent
so we chose to get a mattress much like the mattress we bought for
Miss Dory. That meant getting rid of the "Sleep Number Mattress". I
first put an announcement in our mailroom for the others in the park
to take notice. But no calls for the mattress. I put a notice in
Facebook Marketplace and within 3 minutes had my first inquiry. She
promised to come look at the mattress at 4 pm so I told her I'd hold
it for her. I NEVER do that because people often never show up. I
took three more people of interest before turning the Facebook
announcement to "Pending Sale". During the waiting time, I took a
call from someone in the park who was interested. No one showed up
at 4 pm so I sent a message telling her she had until 4:30 to
contact me. Nothing happened so I called the person in the park and
they wanted the mattress. Our new mattress arrived today. It
promises to be exactly what Gwen likes and felt very comfortable to
me too. Our first night will be tonight. Click all the photos for
more views. 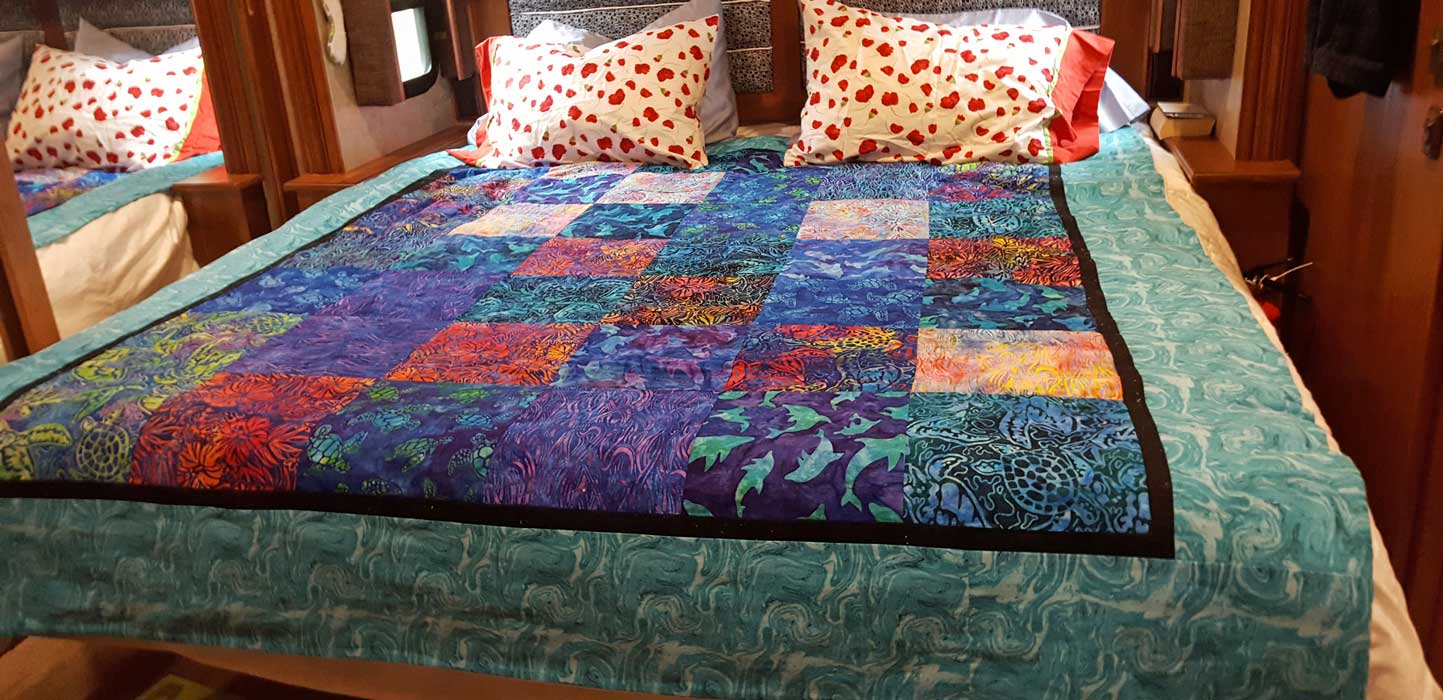
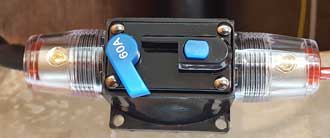
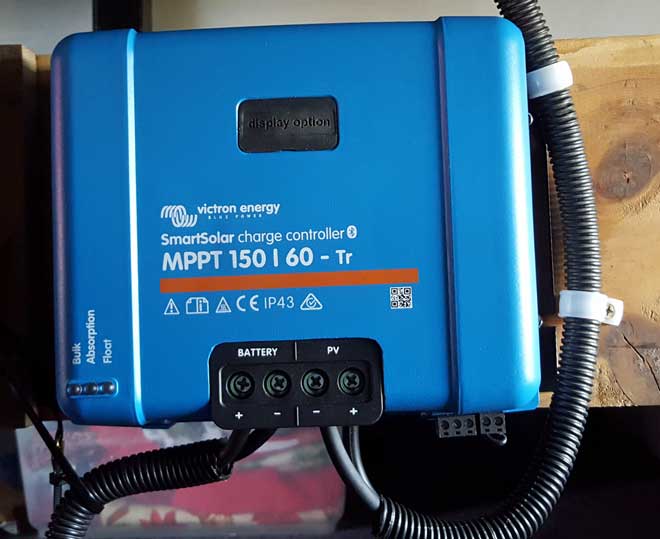
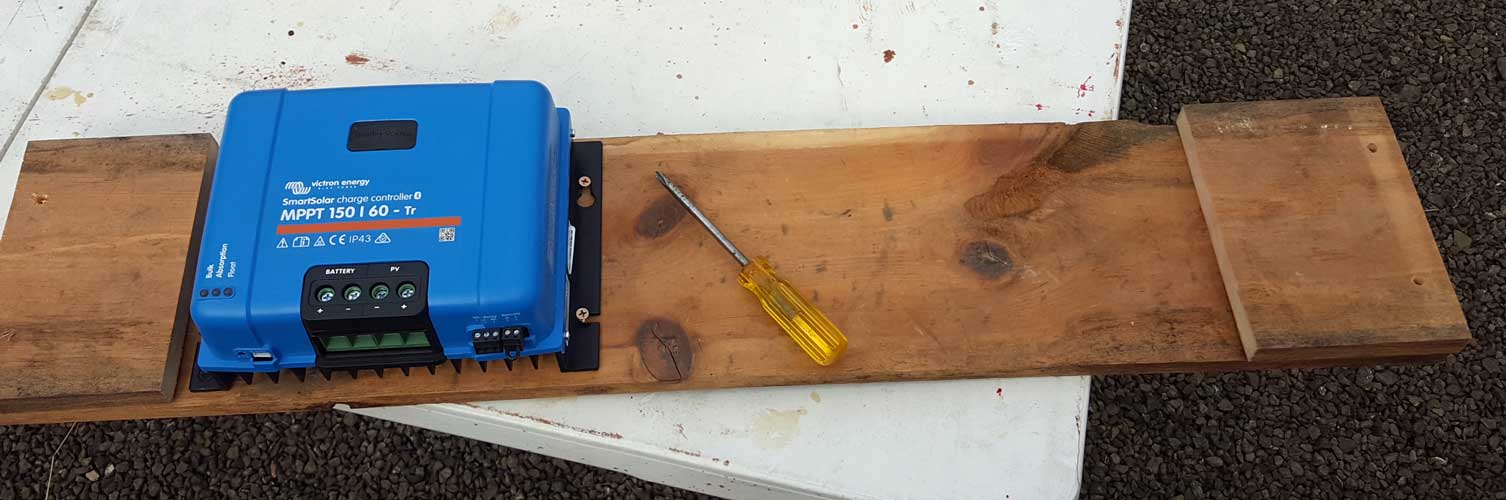
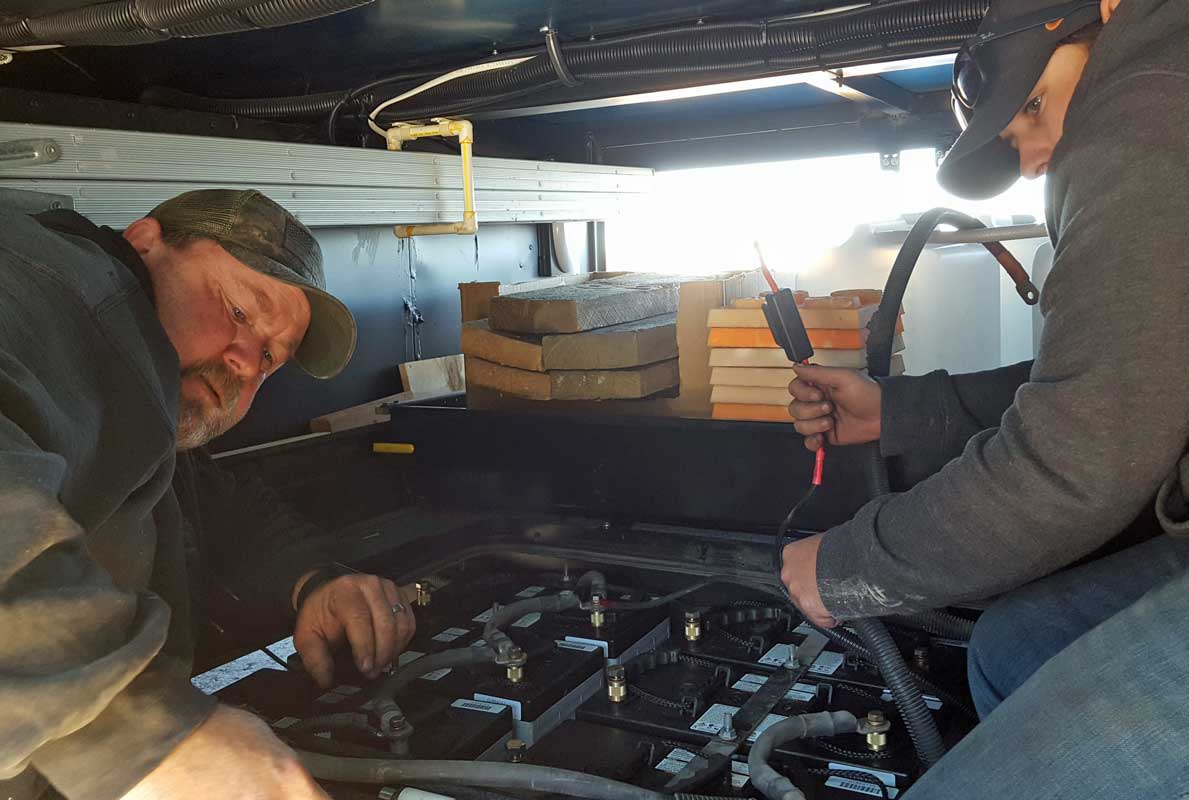
Friday, May 24, 2019: The new charge controller is now wired and the circuit breaker between the panels and charge controller is installed and switched off. Logan from Northern Arizona Wind and Sun reminded me that I should have the charge controller as close to the batteries as possible without being in the same compartment. I bought the batteries and Victron from Logan. So the charge controller is in the main hatch only four feet from the batteries. This is not a convenient location but this controller is monitored and controlled by Bluetooth from my smart phone making it handy. I will wire the panels next, then turn on the circuit breaker and hope for the best. The panels must be wired in a combination of series and parallel to increase the voltage to 38 volts to the charge controller.
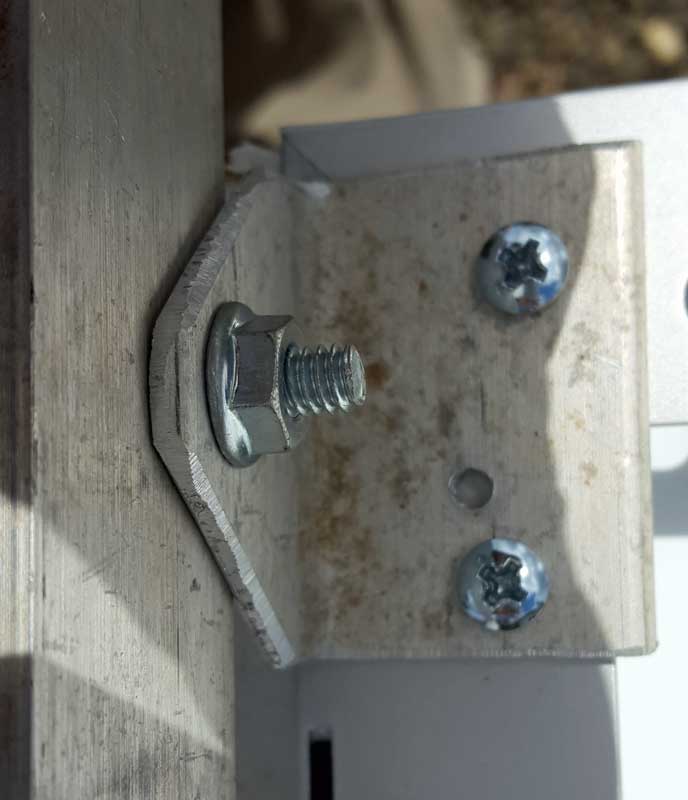
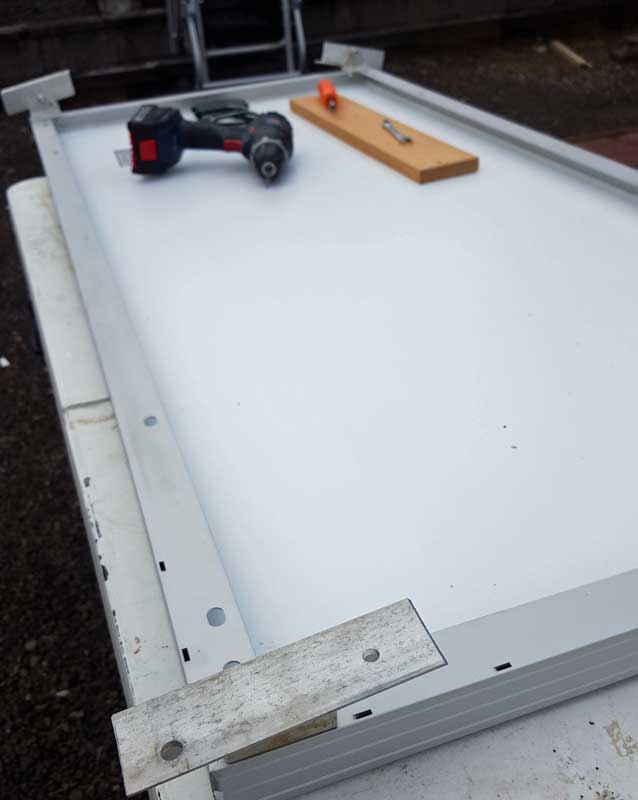
Wednesday, May 22, 2019: Continuing with solar installation today. The brackets are mounted to the new solar panels. I've purchased two more 160 watt panels. The optimum current output of the six panels will be 46.2 amps with edge of cloud effect adding as much as 10 amps. The charge controller is a 60 amp controller so large enough to handle the load.
On the side which hinges so the panels can point at the sun in the winter months, I have installed nylon lock nuts. On the opposite side I use flange nuts because they are easy to tighten and loosen with one wrench. The 3/16" nuts used to secure the bracket to the panel use nylon lock nuts.
The board on the left was used to insure I did not hit the surface of the solar panel if the bit breaks through the aluminum frame suddenly.

Sunday, May 19, 2019: After much discussion we have decided to increase the amount of solar. I installed the system which worked for the Dolphin onto Mz Ruby while in Ehrenberg, Arizona. That system had a maximum output of 30 amps from the four panels. The problem is, when the refrigerator turns on it takes as much as 16 amps which means those 16 amps are not going into battery storage so it was rare for us to get a full charge to the batteries. I'm adding another two panels which will add 19 amps to the system. My current charge controller is a 30 amp controller which meant buying a new charge controller. Because the new charge controller is an MPPT controller I must wire the panels in three groups of series then parallel to the controller. This increases the voltage to the controller to 38 volts. It also means rewiring the entire system. I completed part of that wiring today and also made two new sets of panel mounts. It is much easier to do this project at home base rather than the desert of Arizona because I have more power tools at home base. I've made a shopping list of items I still need to complete this project so off to the hardware store tomorrow. Click these two photos for more views.
 |
 |
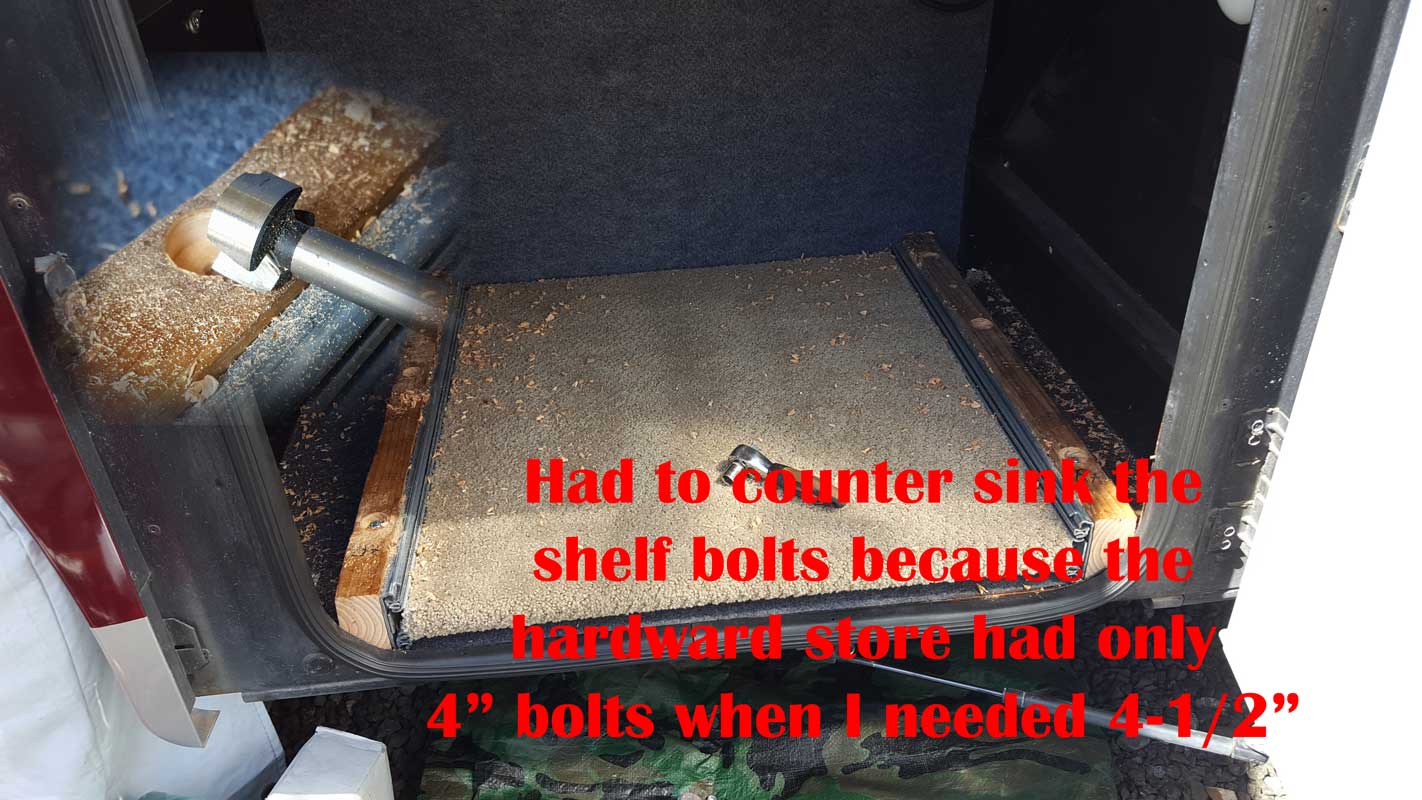 |

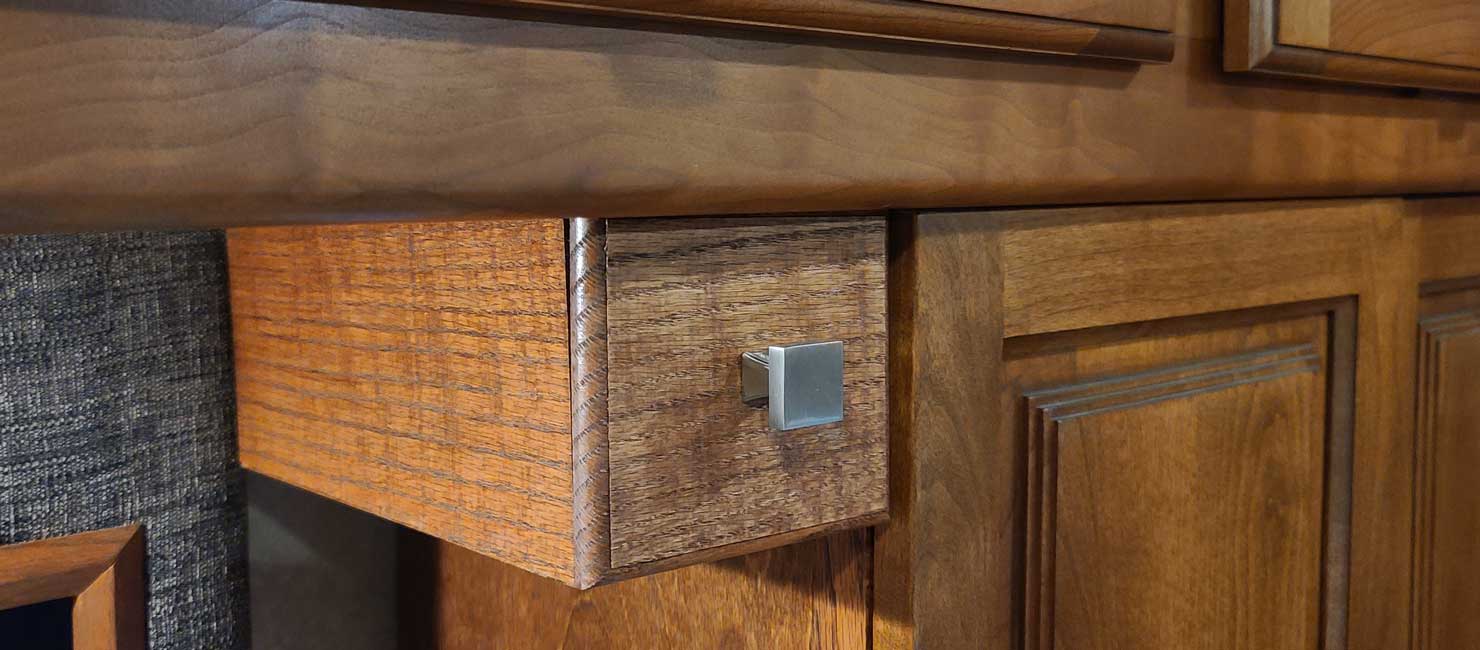
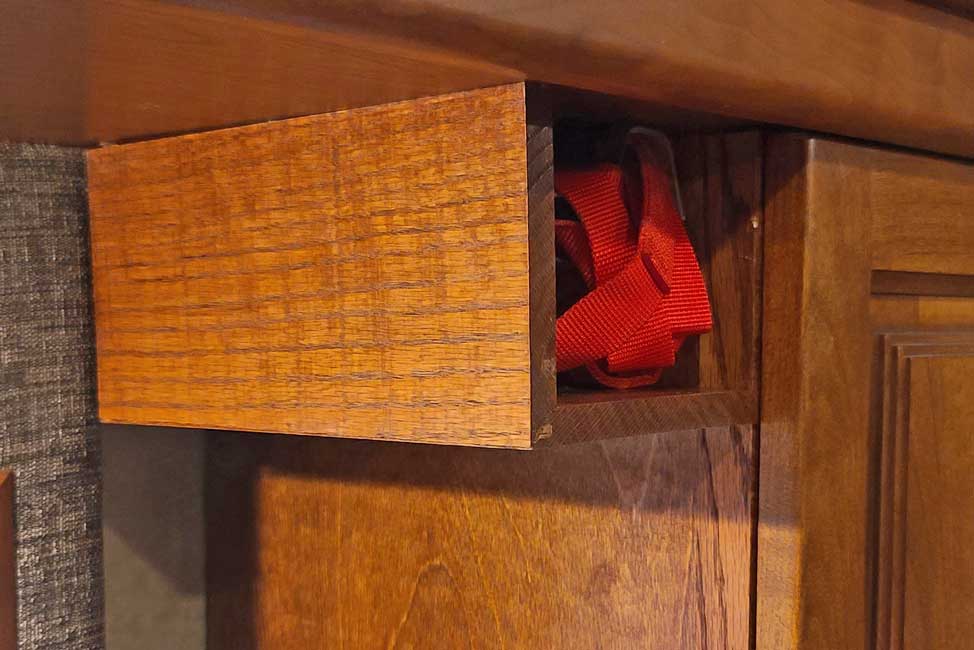
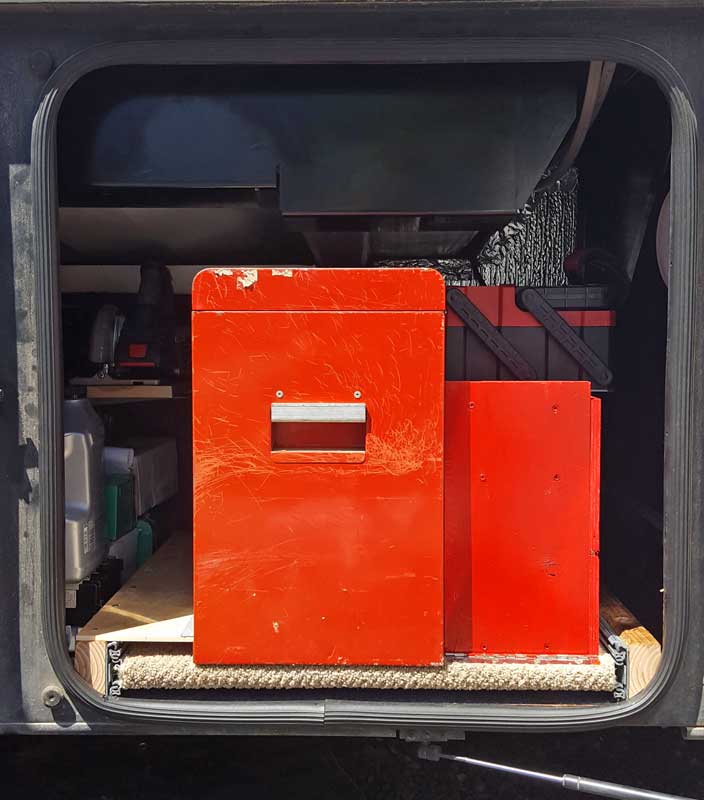
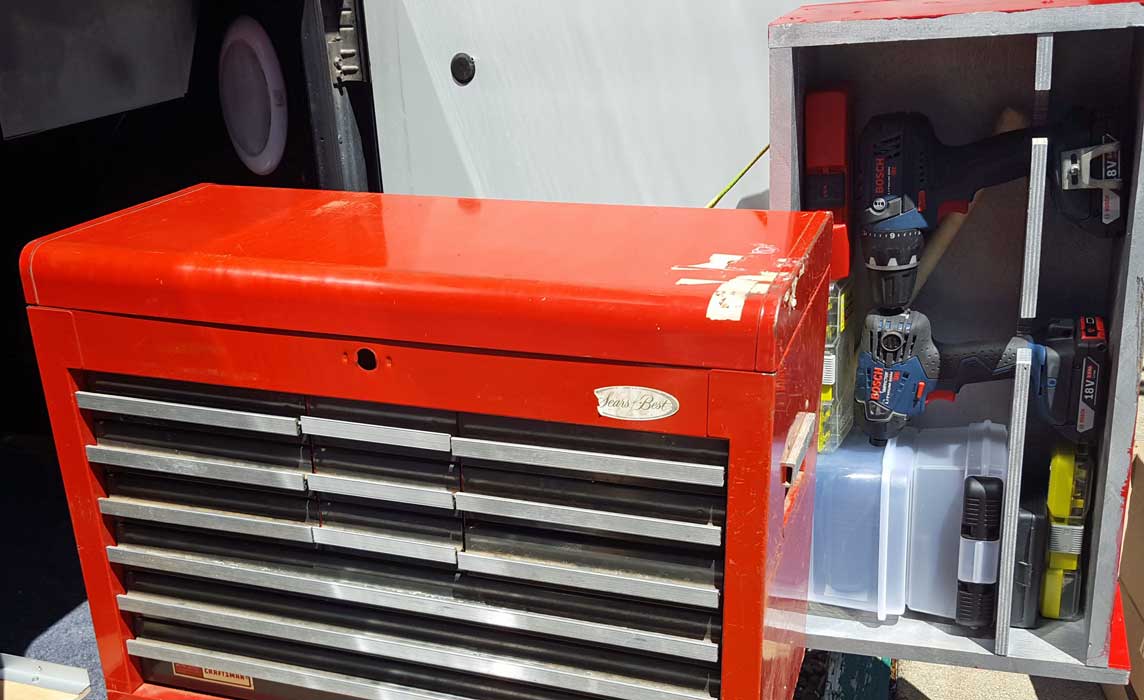
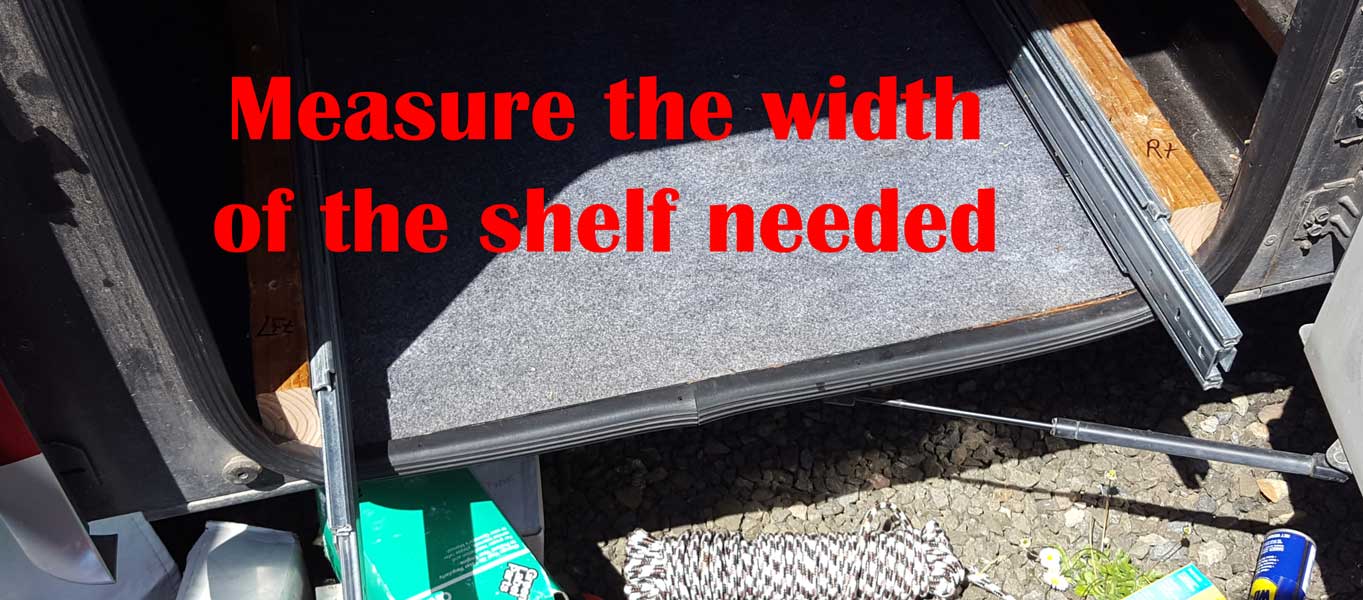
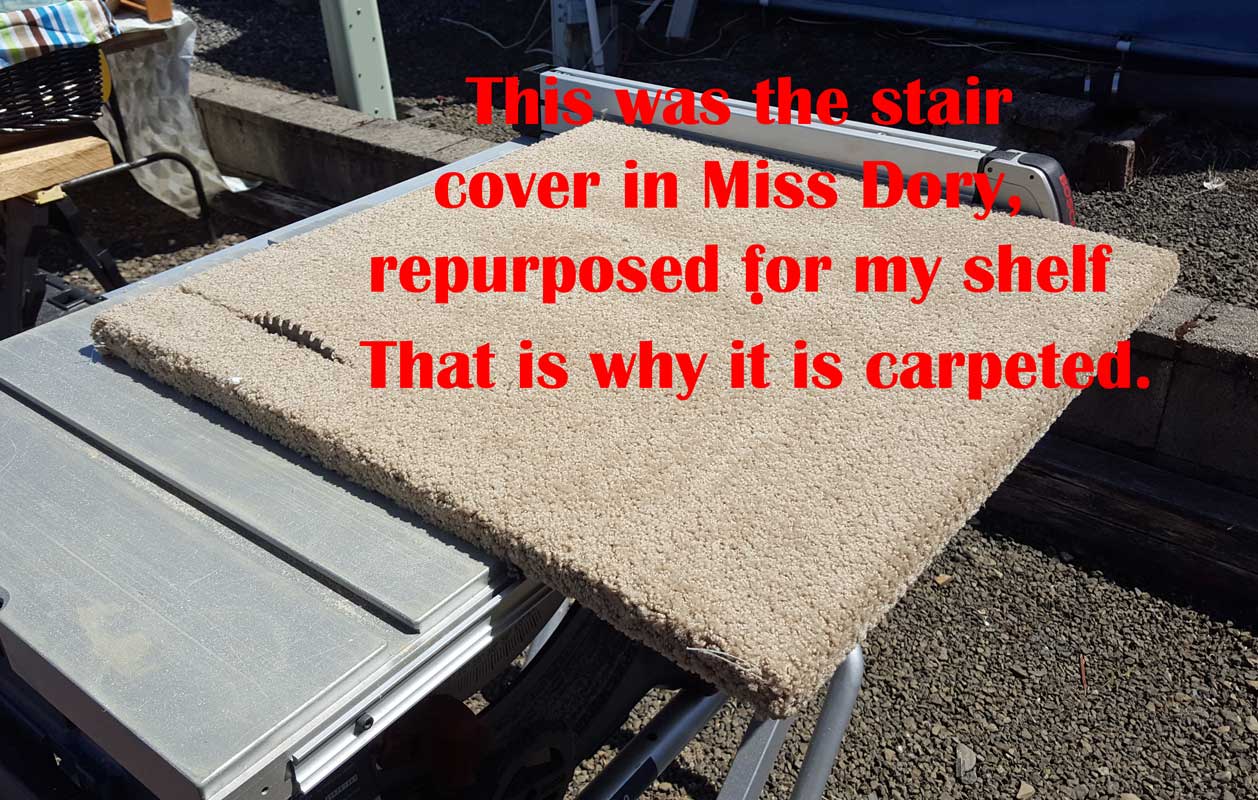
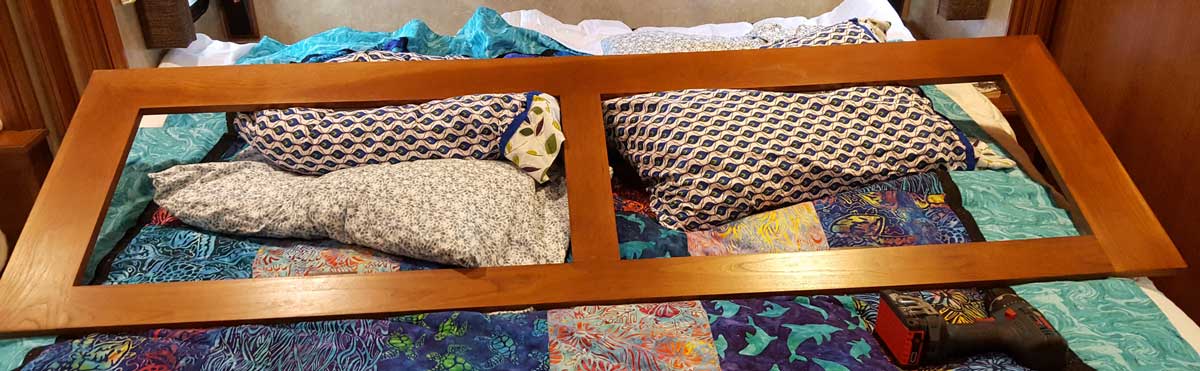
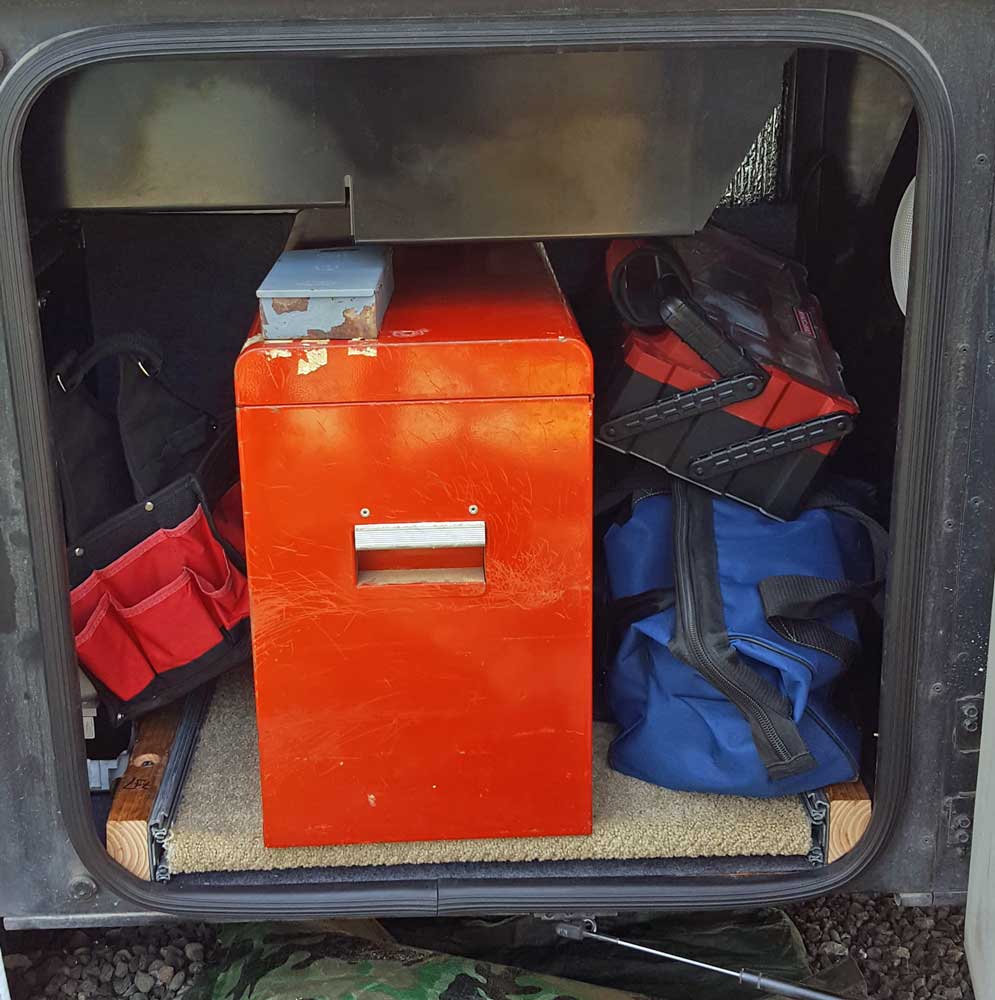 Monday,
May 6, 2019: Today was a fun day with a fun project. I've always
wanted to carry my tool chest with me, now I have the chance. I've
owned this tool chest forty-five years. I purchased full extension railing from Amazon. I ordered
26" but they come in lots of lengths. The storage cabinet is exactly
26" and so is my tool chest. I happen to have the stair cover for
Miss Dory (our previous motorhome) which was also exactly 26" wide.
I trimmed it down to fit the cabinet and decided to leave it
carpeted. I used bolts to anchor the railing and shelf to the
cabinet floor. The hardware store did not have the 4-1/2" length I
needed so I countersunk the bolts. As it turns out, I'm glad I did
because I can add more shelves easily on top the support boards. I
will add another power tool storage behind the tool chest. You can
see, throwing the power tool bags behind the tool chest isn't going
to work. I already have some ideas of what I will build to fit. I
believe I will be adding a shelf on the left side (front of the tool
chest) for additional storage. Click all photos for additional
views.
Monday,
May 6, 2019: Today was a fun day with a fun project. I've always
wanted to carry my tool chest with me, now I have the chance. I've
owned this tool chest forty-five years. I purchased full extension railing from Amazon. I ordered
26" but they come in lots of lengths. The storage cabinet is exactly
26" and so is my tool chest. I happen to have the stair cover for
Miss Dory (our previous motorhome) which was also exactly 26" wide.
I trimmed it down to fit the cabinet and decided to leave it
carpeted. I used bolts to anchor the railing and shelf to the
cabinet floor. The hardware store did not have the 4-1/2" length I
needed so I countersunk the bolts. As it turns out, I'm glad I did
because I can add more shelves easily on top the support boards. I
will add another power tool storage behind the tool chest. You can
see, throwing the power tool bags behind the tool chest isn't going
to work. I already have some ideas of what I will build to fit. I
believe I will be adding a shelf on the left side (front of the tool
chest) for additional storage. Click all photos for additional
views. 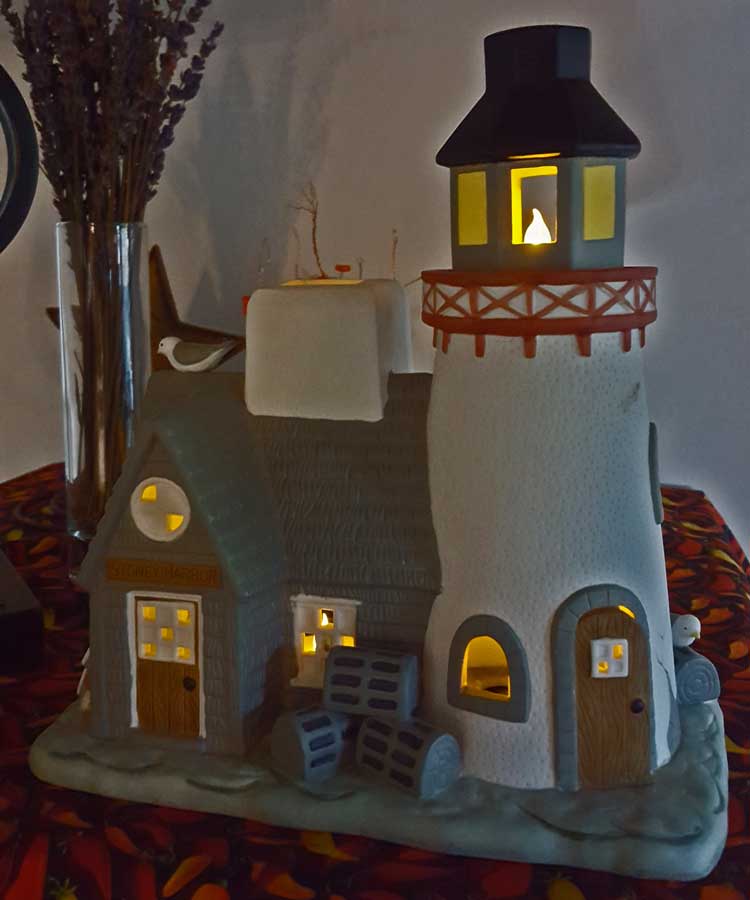
Monday, April 29, 2019: Remember Joe's faucet installed into Mz Ruby? Well, as it turns out, Gwen likes the Cameo faucet better than this faucet. So, with the help of a tool given to me by a Home Depot employee, I removed Joe's faucet and the Cameo faucet and switched them. The Moen faucet is very easy to install/uninstall as long as you have the special tool. The Cameo faucet, not so much. I pulled the center hose from the Cameo faucet because that's what you do with the Moen faucet. But the center hose did NOT want to reinstall. I finally figured out how to take the Cameo faucet apart then worked the center hose back into place. I also like the center hose weight from Joe's faucet better than the Cameo weight so used it rather than moving it. Gwen is much happier now with her favorite kitchen faucet. Click the photo for a view of Gwen's favorite.
The little light house was on a shelf in the Cameo so I moved it to our steering wheel table. Click the photo to enlarge.
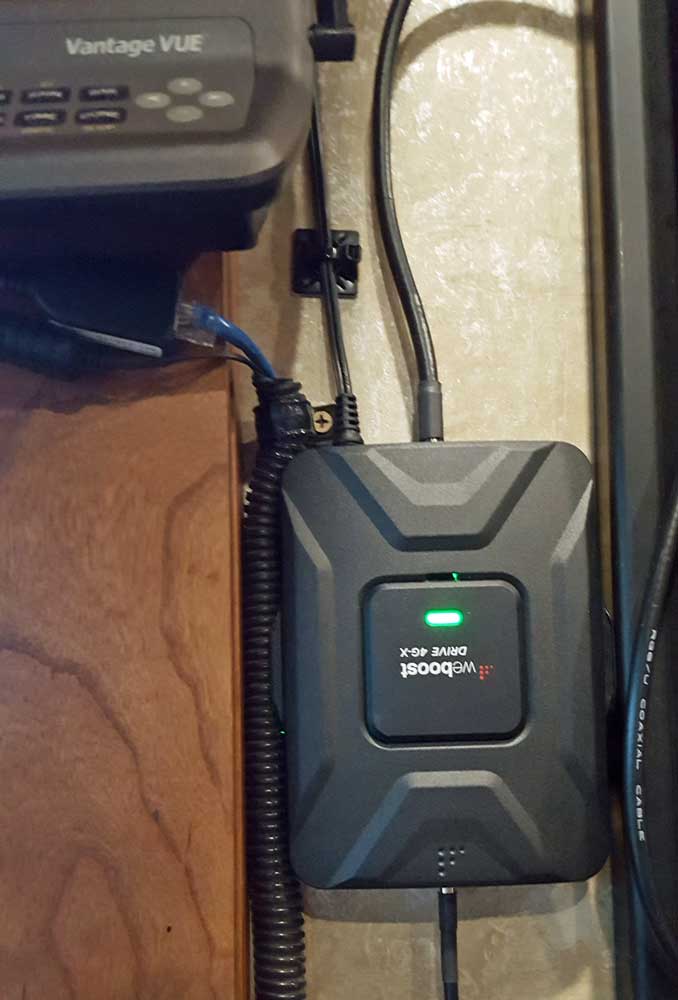 |
Friday, April 26, 2019: Most of the day was spent doing boring things like clearing our all drawers and closets in the Cameo. But later in the day I was able to do a fun thing. I temporarily installed the WeBoost Drive 4G-RV cell phone signal booster. I say temporarily because the kit came with a 20 foot external antenna cable which is not nearly long enough. The video instructions want the antenna to be as high as you can make it. I remembered the flag pole which came with Mz Ruby. The pole is nearly 20 feet tall, the length of the cable they provided. I called the "help line" and was told I need to buy a different cable if I go for a longer line. The flag pole already had a ladder mount so I installed the antenna next to my weather station. We need a cell booster in Sutherlin because the cell signal is very weak on our side of the park. We need to boost the signal in many areas we park. In the photo on the left, the booster is mounted upside down because that is the more convenient cable direction. It is powered by our house batteries so it will work while boondocked. We are nearly always using our phones as "hot spots" for the Internet, another reason to boost the signal. When I get the new cable, I will permanently install the cable. Click both photos for larger views. |  |
Monday, April 15, 2019: Last week I removed the new faucet (from Joe's new home) and replaced it with a faucet more to Joe's liking. Today, I installed the old faucet into Mz Ruby. This was far better quality faucet than the RV faucet originally installed into Mz Ruby. It is a Moen brand for residential installation. Mz Ruby is our seventh RV and in EVERY RV I begin with replacing the horrible, cheap RV faucets with quality faucets. But RV manufacturers install the faucets differently from residential installation. When I changed Joe's faucet, it took only minutes to install the new faucet because everything connected to all the old plumbing.
In the RV, the water supply comes from a PEX pipe and ends with a female half inch "iron pipe fitting". The new faucet also ends in a female fitting, a 3/8" compression fitting. So an adaptor is needed to connect the two.
Another difference is how the faucet is attached to the counter top. The RV faucet was very difficult to remove due to the funky fittings which had to be removed. Three quarters of the time of replacement was taken in removing the original faucet. Alternatively, the install of the new faucet went smoothly and easily due to the superior fittings to attach to the counter top. Gwen is happy as a mouse with fresh cheese!
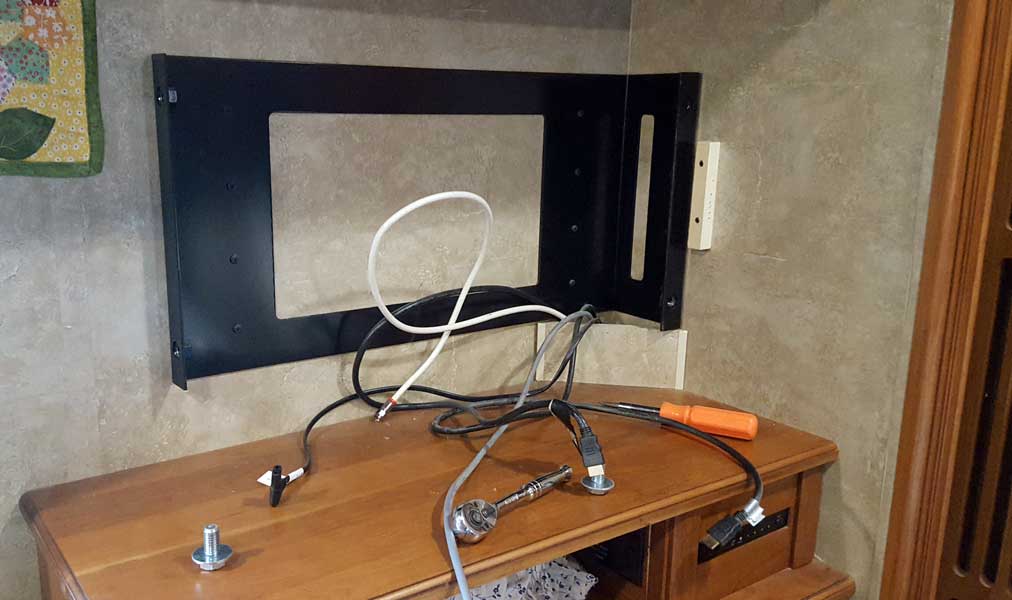
Thursday, April 11, 2019: With a little spare time I decided to take care of one item on the Mz Ruby to-do list. We never watch TV in bed and we are desperate for more bedroom storage. I removed the bedroom TV today which was more difficult than it sounds. There were no release levers or easy bolts to unthread. Instead, I had to reach behind the TV and unthread the four bolts holding the TV to the wall mounting stand. Very tight space to work in. This mounting stand was very substantial. It was probably custom made for this corner. Click the photo for a view of the stand. Click here for a view of the wall without the TV. The plan is to put storage where the TV once resided. I want a cabinet with shelves. Gwen wants drawers. Not sure what will be in this corner. I believe we will put this TV into the Cameo fifth wheel when I get back to Sutherlin. Currently is has a 55" TV which is too large for the space. Gwen has already sold that TV to a neighbor. If you didn't know, we are prepping the Cameo for sale.
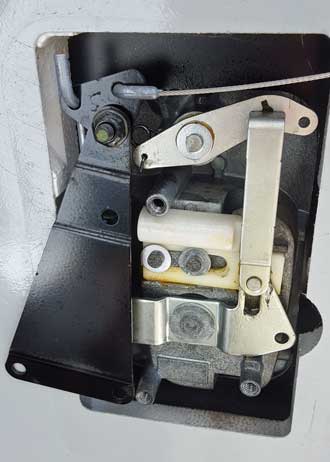
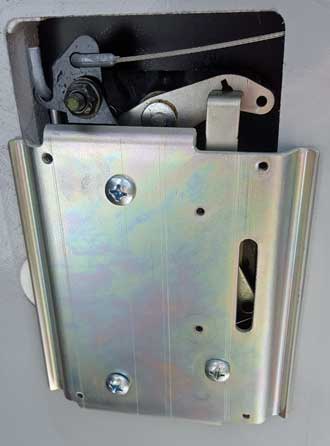
Saturday, March 30, 2019: The latch on one of the basement hatches is not working as it should. It often does not catch and I must slam the door repeatedly to get it to close. So I took the back off to learn what was going on. There seems to be no problem with the mechanism but the three large screws were loose. After replacing the plate and tightening the screws the problem seemed to go away.

Tuesday, March 26, 2019: Today was a busy day. After attending an Extended Service Contract (ESC) seminar at the Escapade I chose to purchase a "drive train - plus" ESC. I was told Mz Ruby would have to be inspected before the contract could be applied. However, the last day of our drive to Verdi I got an amber engine light as you can see on the left of the photo. I looked up the "Engine Diagnosis" and received the engine fault code in the photo. I knew we would not pass any "drive train" inspection with a fault code showing. I called Freightliner and they immediately told me they knew the code. "It is a mistake, it will disappear after a few 'key strokes', it will likely disappear the next time you start the engine." So the inspector showed up today and I kept my fingers crossed. I started the engine and the amber engine icon appeared ... for about 5 seconds then disappeared never to be seen again. Freightliner was right. Mz Ruby passed the inspection!

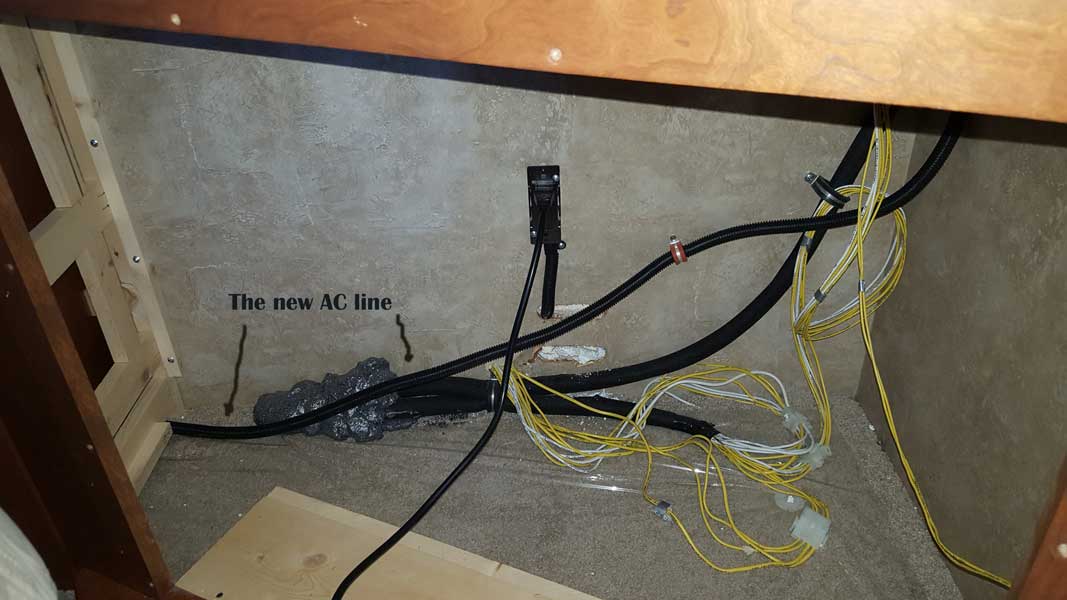
Wednesday, March 13, 2019: While camped in the desert we learned that there are no powered outlets on the fireplace wall when we aren't plugged into shore power ... with two exceptions, the refrigerator and the TV. We need another outlet which has power from the inverter. Gwen needs power for her laptop and for her sewing machine without running extension cords across Mz Ruby. The best choice is to tap into the outlet which powers the TV. The access is behind a panel in the upper cabinet. The Romex to the new outlet will pass behind the TV, behind the fireplace and under the dining table leaf storage cabinet. The wire will never be seen. The fireplace is removed at left. Behind that photo is a photo showing access to the outlet in the upper cabinet. The new outlet is installed in the right photo. Behind that photo is the route of the wire behind the fireplace. Click the photos to see those behind.
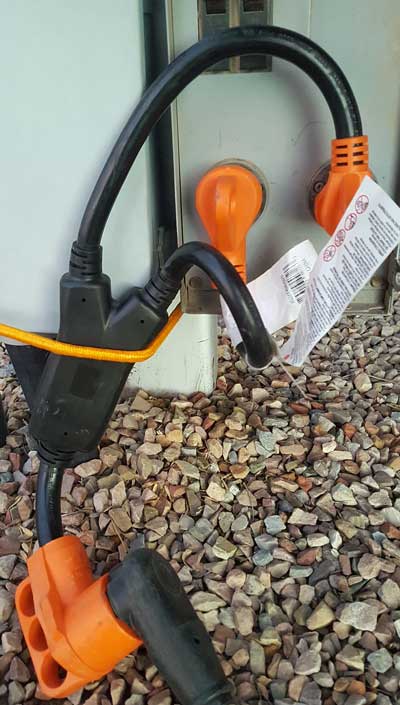
Friday, March 8, 2019: Today was exceptionally windy so we stayed inside all day. I want to describe our RV power supply. Mz Ruby requires 50 amps when connected to "shore power". A 50 amp supply is misleading. A 50 amp plug has four prongs. One is a grounding prong, one is the neutral prong and two provide 50 amps of current per prong so it is really a 100 amp plug. Some RV parks, the Willcox RV park for example, don't supply a "50 amp" connection, instead they supply a 30 amp plug. This has one "hot" leg of 30 amps. So a 30 amp plug is really 70 amps less than a 50 amp plug, not 20 amps less. That brings up the special connector shown at right. Some parks have two plugs in a connection box. For example, Willcox had two 30 amp plugs in one box. With the adaptor, I can plug into both 30 amp plugs which sends 30 amps or current down each prong which normally carries 50 amps per prong. With this adaptor I now have a total of 60 amps, only 40 amps less than the nominal 100 amps but 30 amps more than a single 30 amp connection. This is a handy adaptor to have. I have used it several times.
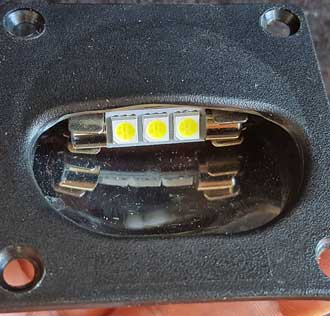
Wednesday, March 6, 2019: One of the bulbs lighting the steps has been out since we purchased Mz Ruby. I have visited a dozen auto parts shops and several RV shops looking for the bulb. No one had a bulb to fit the step lighting fixture. However, when researching, I found an LED bulb to fit and installed them today. They are brighter than the incandescent bulb and use 1/3 the power.
Wednesday, February 27, 2019: Back to making toilet repairs again. Apparently the "vacuum breaker" was not the problem to begin with. The symptoms are, toilet water not turning off when it should. It continues to flow and can overflow the bowl if not stopped. This time I talked to both Thetford and the parts store in Yuma about the problem. I ended up buying a "valve replacement kit". This was just as easy to replace as was the vacuum breaker. Now I have practically a complete new toilet, at least all the moving parts are new. After installing, it works like a new toilet too. Seems to have solved more than one toilet problem. Click the photo to see the new kit.
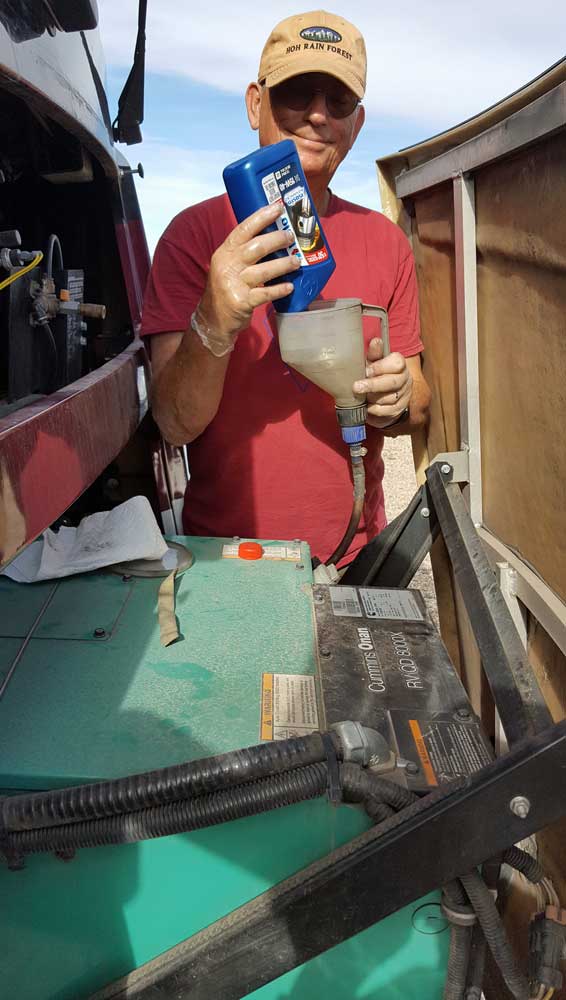
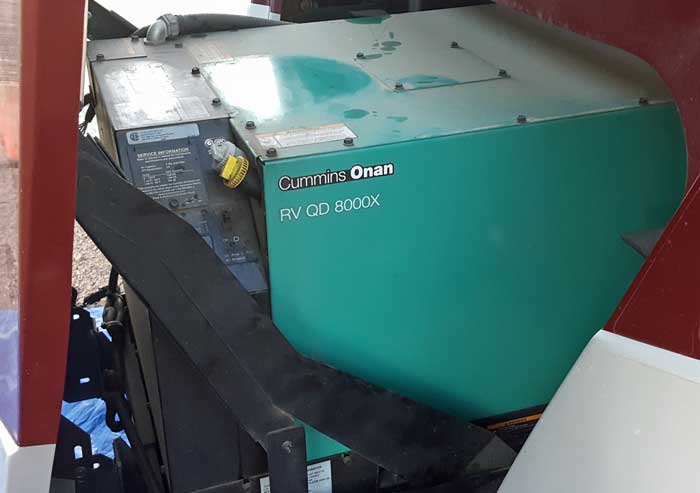
Tuesday, January 29, 2019: I don't know when Mike last serviced the generator and I couldn't find any records of service. I believe that's because I believe Mike did the service himself but didn't document it. So I'm doing my own service today and I DID document it. This is an Onan 8K generator. I bought a new oil filter from the Onan booth in the "Big Tent". The rocks made the service challenging but I did put a tarp and cardboard over the rocks to provide a "floor" and to catch any loose oil before it hit the ground. This generator only takes 3 quarts of oil and since it is a diesel generator I used Chevron Delo to refill the crankcase. I caught the used oil in a one gallon plastic water bottle. Once the new oil was back into the generator, I put the old oil back into the Delo quart bottles. Autozone will recycle the oil when I return it to them. The oil filter fits into a tight spot but I was still able to remove and replace it. I had to watch a video to learn where the air filter was located. The instruction manual showed the exploded view of the air filter housing but did not tell where to locate it. The only thing I was unable to do was to remove and blow out the spark arrestor. I'll do that after returning to Sutherlin. Mike had provided me with a new air filter so I didn't have to buy one. Click the photo for another view.
 |
 |
 |
Sunday, January 27, 2019: Our toilet has not been working correctly so today was the day to change the two flanges to correct the flush cycle. When I removed the toilet I decided the hoses needed changing too. Fortunately Gary had the right size tubing or I would have been driving to Quartzsite. Had I been doing this in Sutherlin, I would have been using my pressure washer for a thorough cleaning. After inspecting the Vacuum Breaker (the plastic piece the hoses connect to) I would replace that too, if I had the part. I've put it into my "wish list" on Amazon. After installing it seems to be working better but I'm not convinced the amount of water it allows into the bowl is correct. The Vacuum Breaker is what I suspect to be the problem. I may have to order the part sooner than later. Click the photos for more views.
January 29 update: I replaced the vacuum breaker today. I chose to buy it locally because the toilet continued with symptoms. I could have purchased off Amazon for $19.10 including shipping, but paid $28.69 locally for exactly the same part. Local stores (for ANY product) are critical of customers who buy from Amazon but they will need to reevaluate their service and profit margin if they hope to compete. The symptoms of this failing part was water leaking and filling the bowl at non-standard levels. It seems to be working fine now.
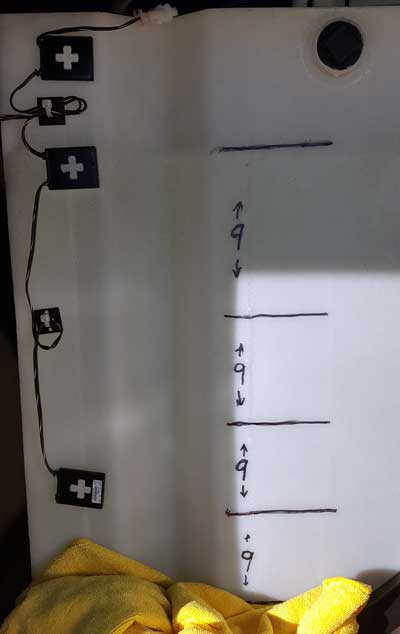
Wednesday, January 23, 2019: We have used a lot of freshwater lately so I decided to mark the tank as I added water. This tank varies in shape to fit the space where Winnebago believes fresh water should be stored. Because the shape is not linear, the level changes as I add water. I made a mark for every nine gallons because the water jugs I have are 4.5 gallons each so I made a mark for every two jugs into the tank. This is an 85 gallon tank so there must be a lot of storage below this level and maybe another twenty gallons above this level. This will be helpful in knowing how we are doing on freshwater storage. The black squares with the "plus" are the electronic sensors sending the tank level to the control panel. The marking helps to know what monitor is reporting. The black cap at the top is the only way to gravity feed water into the tank. Because of the location it is nearly impossible to use this gravity feed with anything but a water hose.

Tuesday, January 8, 2019: Ron has returned to install a windshield cover plus a driver's and passenger window covers. These covers provide privacy during the day but the main purpose is to reduce the effect the sun has with heating the inside of the coach through the glass. All of Mz Ruby's windows have sun shades (including the windshield) on the inside of each window. That offers daytime privacy and does help to reduce the heat inside. Problem is, the sun hitting an inside sun shade has already passed through the glass so the heat is INSIDE. The windshield and other two covers are snapped in place on the OUTSIDE, stopping the heat BEFORE it enters the interior of the coach. The window shades Ron installed previously stop the sun from hitting the window entirely. During daylight hours, we can see out the window but passers-by cannot see in. There is no privacy effect at night. The shades are held in place by twist snaps so a ladder is needed to install or remove them. These are of very good quality so I believe we will be very happy we have purchased them. Click the photo for a close-up view of the shade.
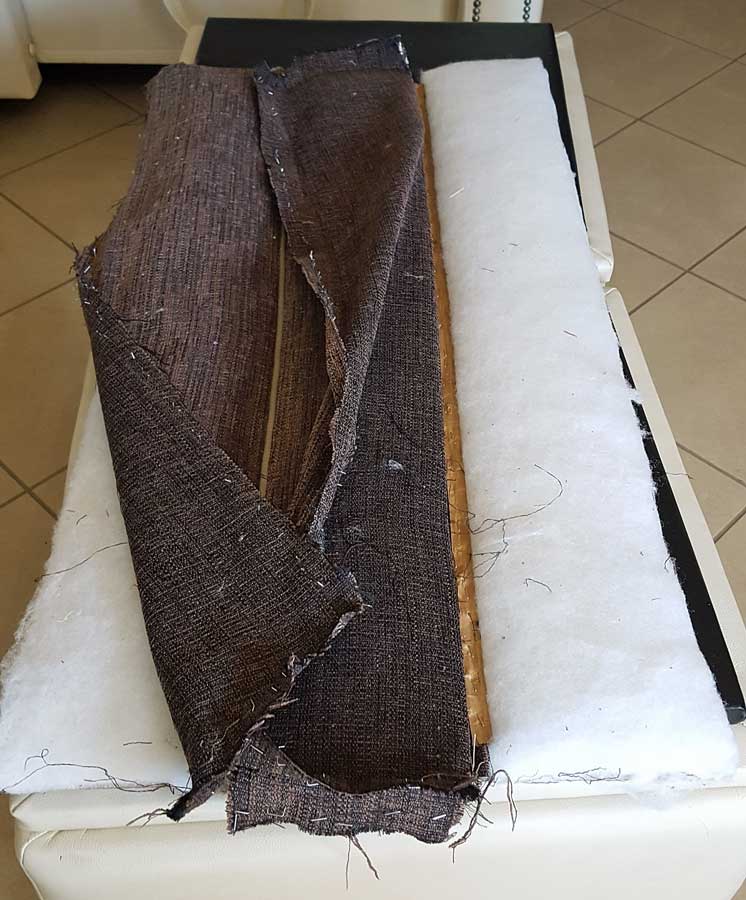

Thursday, December 27, 2018: We have been wanting to replace the headboard since the purchase of Mz Ruby. The headboard needed to be raised, about 8 inches so that was the first task. Next, we removed several hundred staples holding the fabric to the headboard. That left the support board with only the padding on the board. Gwen did some sewing of the new fabric and we began stapling the fabric to the board. These boards are held to the wall with a hook and loop tape (like Velcro) so I installed the tape on the back of the board and secured to the headboard. The headboard now has a new look.
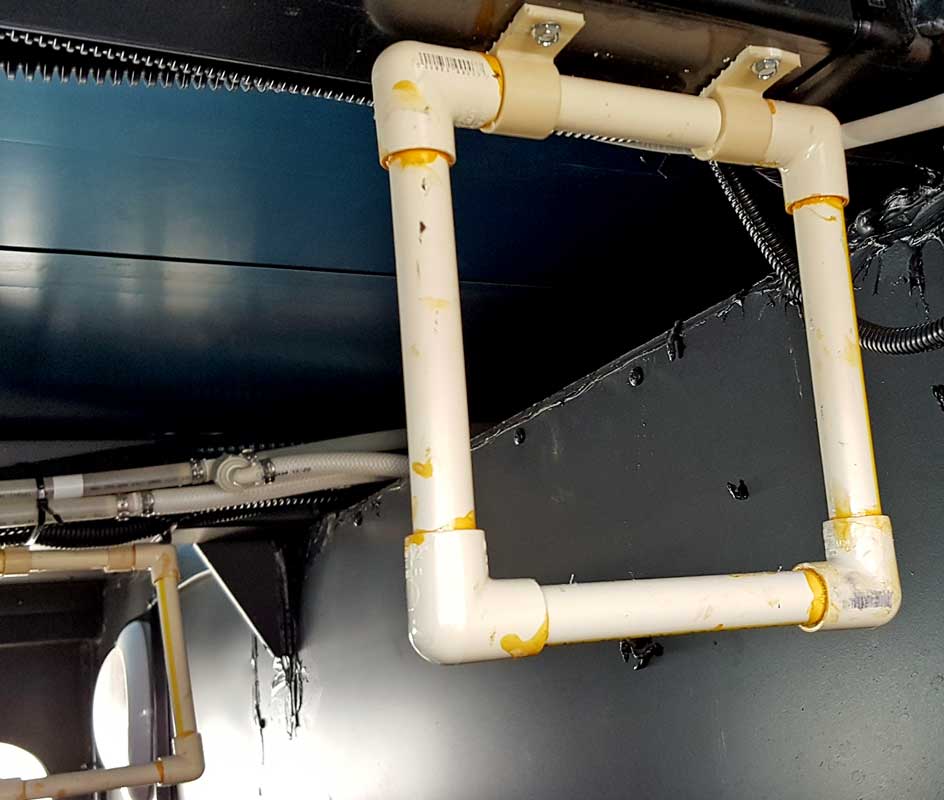
Thursday, December 20, 2018: Any time I have a storage compartment from one side of the RV to the other, I hang my CPVC ladder hanger. This keeps the ladder out of the way and frees up storage space on the floor of the storage compartment. So that is what I did today, installed my ladder hangers. Click the photo to see a close up of a hanger.
 |
 |
 |
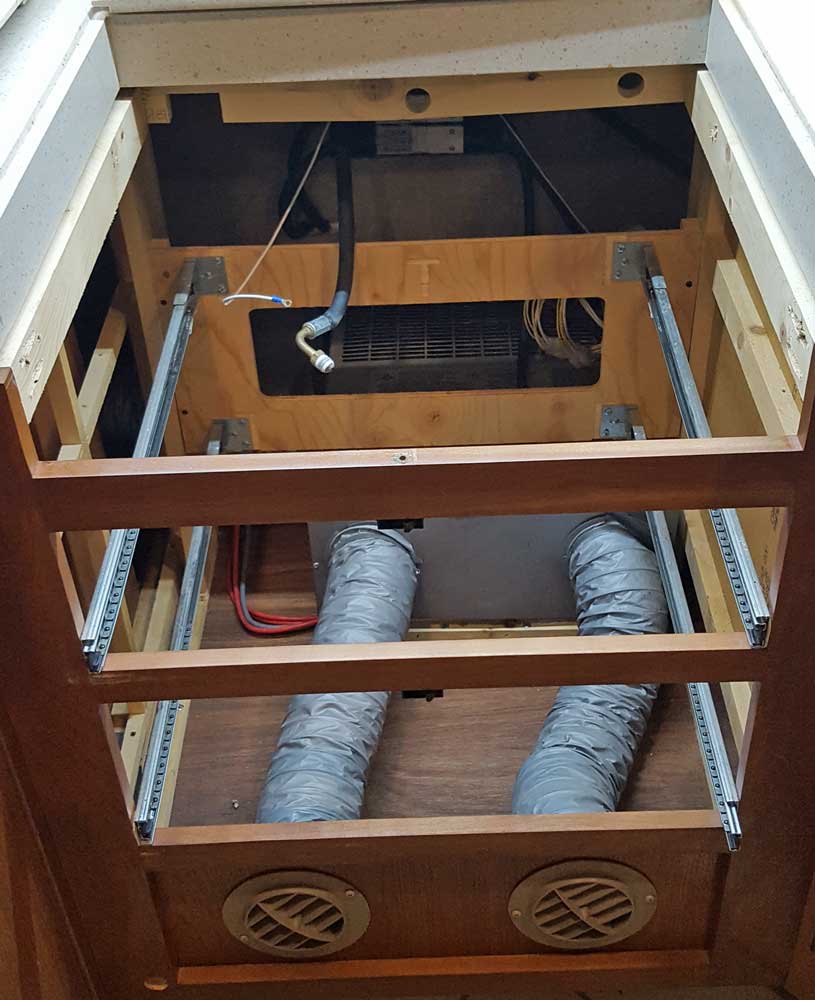
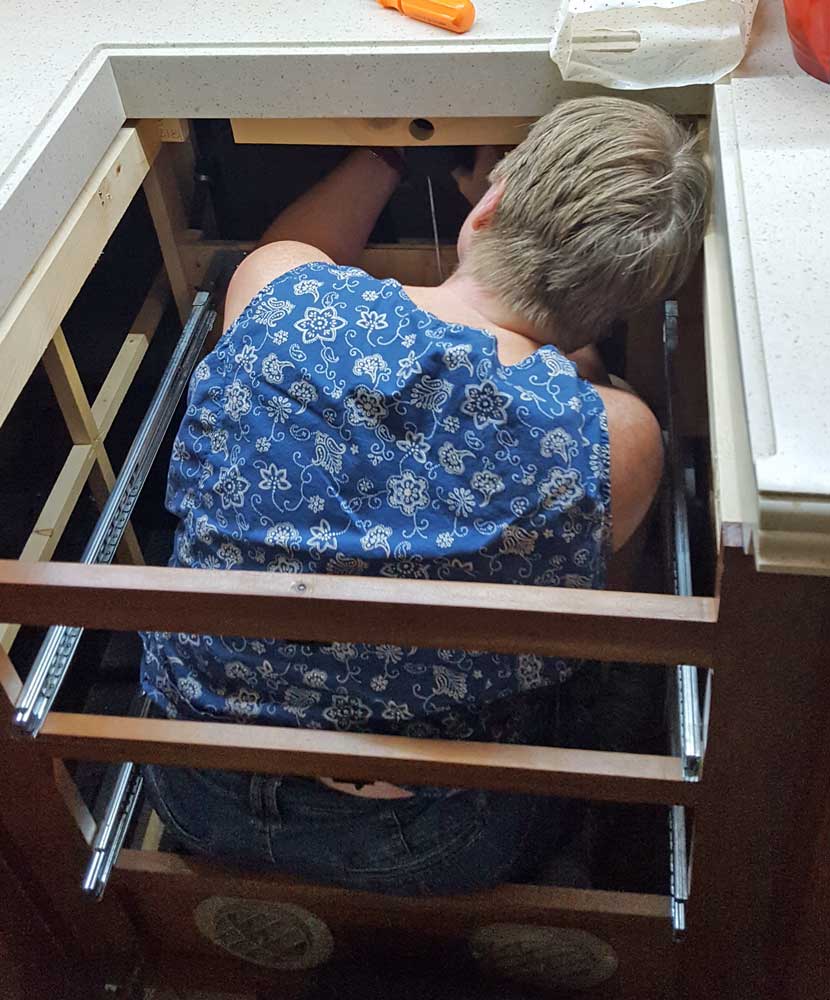
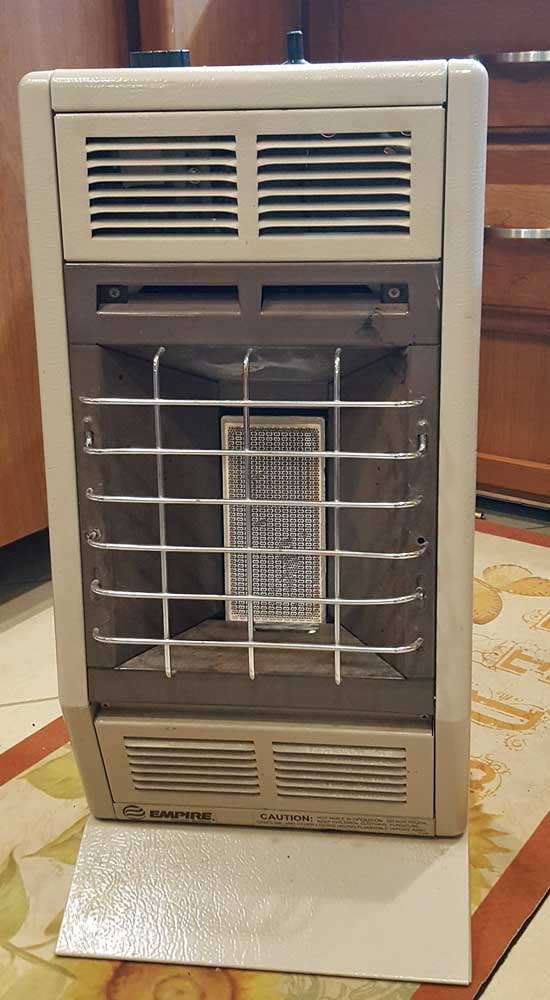 Tuesday,
December 18, 2018: Today was the last step in preparing Mz Ruby for
off grid parking. Parking off grid requires a source for power
(solar), a method to fill the fresh water tank without moving the
rig and a method to heat without using power (the furnace uses power
for the blower). I drove Mz Ruby to Blythe where I found a propane
dealer who could install a "T" onto the existing rubber hose leading
to the cook top. He also built a hose leading to the base of the
cabinet where I will connect the propane heater. I've done this to
the last four RVs. Here is how I
installed the propane connection into Miss Dory. Here it is installed into the Lazy Daze. Here it is in the
Alumascape. Finally, the installation
into the Cameo fifth wheel. I was going to do the same with Mz
Ruby but the rubber hose had me confused until I talked with the
propane dealer in Blythe. Once the "T" was installed, the hose was
easier to install than copper tubing. You can see the quick connect
at the base of the photo at the right. Click the photo to see the
heater. This is call a "one brick" heater. It is 10,000 btu, not
enough for a motorhome this size. We have a "three brick" heater
(18,000 btu) in Sutherlin so we will make-do with the smaller heater
until we return to Sutherlin. Click all the photos for additional
views. Oh! And the photo with Gwen inside the cabinet shows how she
got the hose reattached to the back wall. I couldn't do it.
Tuesday,
December 18, 2018: Today was the last step in preparing Mz Ruby for
off grid parking. Parking off grid requires a source for power
(solar), a method to fill the fresh water tank without moving the
rig and a method to heat without using power (the furnace uses power
for the blower). I drove Mz Ruby to Blythe where I found a propane
dealer who could install a "T" onto the existing rubber hose leading
to the cook top. He also built a hose leading to the base of the
cabinet where I will connect the propane heater. I've done this to
the last four RVs. Here is how I
installed the propane connection into Miss Dory. Here it is installed into the Lazy Daze. Here it is in the
Alumascape. Finally, the installation
into the Cameo fifth wheel. I was going to do the same with Mz
Ruby but the rubber hose had me confused until I talked with the
propane dealer in Blythe. Once the "T" was installed, the hose was
easier to install than copper tubing. You can see the quick connect
at the base of the photo at the right. Click the photo to see the
heater. This is call a "one brick" heater. It is 10,000 btu, not
enough for a motorhome this size. We have a "three brick" heater
(18,000 btu) in Sutherlin so we will make-do with the smaller heater
until we return to Sutherlin. Click all the photos for additional
views. Oh! And the photo with Gwen inside the cabinet shows how she
got the hose reattached to the back wall. I couldn't do it. 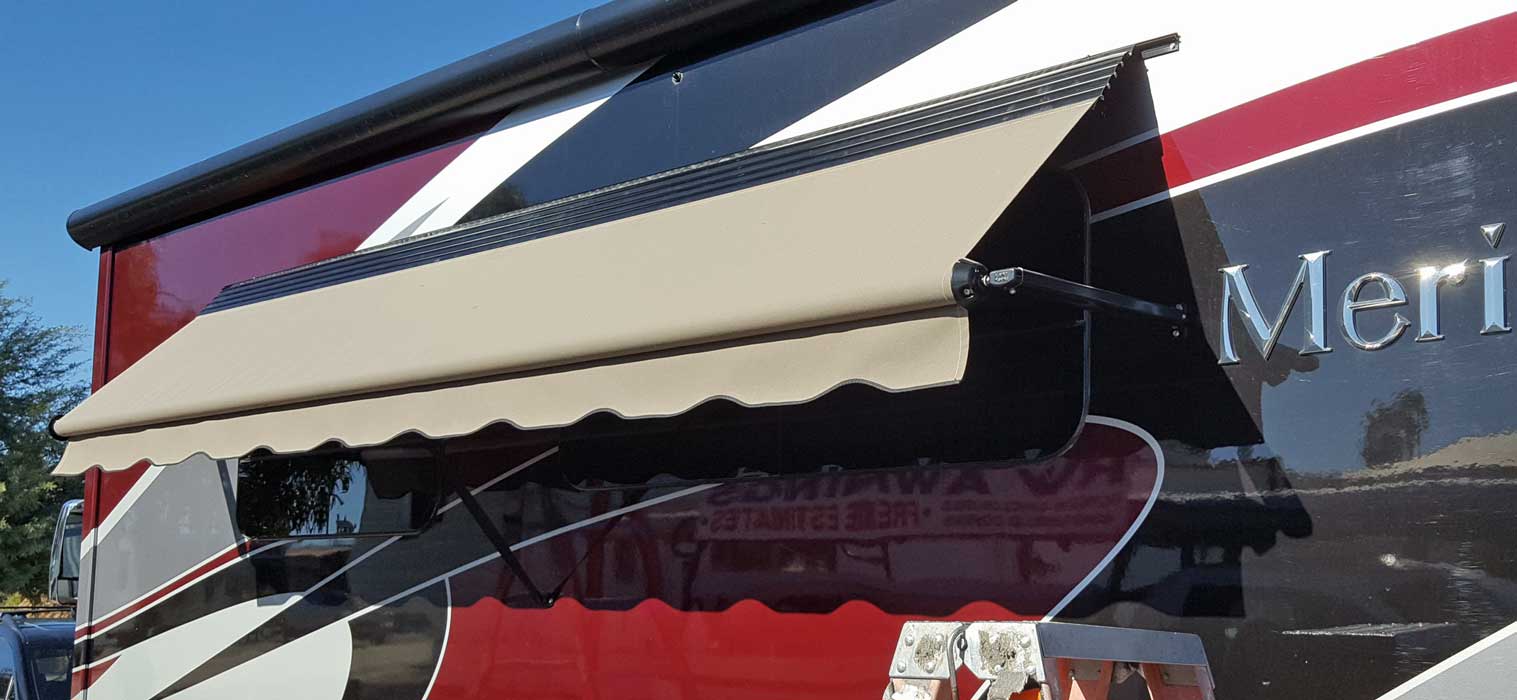
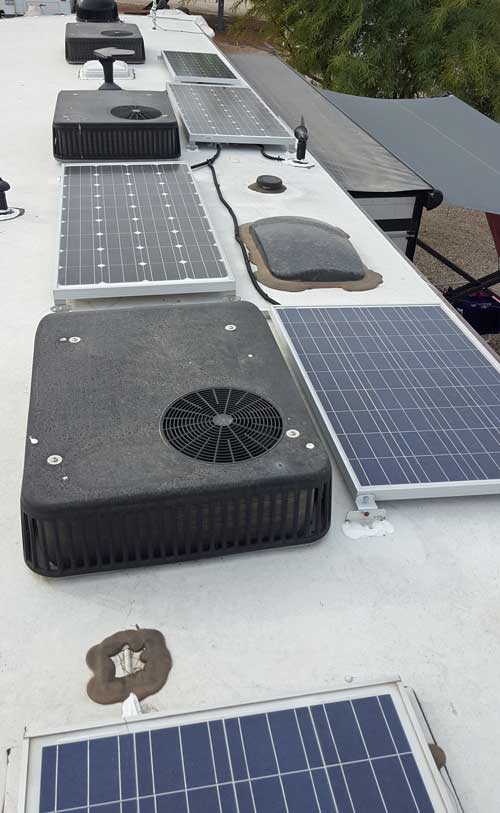
Tuesday, December 4, 2018: The solar charging system is finally complete. I installed the fifth panel today. The solar charging system is ready to test. That may not happen until January when we leave the resort. In a sense we are starting from scratch again. We have never had to generate enough power to run a residential refrigerator nor have we ever used AGM batteries as our energy storage. We are experienced with four 6 volt batteries which have worked well since 2009. They discharge to about 70-80% each night and are fully charged by the sun before noon each day. I'm anxious to learn how well this system works.

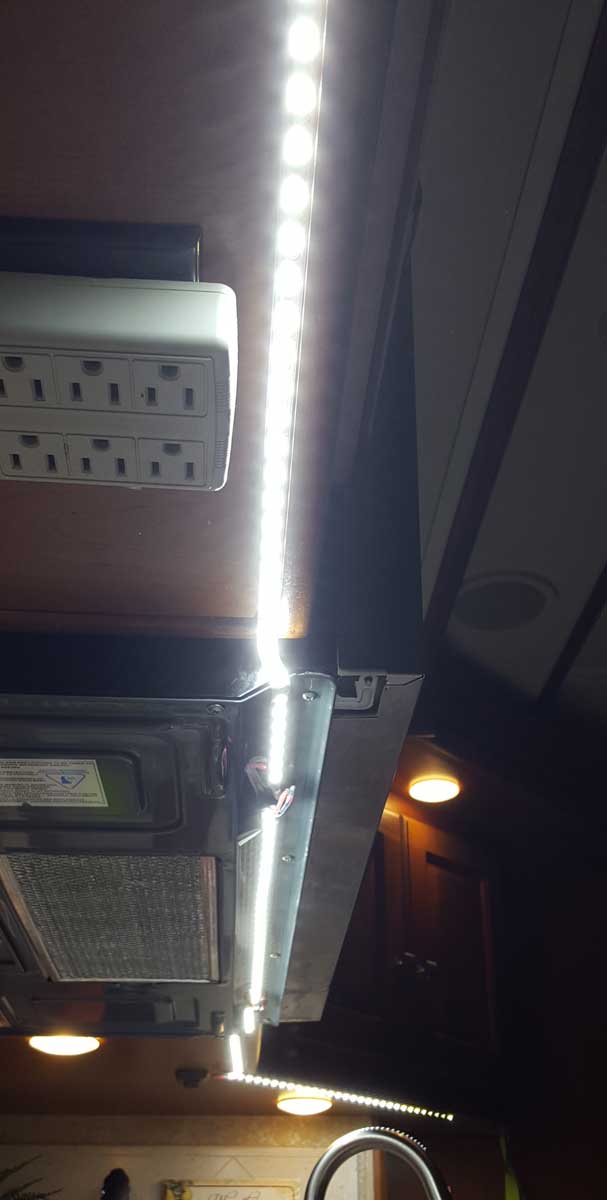
Sunday, December 2, 2018: This is our fourth RV to have strip LED lighting under the kitchen cabinets. Gwen insisted on more lighting and she loves the LED strip lights. I'm using the same brightness LED as before but using a flexible self-stick style this time. I'm getting the 12 volt power from one of the under-cabinet LED spot lights on the left side of the cabinets. So the LEDs are activated when that switch is turned on. I also used some solder tubes for the first time to connect the four strands of lights together. You simply insert the bare wire from both units into the tube and use a heat gun to melt the tube solder and shrink the shrink tube around the connection. It worked well. Click these two photo and the one below to see the total installation.
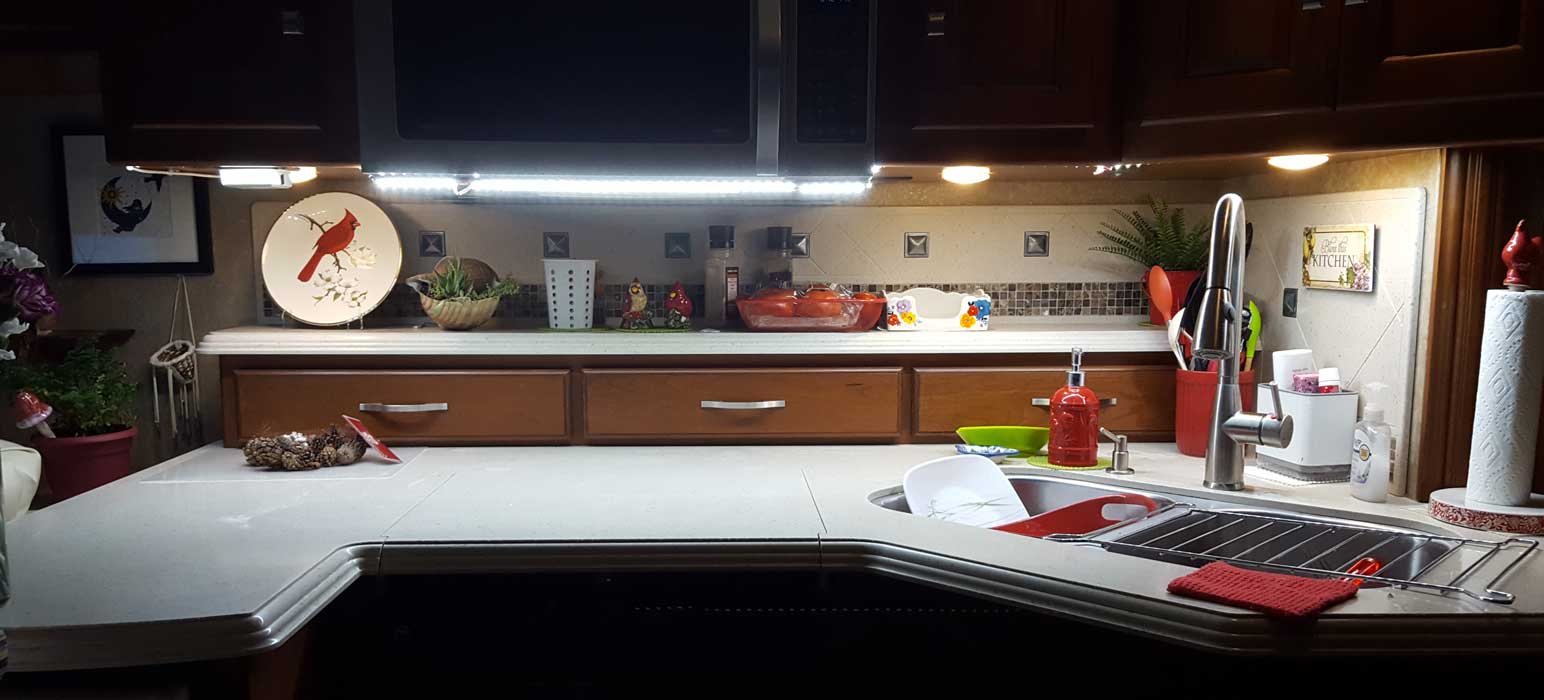
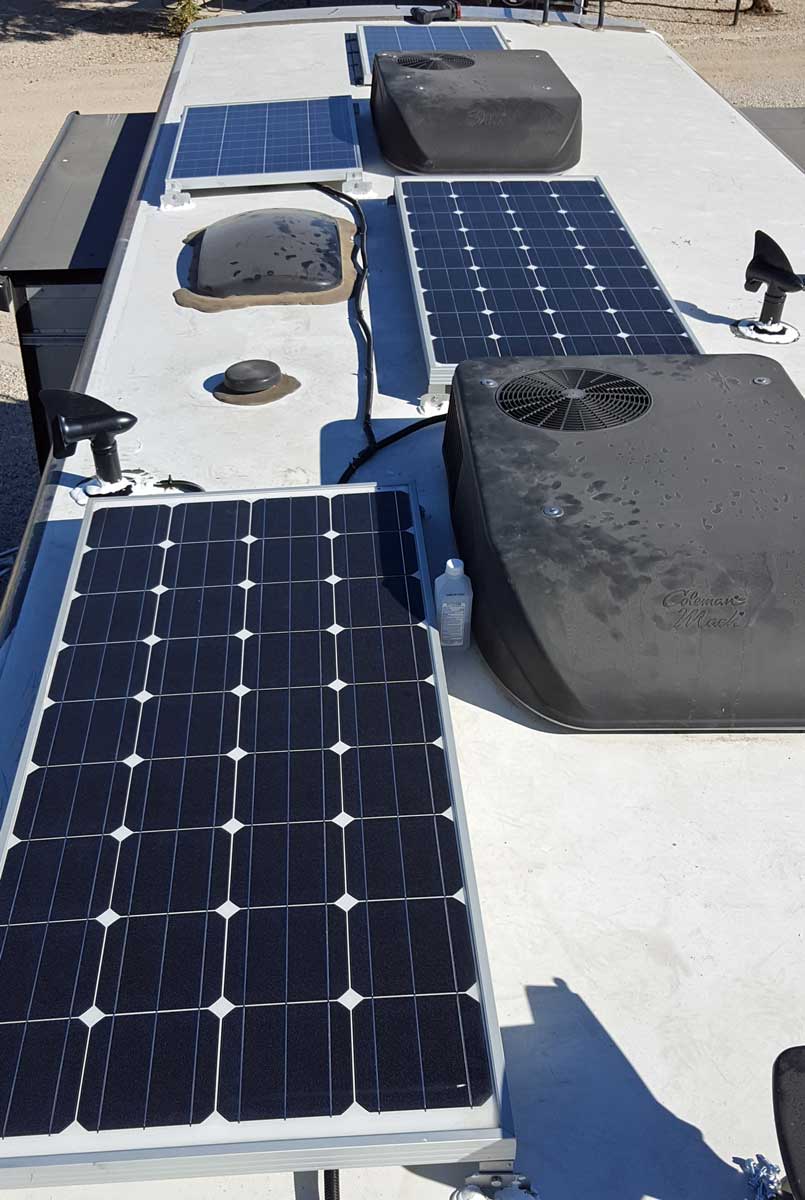

Wednesday, November 28, 2018: The solar installation on the roof is finished with one exception. The fifth panel is waiting for the mounting brackets. The wiring is done for the fifth panel so installation should be easy. In the photo on the right I am standing where the fifth panel will be installed. Since the solar wire is following the gray water vent pipe I decided to change both vent caps to the style I've used before. This style will be helpful in keeping holding tank odors out of Mz Ruby. I've covered all roof wiring with wire loom to help protect the wire from the sun. Of course this plastic loom will slowly disintegrate but it will be protecting the wire and can be replaced in five years. I used Dicor as the "glue" for each of the mounting feet and also to seal the base of the new directional vent caps. Even though the batteries are fully charged the charge controller will allow a trickle charge. I am seeing the trickle charge current reported on the charge controller. Click these two photos for more views.
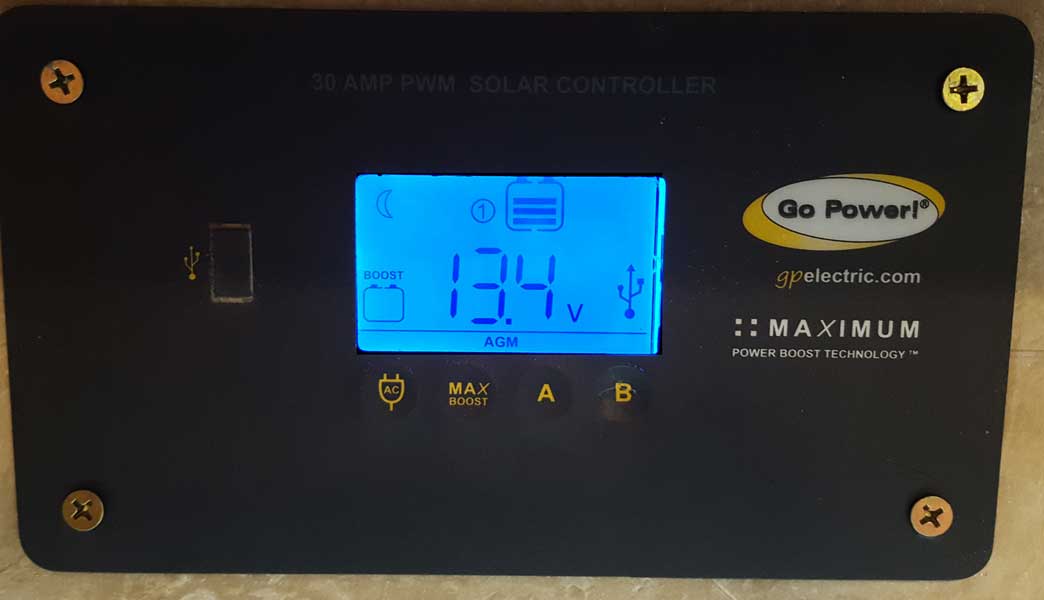
Tuesday, November 27, 2018: Sad to say, it took me nearly all day to fish the wire from beneath Mz Ruby to the charge controller. I had no trouble running the wire from the battery bank to the base of the gray water vent pipe but from that point on there were pipes, wires and wood supports in the way. I tried several methods and finally got one to work by mid-afternoon. The vent pipe is located directly behind the medicine cabinet so I mounted the charge controller inside. Now all work is completed under Mz Ruby and inside. I still have much work to do on the roof. The panels are not yet connected to the charge controller. Click the photo to see the status of the fully charged batteries reported at the charge controller. At the bottom center of the screen you can see the controller is set for "AGM" batteries rather than the "flooded" batteries of Miss Dory.
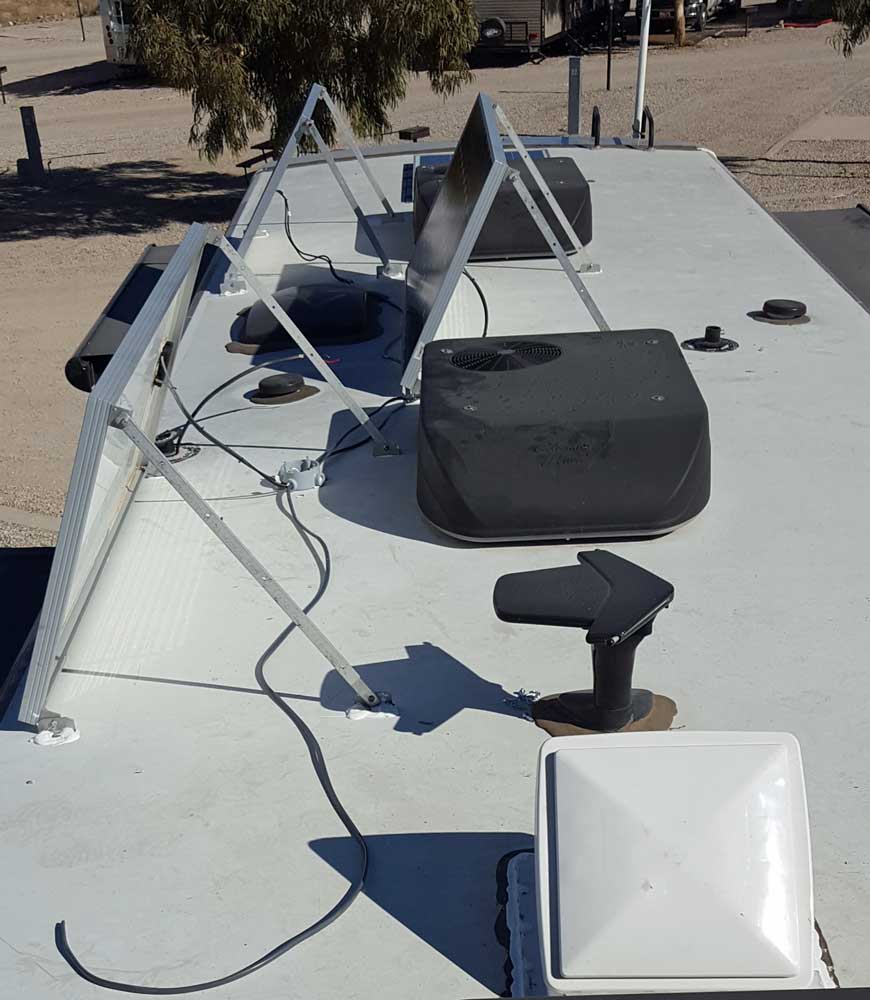
Sunday, November 25, 2018: I'm still waiting for parts to arrive but I CAN do the roof wiring while waiting. I stood the panels upright to get at the wires under each panel. I ran these wires into the combiner box and connected to the positive and negative posts. The line from the charge controller will enter the combiner box from the bottom of the photo.
Click this photo to see the panel installation on the roof. The combiner box will be under the panel nearest to the camera. It hasn't been mounted yet because I'm waiting for some roof parts and I want to mount all at the same time. The wire on the roof coming toward the camera is for the panel I've ordered. Hopefully that panel will arrive this week and I can finish the solar installation. When that happens, I will have five panels on the roof. The 100 watt panel installed by Winnebago is at the far end of the roof. It is mounted flat and can't be raised. That will be OK from about mid-March to mid-October. The winter months, the sun is so low in the southern sky the panels need to be raised and pointed at the south. Leaving a panel flat in the winter months means the efficiency of that panel will be only about 30-40%. In our previous solar experience our three panels have had our four six volt batteries fully charged before noon. Now we will have a new solar learning curve. We must charge six AGM batteries with a 24/7 draw on the batteries for the residential refrigerator. Both the batteries and the residential refrigerator are new to us. I suspect it will require turning off the refrigerator at night but we won't know that until we try. I'm actually looking forward to the challenge. We DO have an 8,000 watt diesel generator to help out but isn't one of the reasons to have solar to stop using a generator?
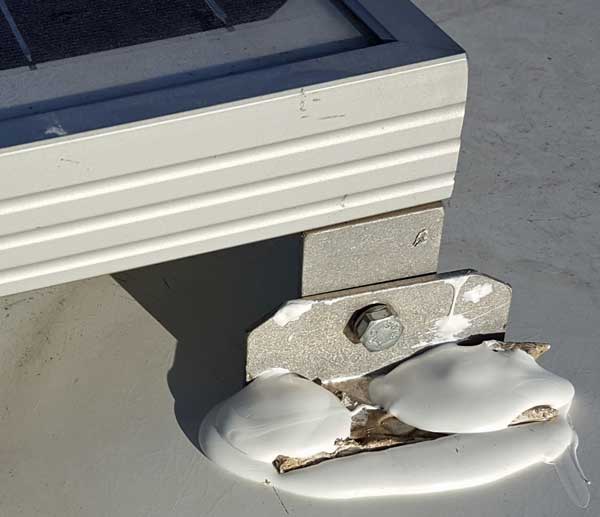
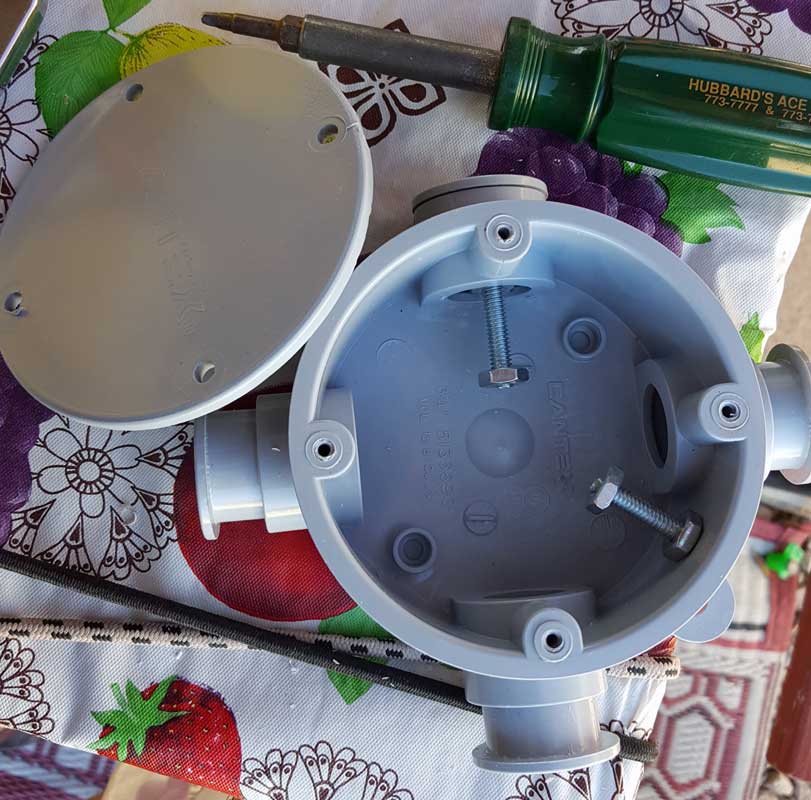
Friday, November 23, 2018: Continuing with the solar installation. With Gwen's help, we got the three solar panels to the roof of Mz Ruby. After two trips to Blythe for parts I was able to get them secured to the roof. I set each mount into a pool of Dicor. It is really the Dicor securing the panels to the roof. I can attest to the strength of Dicor since I had to pull the panels off the roof of Miss Dory. I cleaned the fiberglass roof of Mz Ruby with Isopropyl Alcohol to be sure I got a good seal with Dicor. Of course the Dicor also seals around the holes I've made with the two screws at each corner of the panel. I've also decided to add another 100 watt panel to my system to maximize the number of panels managed by the charge controller. That will add 5.3 amps to the system. That panel will arrive next week. So my four panel system plus the (1) 100 watt panel installed by Winnebago should keep the six AGM batteries charged and keep the residential refrigerator running. Note: there are few choices for the location of the panels. I'd like to install them to be able to tip them to the right or left to catch the southern sun in the winter months. These are too close to the air conditioners to be able to avoid a shaded area on the panel if tipped in that direction. So my best choice will be to park facing east then point the panels away from Mz Ruby toward the southern sun. Between trips to Blythe, I worked on my homemade combiner box. Click the left photo to see it. I have not mounted the combiner box to the roof yet. The two posts are for the positive and negative wires coming into the box.
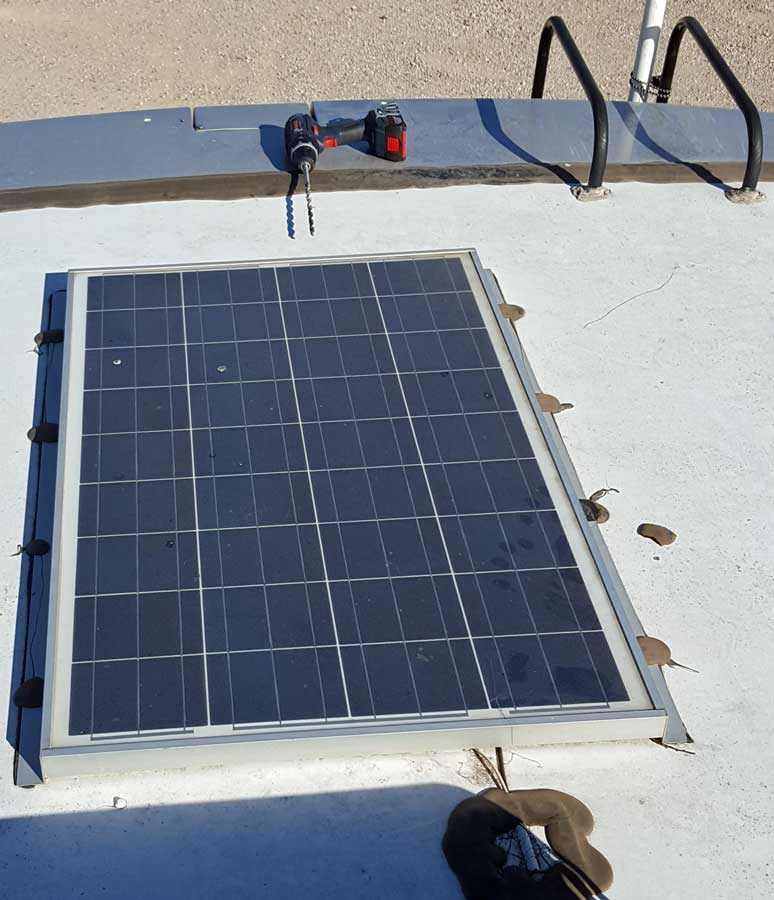
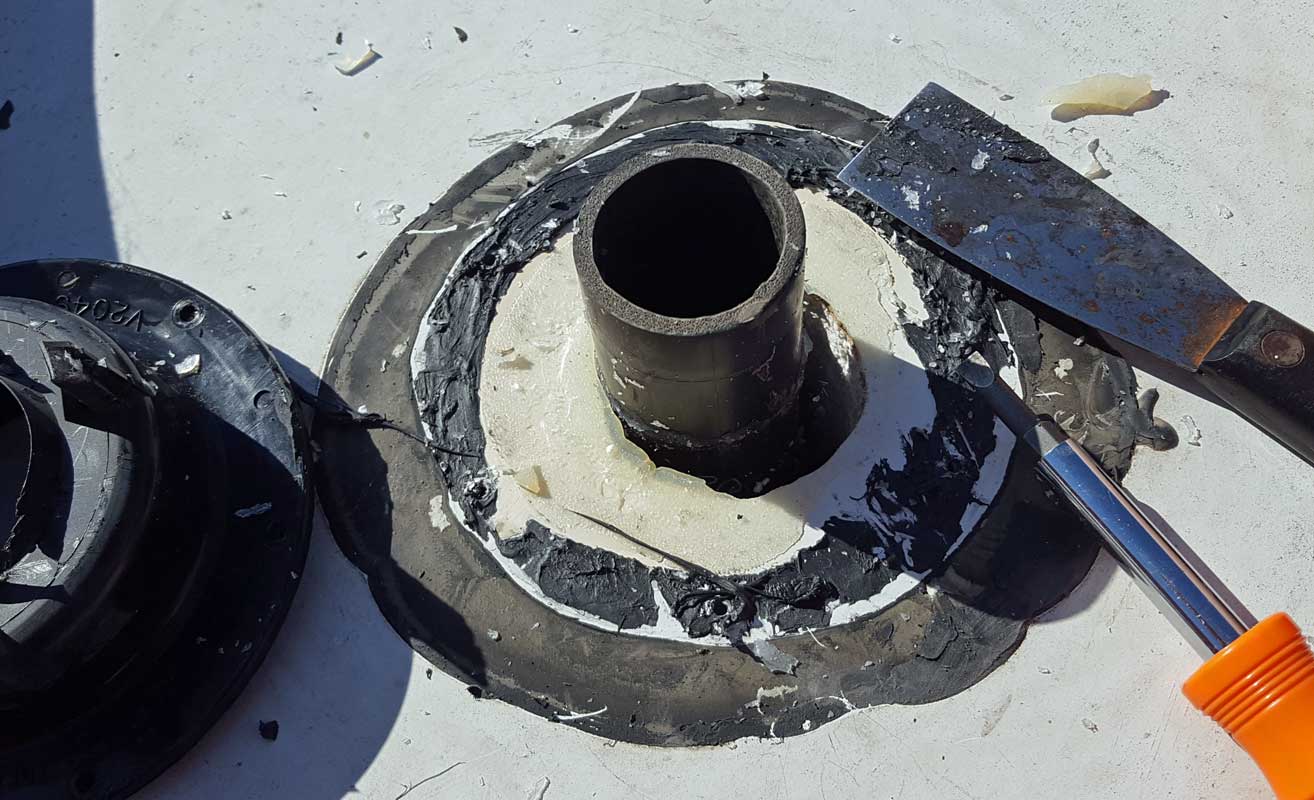
Tuesday, November 20, 2018: I began the work today of installing the solar charging system. Mz Ruby came with a 100 watt panel. I was hoping to install my system by connecting to the existing system but Winnebago used a minimal wire size so I decided to leave the existing system alone and install my own separately. The steps are to find a wire pathway from the roof to the batteries. Locate a location for the charge controller along the wire pathway. Install the panels to the roof. Install a combiner box where all panel wires are combined into one wire going to the charge controller. Connect the batteries directly to the controller. Connect the panels to the controller with a cover over the panels. Set the controller to the type of batteries. That's it. I didn't get very far today. I'm still exploring the wire access route. I believe I can follow the gray water vent pipe into the basement and then to the batteries. The charge controller will be installed only a few feet from the roof inside the shower room medicine cabinet. At mid-afternoon I drove to Blythe Ace Hardware looking for the parts I needed. Half of the parts were not in inventory and the other half were priced high. I was NOT a happy camper! I came home and ordered the parts I needed on Amazon. Small town business is critical of Amazon but Amazon generally has the inventory I need and usually only two day shipping. I am willing to pay a reasonable amount more to buy local but the difference of $.83/foot compared to $.15/foot is not reasonable. I DID buy a couple of items from ACE and will likely drive to Quartzsite to get more parts I need. Click the photos for additional views. The single 100 watt panel installed by Winnebago is behind the photo on the right.
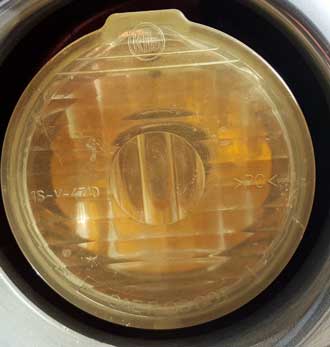 Monday,
November 19, 2018: Mz Ruby has a couple of orange turn
signal lights up front. The plastic lenses on these orange
lamps are slightly cloudy. I had already used Meguiar's
PlastX on Miss Dory's headlamps so I knew it would work in
this case too. Monday,
November 19, 2018: Mz Ruby has a couple of orange turn
signal lights up front. The plastic lenses on these orange
lamps are slightly cloudy. I had already used Meguiar's
PlastX on Miss Dory's headlamps so I knew it would work in
this case too. |
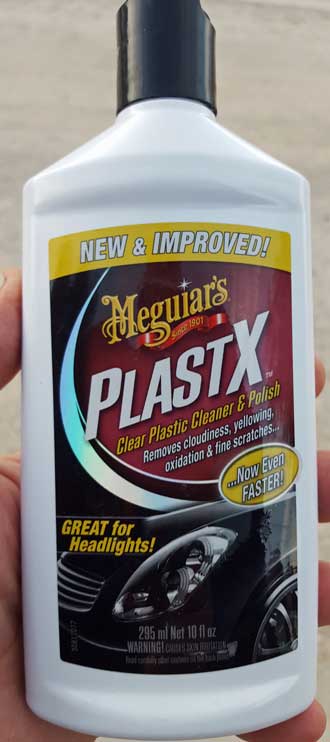 |
|
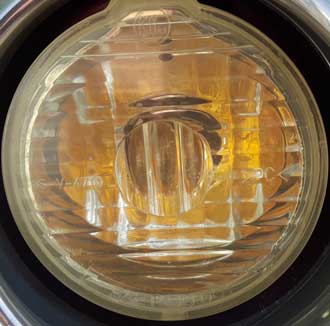 The cloudy lens is on the left and after the
application of PlastX the lens looks like the lamp above.
I'll give it a couple of days then do another treatment.
The cloudy lens is on the left and after the
application of PlastX the lens looks like the lamp above.
I'll give it a couple of days then do another treatment. 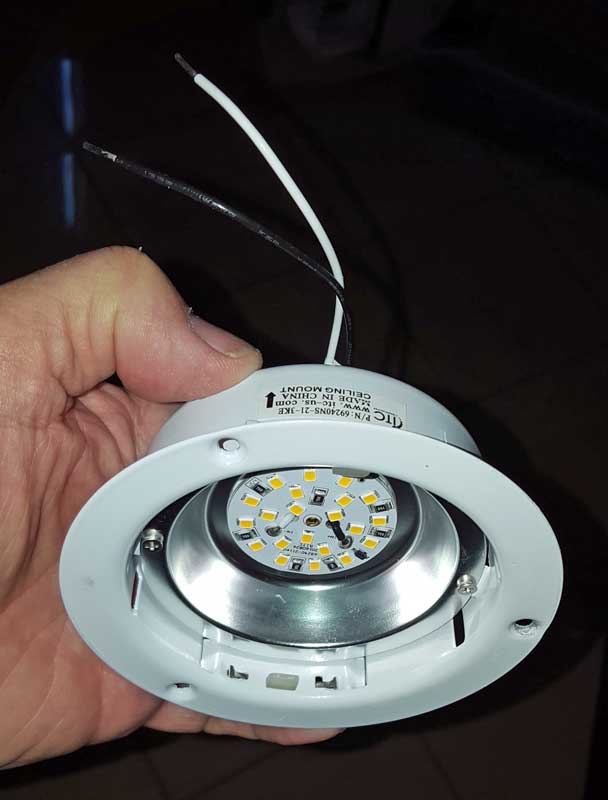
Sunday, November 18, 2018: One of the ceiling LED lamps in the bedroom has been flickering. I found the distributor, ITC in Holland, Michigan. I filled out an RMA form in the hope to return the lamp for a replacement. I was contacted by ITC customer support within a couple of days. When I explained the problem I was told they would ship me a replacement at no charge. Nice. Today, I installed the new lamp, problem was solved. Click the photo to see the replacement lamp.
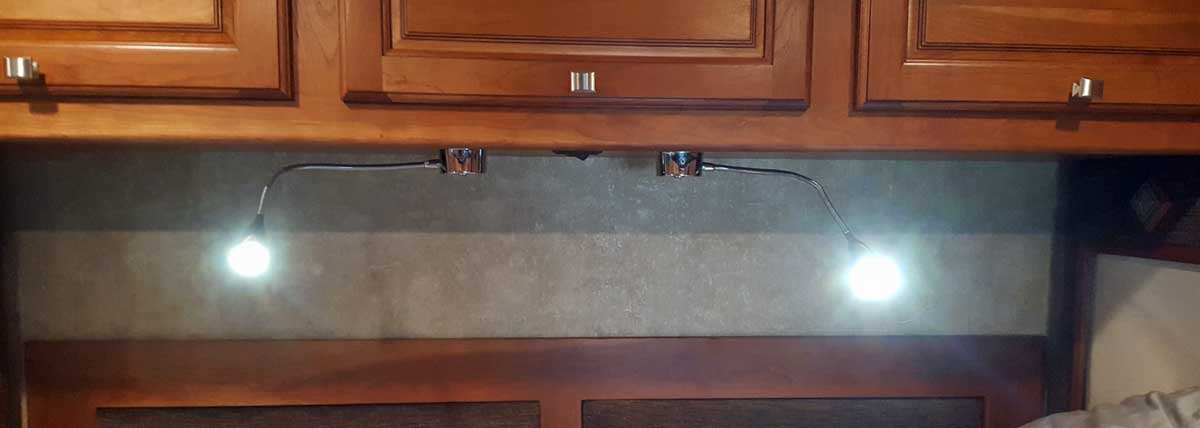 |
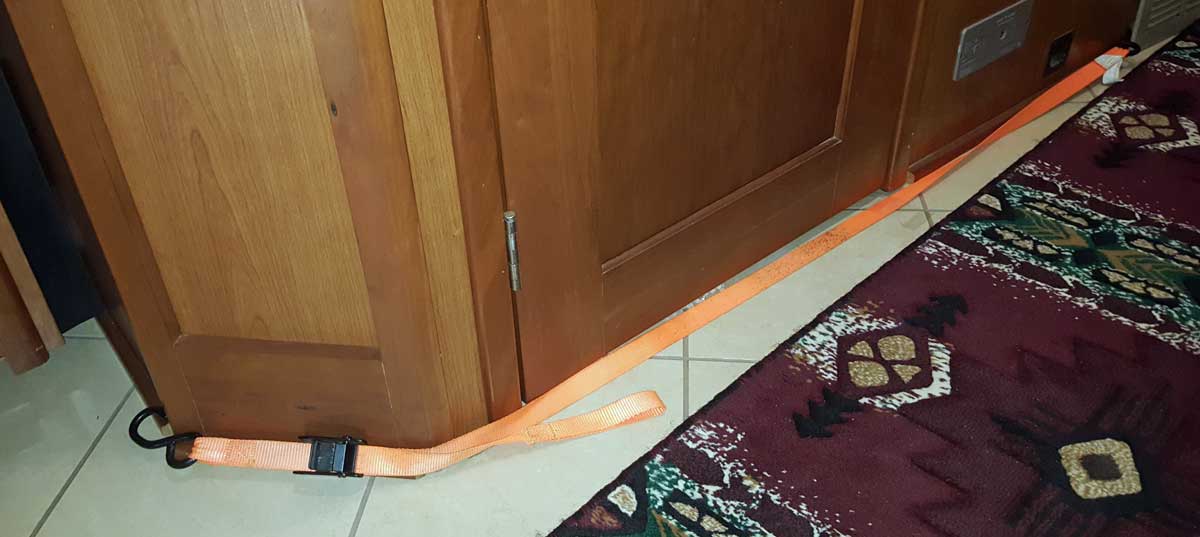 |
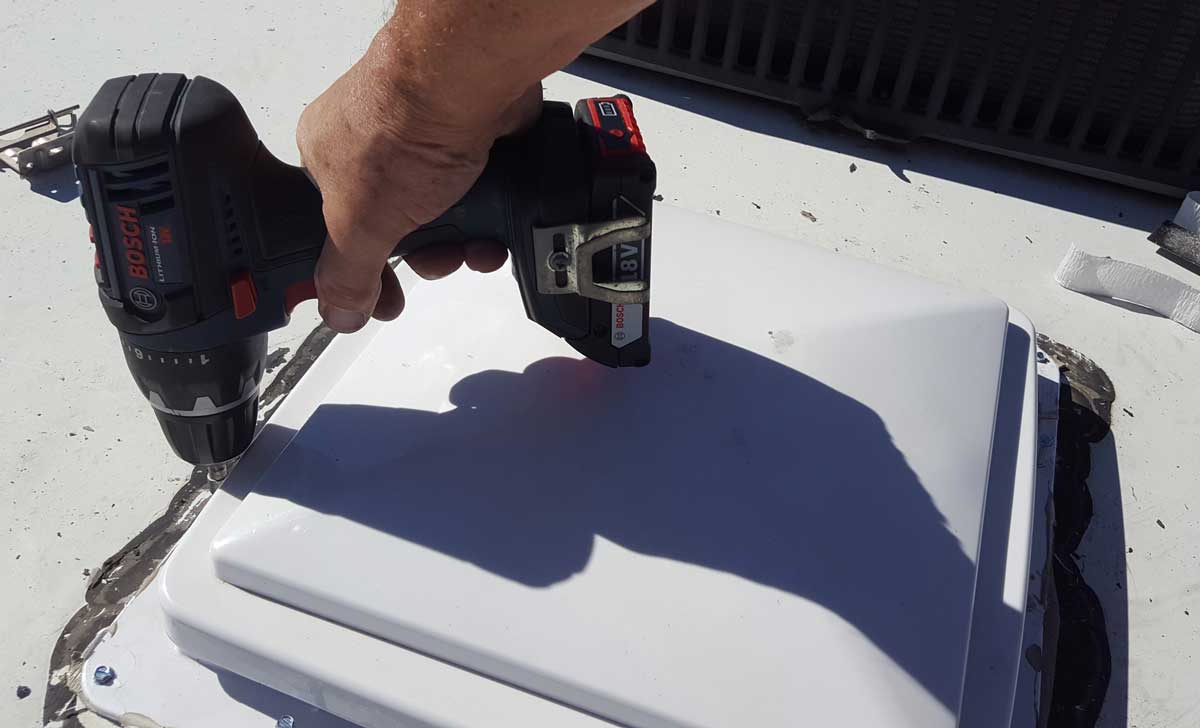 |
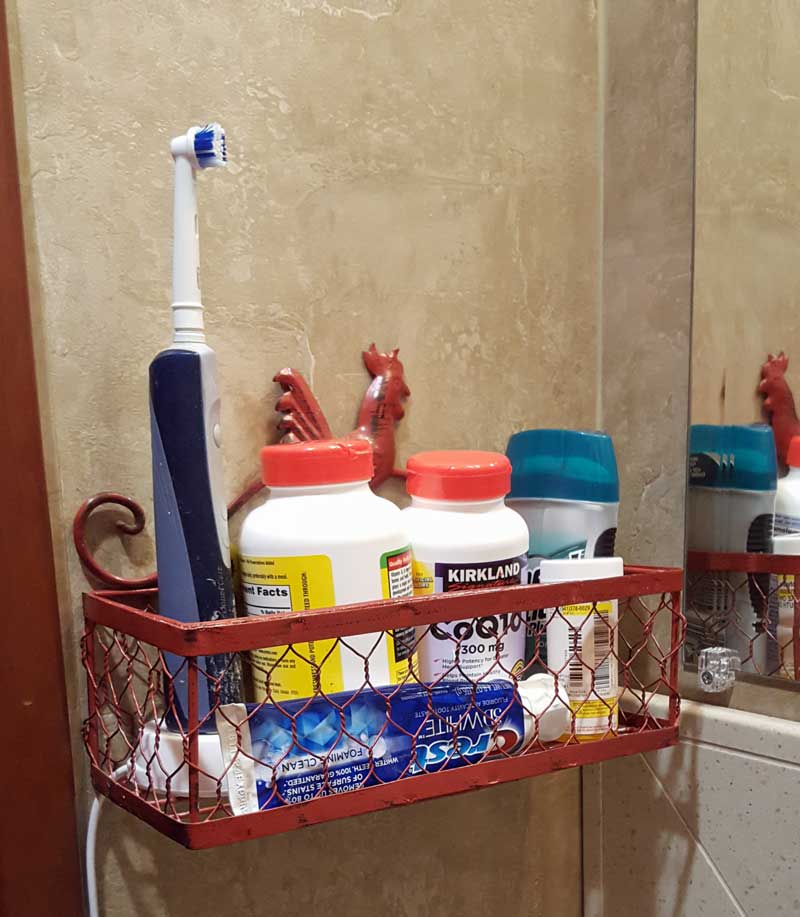 |
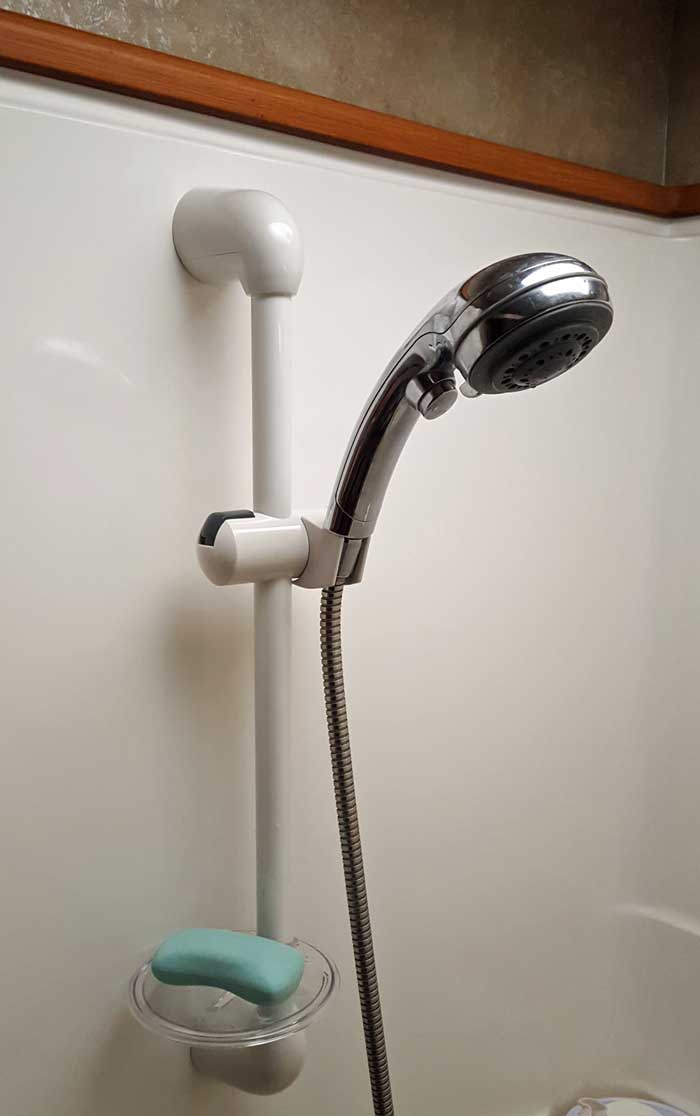 |
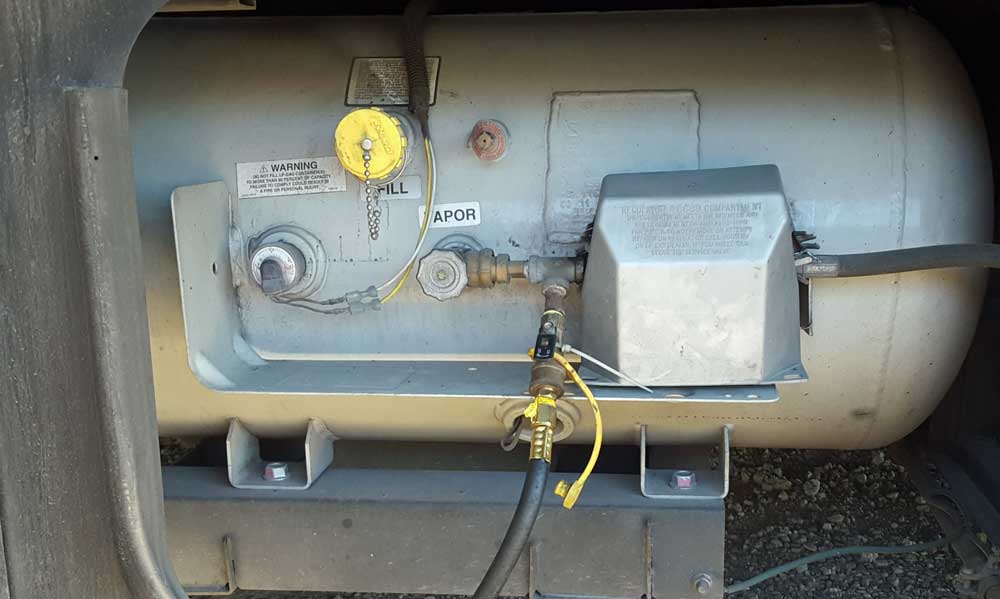 |
 |
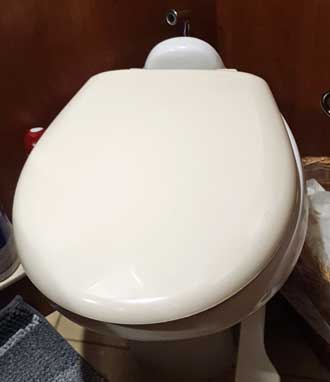 |
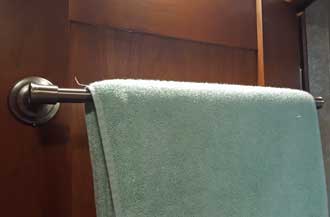 |
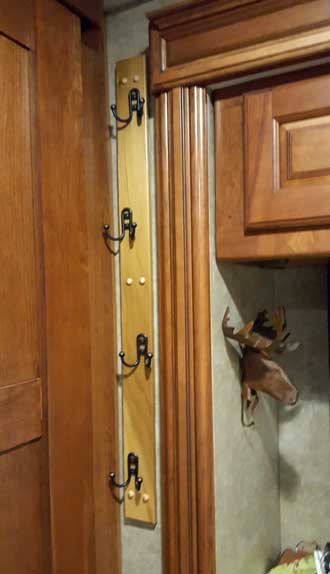
Sunday, November 4, 2018: There are lots of little things which must be done to make Mz Ruby just RIGHT for us. And she will need a few BIG things too. We spent much time and money making Miss Dory just right so we have begun to remove from Miss Dory and install on Mz Ruby. The little things today were the screen door crash bar, the soft lowering toilet seat, a new towel bar in the shower room and lots of hooks in the bedroom. There is much to do and some jobs like moving two of the three solar panels will be major.
Tuesday, October 30, 2018: We have met with Mary and Mike. They are from Texas and have owned Ms Ruby from new for the last four years. They have done some REAL touring, putting 52,000 miles on their Itasca Meridian 40U. We found this motorhome to be perfect for our upgrade. We met them last night for dinner at a nice Mexican restaurant in Las Cruces, New Mexico (click the photo). We spent today learning how to use the systems. This is a diesel pusher, our first diesel motorhome. We did own a diesel pickup for eleven years. I will show much more of this motorhome as we learn more ourselves. A word about the search: We first thought the 36M was for us but after seeing it switched to the 40U. There were very few in the US, about half a dozen. La Mesa RV had one in San Diego and we were interested. I read the Yelp reviews of four of the La Mesa dealers which frightened me away from dealing with them. I am aware that some of the reviews may be from competitors but enough seemed legitimate to look for an alternative. That's when I contacted Mary and Mike. They had exactly what we were looking for. We made arrangements over the phone and they agreed to meet us halfway. What a wonderful couple. We hope to remain friends and meet them again.
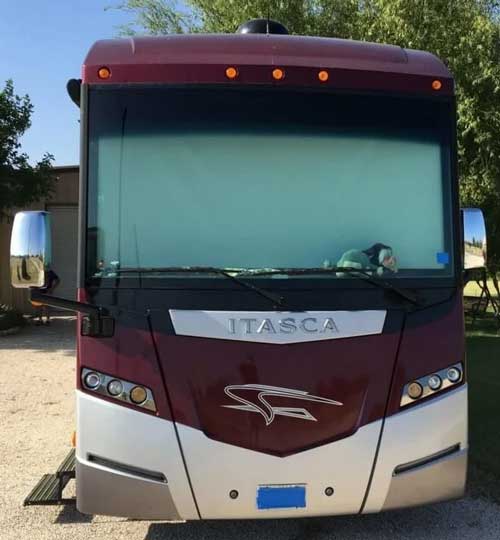
Monday, October 29, 2018: We have searched for three months and thought the Winnebago Journey 36M would be our new motorhome. After walking through a 36M, we decided it would not be for us. We had also marked the Winnebago Journey 40U as top on the list. Fortunately, while parked at the Elks Club in Lake Havasu City we were able to tour a fellow Elks unit. It is an Itasca with the identical kitchen and living area floor plan as the 40U. Gwen came out of it saying "that's the one". The Itasca is made by Winnebago and equivalent to the Winnebago Journey. The Journey and Meridian are identical in every way. We have a meeting with the owner of this unit this week. Perhaps we will be the new owners soon. More about our search if we get this one. I mostly followed my advice from November, 2015. After reading this article, scroll up to December 14 and finish reading my advice.

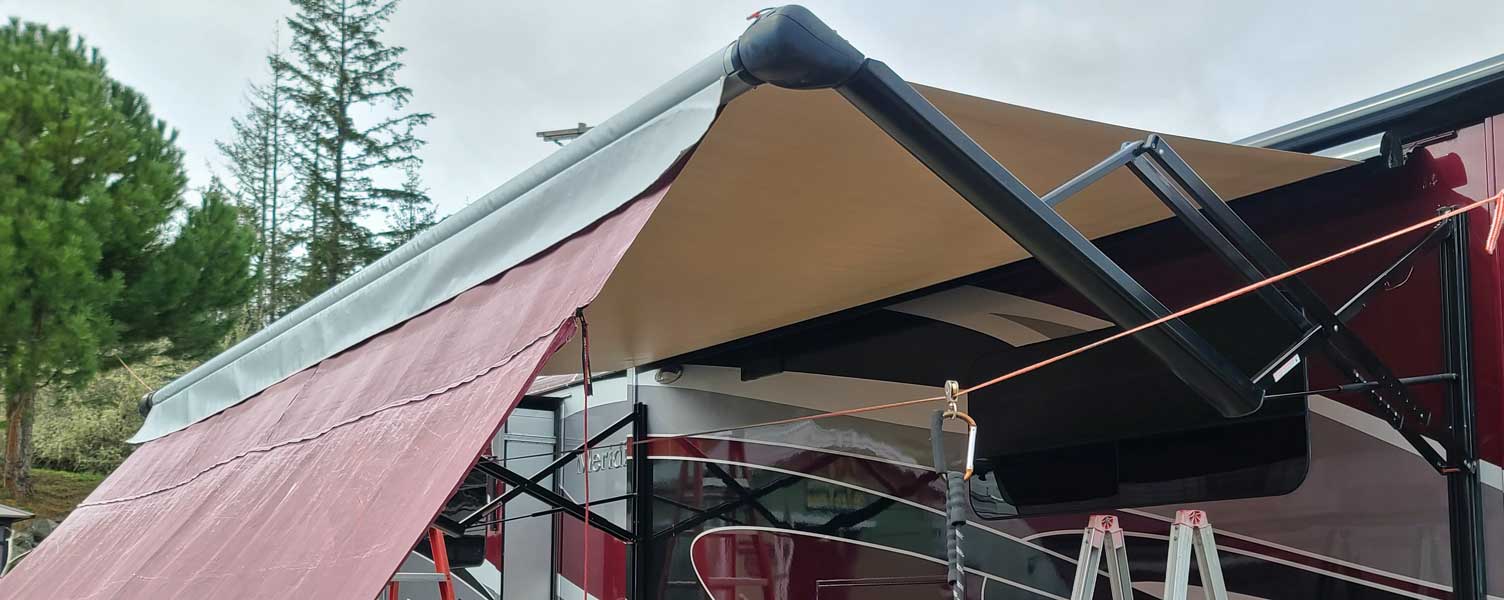
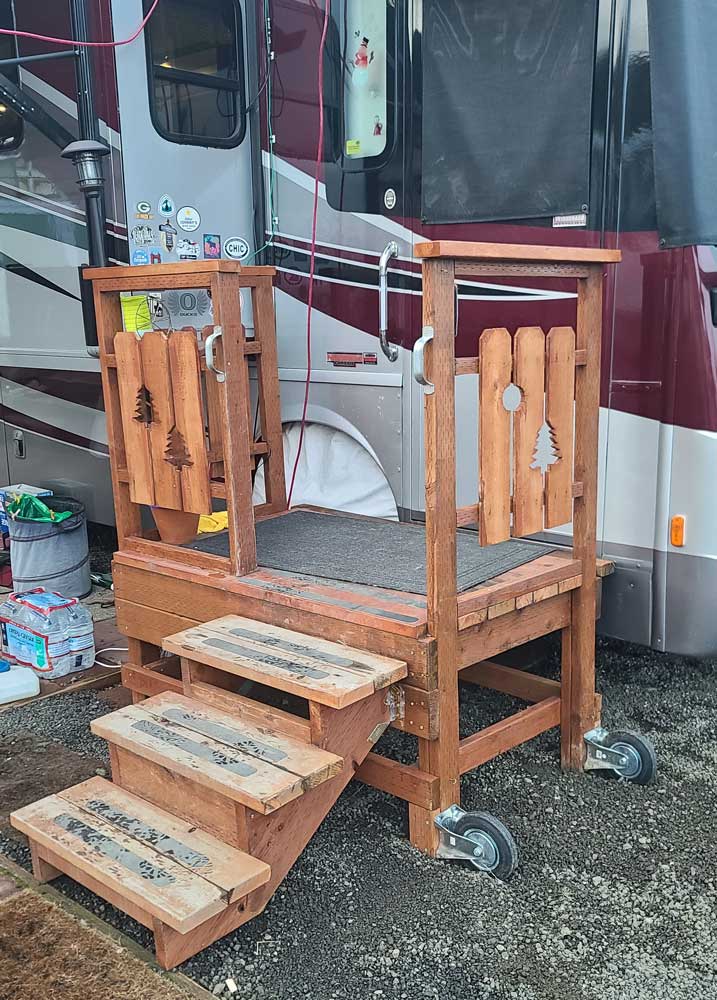
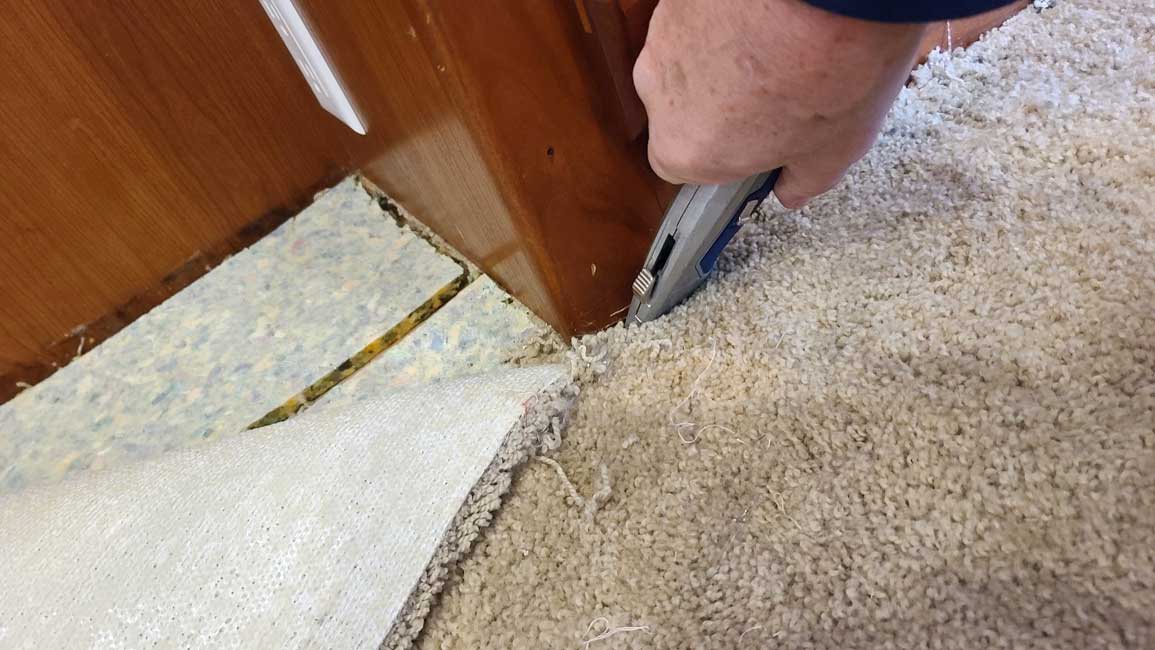
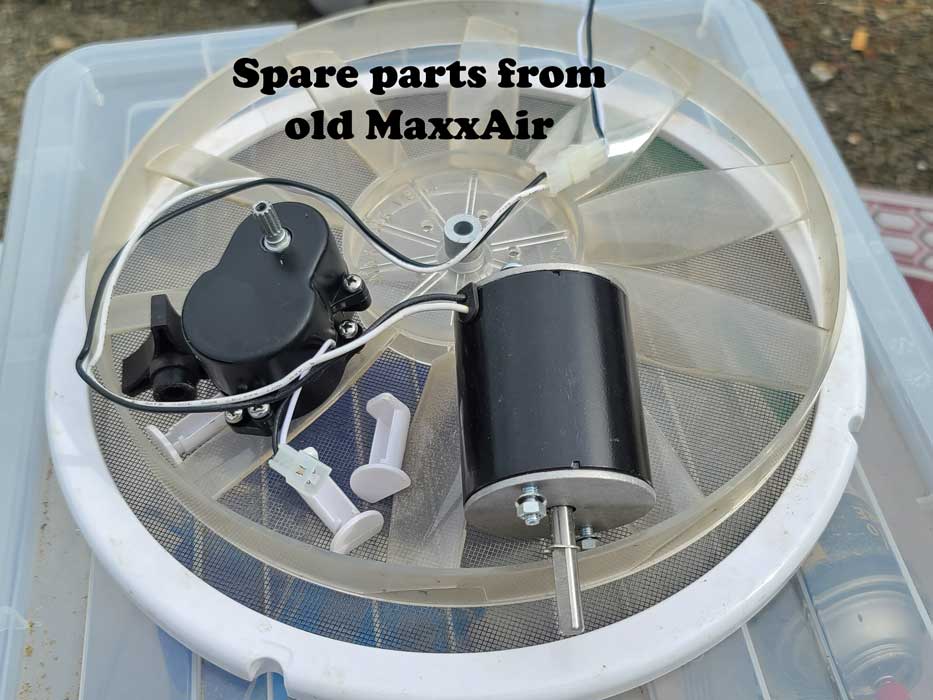
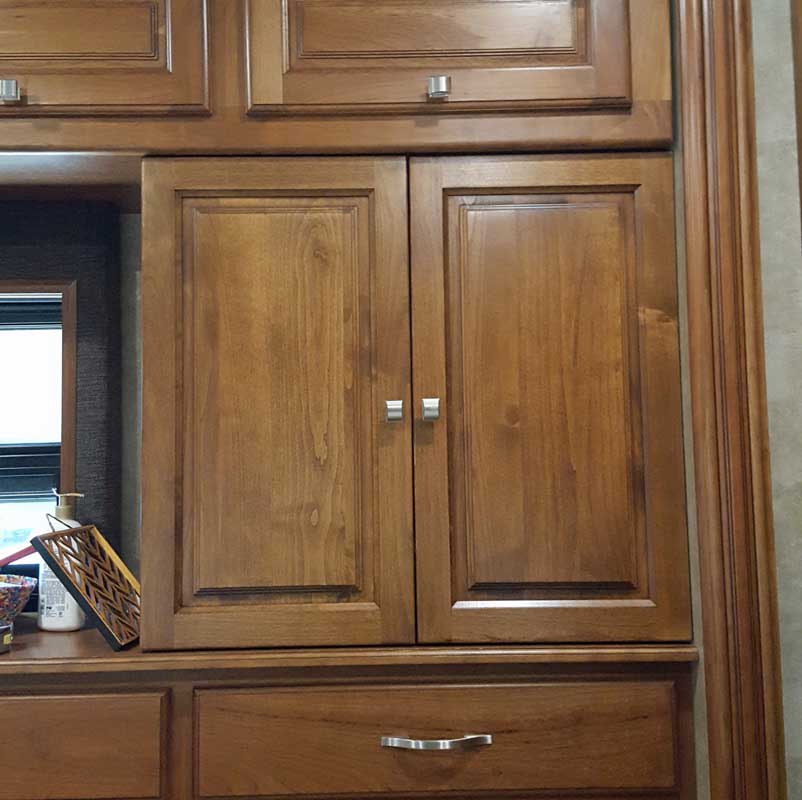
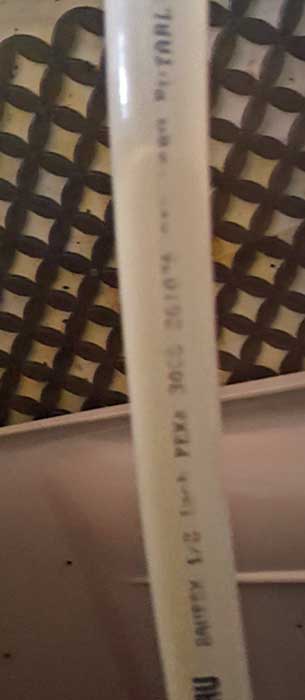
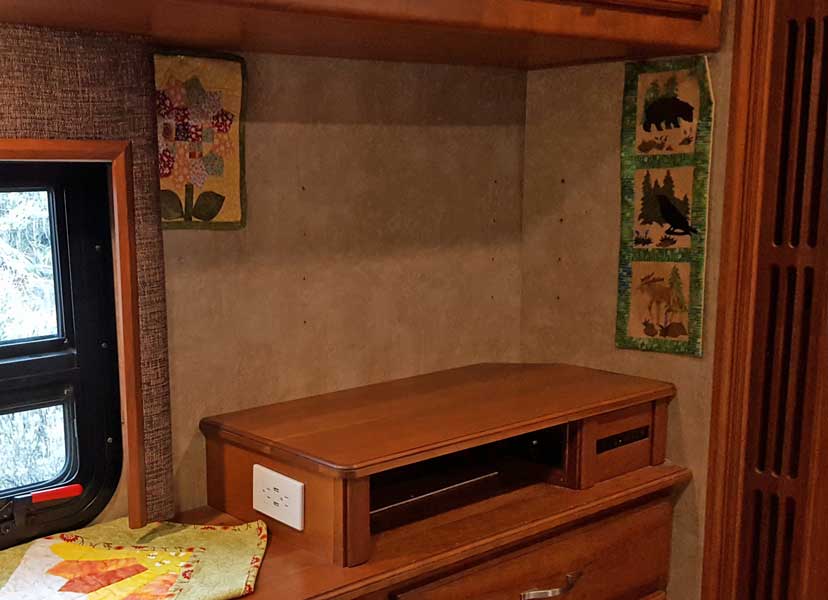
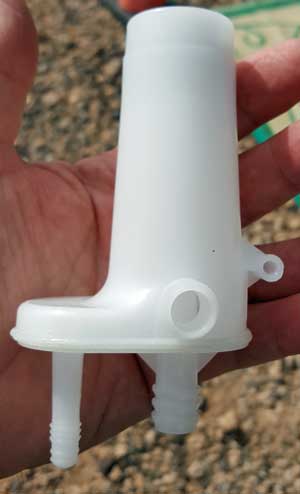
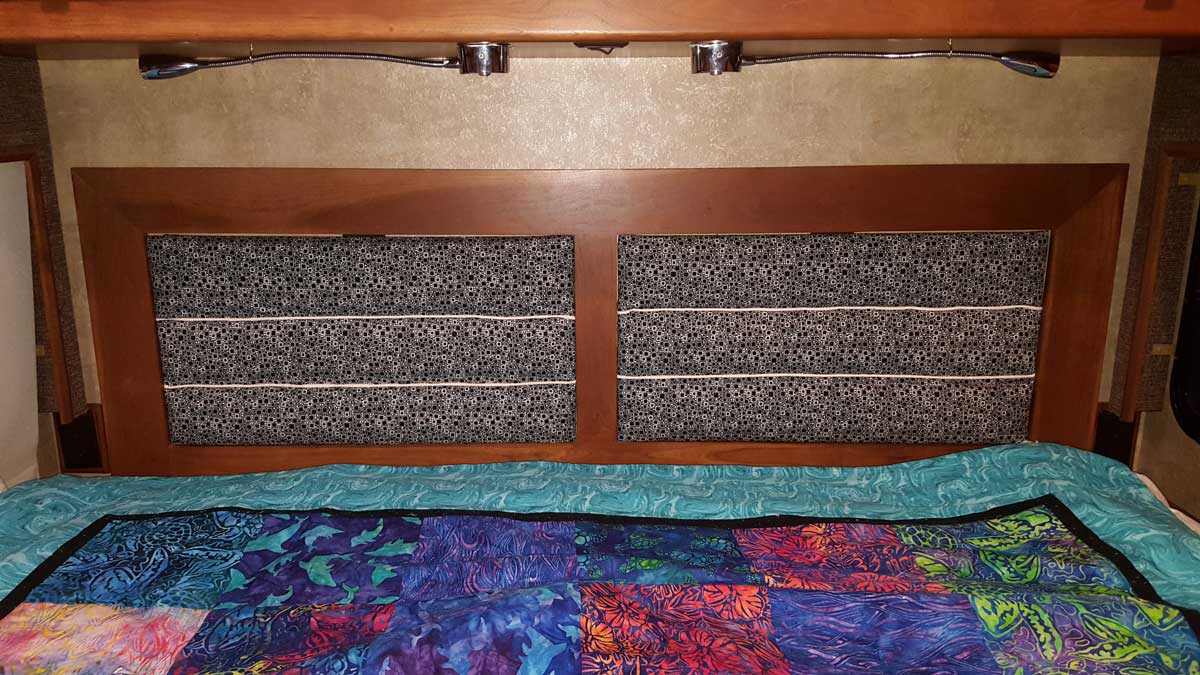
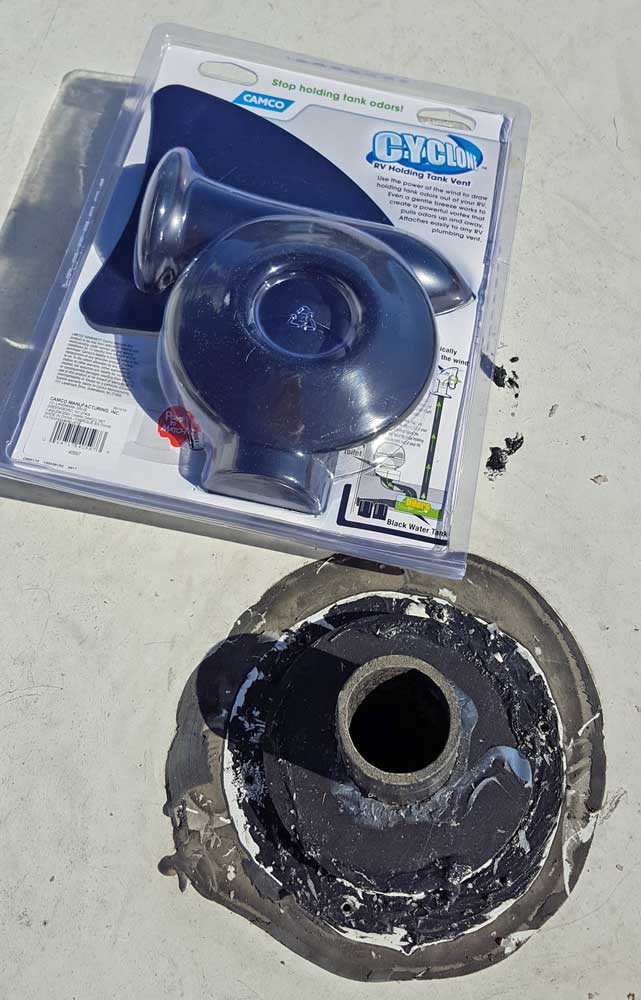
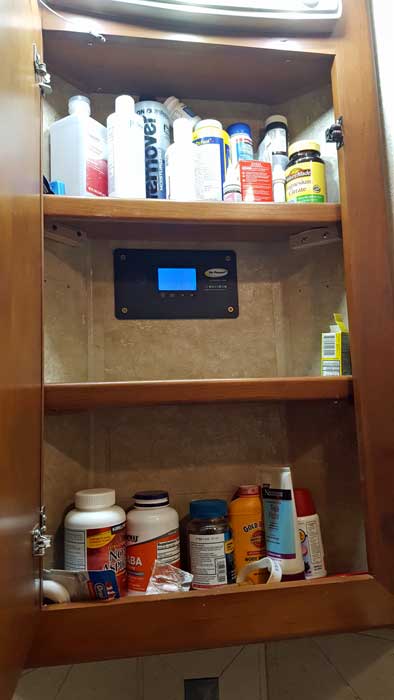
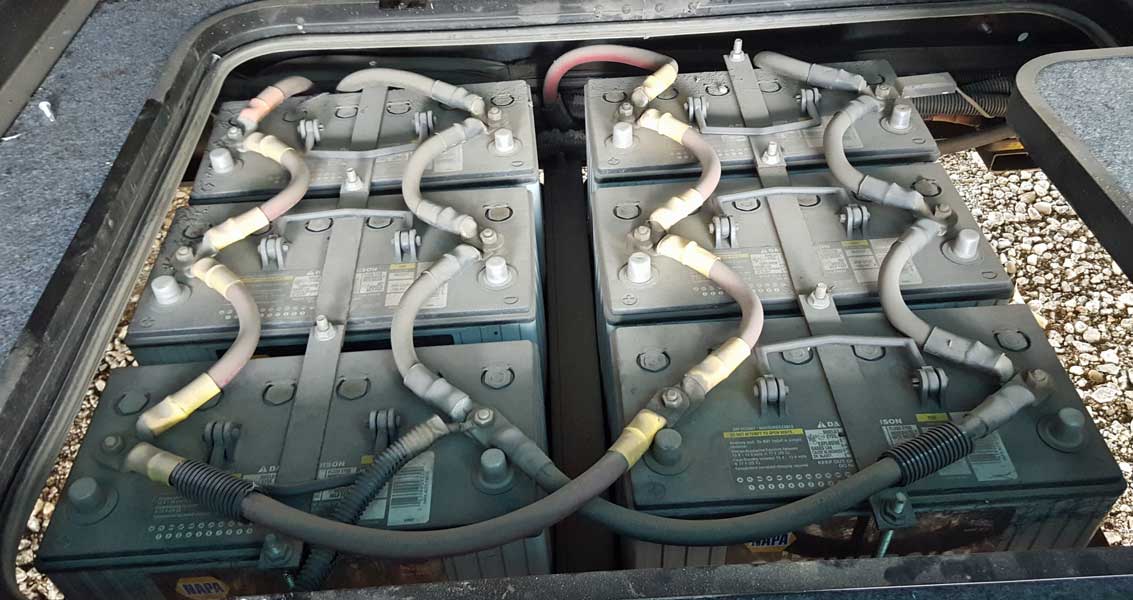