 |
RV Adventure: Replace a Mountain Bike
Part 3
|
|
|
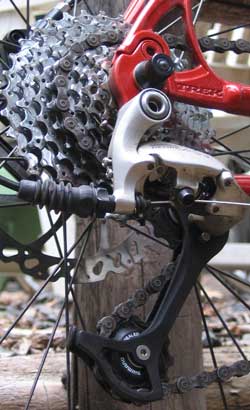
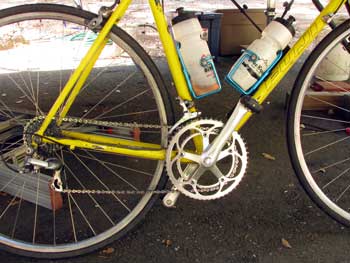
What makes these bikes go and what has made mountain biking the most popular cycling sport over the last 25 years is the gearing. Old Blue has seven cogs in the rear with three in the front giving (in theory) 21 speeds. The Trek has nine cogs with three chainrings so 27 speeds. Much of this is sales talk because several of those speeds on both bikes are identical gearing depending upon which chainring and which cog is chosen. There is a proper way to shift gears. As a bike shop owner, I used to give |
 |
 |
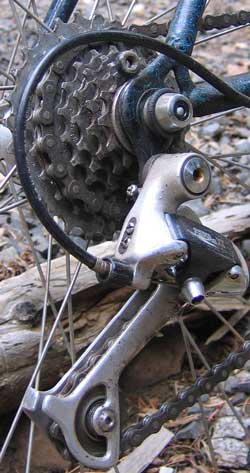 |
mountain biking lessons for the North Lake Tahoe Parks and Recreation department. The lesson was four hours long and much of that time was used to discuss how and when to shift from one speed to another. Both these bikes use the top-of-the-line Shimano Deore XT rear derailleurs and even though there is 18 years difference in age, I can't tell the difference in the shift.
Note the size of the largest cog. The Trek has a larger rear cog. This is going to give a lower gear range and in theory, an easier ride up hill. The problem is a lower gear means the bike is moving forward at a slower |
| |
speed. The slower the speed, the harder it is to stay up-right especially if you are being tossed from side to side by rocks or uneven terrain. I do like the lower gear however.
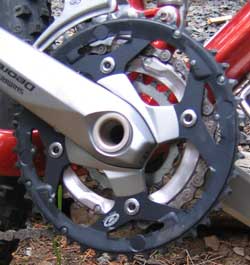
The front set of rings are called "chainrings". Both bikes have three but the quality of the chainrings on Old Blue are superior to the |
 |
| |
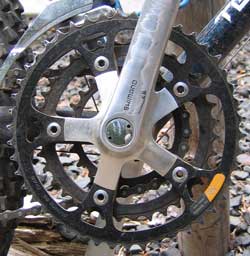 |
Trek. I noticed that the $2,200 Trek (the bike above my bike) still used the same chainrings so I guess you have to spend $3,000 to get the really good chainrings. Again note the size of the rings. A larger chainring means you can continue to peddle going down a steep hill, a smaller ring means you will have yet a lower gear for climbing. |
| |
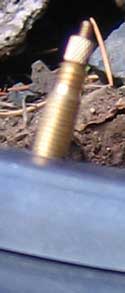 |
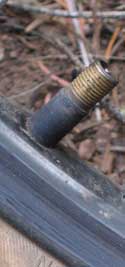
The Trek on the left has a presta valve while Old Blue has a schrader valve. The presta valve is a bit more "high-tech", lighter weight more reliable but can't be filled at a gas station pump. I've always favored the presta valve but 18 years ago, they were only available on road bikes. It's not a big deal but I'm glad to have the new valves. |
 |
|
| |
 |
Finally, you may have noticed in the photos that I have some strange looking pedals on both bikes. These are "Frog" brand pedals where a cleat on the bottom of the shoe locks to the pedal. The foot is released from the pedal by swinging your heel away from the bike and pulling up at the same time. I've been using |
| |
these pedals for 18 years so I'm almost use to them now... a long learning curve. Cleated pedals give you about 10-20% more power and are especially nice when road biking. They also make sure your foot is in the perfect position for the most power and control. This is another one of those things you would not want to do if only |
 |
| |
riding casually. As I mentioned before, I've been pretty serious into cycling as a sport since 6th grade so I don't consider myself a "casual" rider. I'll tell you more in the pages about road riding which I haven't had the time to complete yet. Finally, if all you need is a bicycle to ride a mile to the grocery store once a month, then nearly any bike will do. But if you want to ride for exercise and or endurance/stamina, I highly recommend buying a bike from a reputable dealer who will fit you properly to the different sizes of frames (the wheel size does not change) that are available. |
| |
Return to
Mountain Bike Part 2 |
|
| Rebuilding a Road Bike |
| Monday, August 23, 2010: After all the mountain bike talk in 2005 I decided to add some talk about road biking in 2010. I've been spending, by far, most of my time on my road bike rather than mountain bike. I've always liked road biking better although in the 80's and 90's I rode equal time on both. I like road biking because I can set up a pace then hold that pace for 1 - 3 hours. You can't do that with mountain biking. It's two totally separate sports as is Alpine and Nordic skiing. I would like to have a new road bike since my old bike is a 1997 model and pretty beat up. My previous bike was a French aluminum Vitus brand which I literally wore out after 30,000 miles of riding. This bike probably has between 5,000 and 10,000 miles on it. I've put 1,200 miles on it since May and my weekly mileage is finally starting to build since I'm getting both endurance and strength back and I've lost 30+ pounds which I don't have to carry up the hills any longer. I'm going to ride a century (100 miles in a day) in about a week. Anyway, I test road several new bikes while in Santa Fe and it was a wonderful experience. Road cycling has come a long way in 13 years. |
| When I first walked into a bike shop and told the owner what I was looking for and my price range, he showed me what he had. I pointed to some of the other bikes that looked more like my style of riding and my price range went UP. The owner talked about his bikes with a "compact double" and "ten speed". The "ten speeds" I remember were the old Schwinn Varsity "ten speeds" when I was eleven years old. |
 |
|
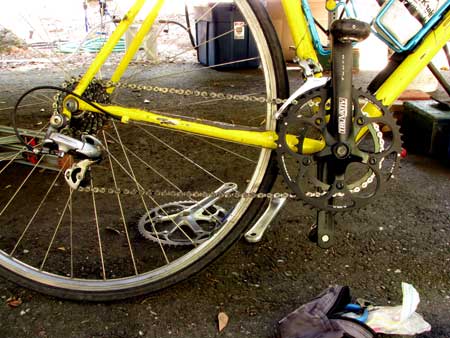
| The Varsity had a cassette on the rear wheel with 5 gears in a cluster. The rear derailleur would move the chain from one gear to the other using a lever on the downtube. It also had a crank set with two chainrings connected to the pedals. The front derailleur moved the chain from the large chainring to the small one and back again. Multiply the 2 chainrings times the 5 gear cluster and you have a "ten speed". Well, I knew I didn't want a "ten speed" because my old Fuji was a "sixteen speed" with an 8 gear cassette and two chainrings. The owner had to show me that HIS ten speed has a 10 gear cassette with two chainrings or a "twenty speed" bike. Yikes! That's incredible, I thought. So what's a "compact double"? You see those two chainrings in the photo of my Fuji above? The larger chainring has 52 teeth and the small has 39 teeth. It's been that way for a long time because the jump between those two sizes is fairly smooth. A "compact double" has a large chainring of 50 teeth and a small chainring of 34 teeth. That's a bigger jump between the two sizes but gives lower gear ratios with the small 34 tooth chainring, good for climbing hills. Nearly ALL the SOB (seniors on bikes) riders in Santa Fe had bikes with a compact double and even the 79 year old rider beat me to the top of the hills. The compact double is replacing bikes which use to have triple crank sets with three chainrings. Those have nice low gears but are really made for touring, not the faster road riding. My Fuji is make of Crom-moly steel. Very few high end bikes today are made with steel, they are made with "carbon-fiber", making them lighter, stiffer and from my experience, more stable. When I was eleven years old, I wanted one of those Varsity ten speeds but couldn't afford one so I built my own "ten speed" from spare parts and saving up for Western Auto Store bike parts. Again, I can't afford the bicycle I really want so I'm remodeling the old bike I have into something new. When I was eleven, I would paint my bike a new color each week, but this time I'm just going to leave my bike to be "ugly yellow". |
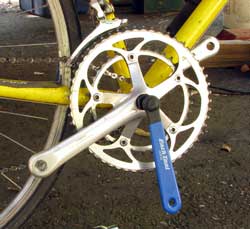 |
I'm going to start by replacing my trusty Shimano (brand name) crank set with a compact double so I can keep up with the 79 year olds. I found a SRAM (brand name) compact double on eBay for only $26 including shipping (regularly $100). It arrived today and I immediately set about installing it. There are many risks in doing this. The new crank set must seat perfectly on the bottom bracket spindle very close to the same distance from the frame as the old crank set for the front derailleur to |
|
| work correctly. The front derailleur must be movable to lower to the new 50 tooth chainring. The rear derailleur must be able to handle the extra length of chain when using the small chainring. So there were questions in my mind if I wasn't opening up a "can of worms" by making this first change. I didn't want the expense of new derailleurs. To remove the old crank set, I used a crank set puller which is about $15 at a bike shop. That's probably what it would cost you to have the bike mechanic use this tool so you might as well buy the tool and do it yourself. Note, I've already removed the pedals. They are much easier to remove with the crank set still on the bike. You'll need a pedal wrench (usually 15 mm) to do it, I already own one and use it to remove the pedals before hanging the bikes on my bike rack. |
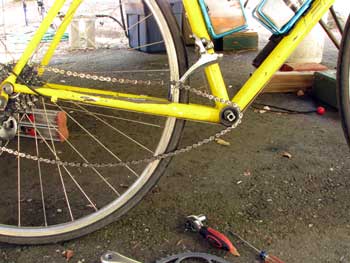
| So now the old crank set has been removed. Since this is an old bike it has the old style square tapered spindle which may be the reason the new SRAM crank set was so cheap, it only fits OLD bikes. The crank set is held onto the square spindle with a 14 mm crank bolt. The instructions said to grease the spindle before pushing the crank in place but I remember from my old bike shop days NOT to grease. |
 |
|
| It's too easy to push the aluminum crank onto the spindle too far and ruin the crank. You DO want to put grease onto the crank set |
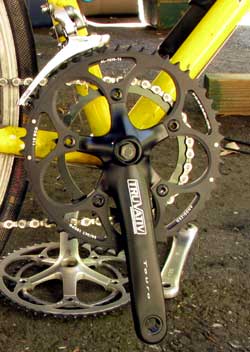 |
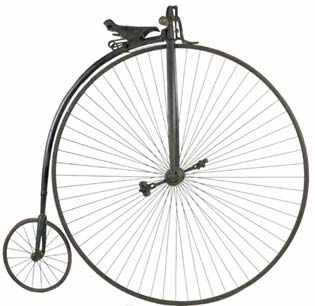
bolt. Once the crank is seated tightly using the 14mm crank bolt, I began adjusting the front derailleur. It had to be lowered for the smaller chainrings, then re-centered to drive the chain onto the two chainrings properly without touching the chain when in the full right or full left position. That took several tries and adjustments but I finally got it right. Oh, did you notice the new black color, no longer silver. Perhaps I SHOULD repaint the bike to be as pretty as the crank set. No, ugly bikes aren't usually stolen. By making this change I'll have a wider choice of gears especially nice for climbing. Can you believe that bicycle gears are still measured in "gear inches" where the |
|
| measurement comes from the old Penny Farthing bicycle. See that huge front wheel? It's the diameter of the front wheel which gives the gear measurement. My old LOWEST gear was 41.0 inches, meaning the equivalent of a 41 inch diameter on the Penny Farthing's front wheel. The old HIGHEST gear was 113.9 inches. With my new compact double my lowest gear is 35.7 inches and highest gear is 109.5 inches. You can imagine a similar measurement for each of the combination of chainring to cassette gear. Here is a great place to visit to learn the gear inches of YOUR bicycle. I've lost a little in the high gear but I don't worry nearly so much about pedaling downhill |
 |
|
 |
as I do pedaling uphill. I took the bike for an 18 mile "easy" ride today because I plan on a very tough 72 mile ride tomorrow with 4,700 feet of climbing. All the gears and shifting worked perfectly, not ONE missed gear or shift. The shifting is different, slower, but I expect, with practice to |
|
| improve on shifting speed and smoothness. I did take 6 minutes off my usual hour and ten minute ride but perhaps I was just excited about the new crank set. (I did tighten those 14mm crank bolts when I returned from this 18 mile ride.) It definitely felt like a new bike and I was able to keep my cadence right where I wanted it. Cadence is pedaling speed. Remember when I spoke above about "setting up a pace and holding it"? Cadence is what I'm talking about. With proper gearing I can hold a cadence in the high 90's (pedaling RPM) no matter the terrain. Keeping a higher cadence is more efficient and uses less energy. I couldn't do that with the old crank set and was often in my lowest gear and looking for even LOWER gears. Today, I never had to drop to my lowest gear to maintain my cadence. |
| Tuesday, August 24, 2010: I thought I would update this since I talked about preparing for a century ride today and then the century ride next week. I was humbled today. My new compact double worked perfectly and I DID have to use my lowest gear much of the time as the grade became steeper. The total elevation gain was 4,700 feet and the day was warm. When I began the ride I weighed 164.1 lbs and only weighed 158.0 lbs after the ride. I drank two large water bottles, one with water and the other with diluted Gatorade. But I still lost 6 lbs of water on the ride so I was, no doubt, feeling the effects of dehydration. The plan called for riding 71 miles round trip. I did the entire climb to the summit but my leg strength gave out nearly totally. It even hurt to go downhill. Fortunately, Gwen was doing laundry in Downieville so I bailed out of the ride in Downieville and let her drive me back to the trailer. I've felt this bad before at the end of a ride but that was after a century, NOT 60 miles. So, I will attempt this ride again after some more workouts and other improvements to the bike but I will NOT be attempting a century ride for a few weeks. I've already ridden 80 miles this season and felt very good at the end of the ride. I think the difference was the stop at the little cafe for lunch with lots of iced tea at the 35 mile mark and only 3,000 feet of climbing. This ride BEGAN with 36 miles of continual climbing with NO lunch break until I got back to the trailer 5 hours later. I guess you can't ride 71 miles with 4,700 feet of elevation increase on just ONE bowl of grits and a little bit of belly fat! |
| Friday, August 27, 2010: When riding the new bikes in Santa Fe, I noticed the top of the handlebars were level with the top tube bringing the brake hoods up providing a better hand hold when riding. I tried rotating the handlebars on my bike but found I was stretched too far and the |
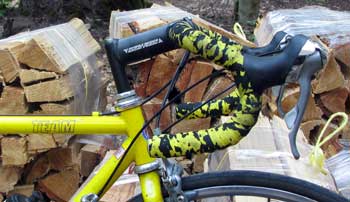 |
| cables were over stretch. The photo shows how my handlebars are rotated down to make the BOTTOM of the bars level with the top tube. This was the way to arrange handlebars in 1997. It's an uncomfortable riding situation with nothing to push against when riding with hands on the brake hoods or sloping bars before the hoods. The new handlebars have a straight section below the brake levers to give a better handhold when down on the "drops". I'm not going to buy new handlebars so I will just make-do with these. The neck length of the old stem is 120 mm, I ordered a replacement stem with neck length of 90 mm. I you remember your high school math of 2.54 cm/inch then there is 25.4 mm/inch so the neck is a bit more than 1 inch shorter on the new stem. Pass your pointer through the photo to see the difference after I rotated the handlebars to make the top of the bars level with the top tube. The shorter stem brings the bars back toward bike frame. Today was my first ride with this new handlebar configuration. Again, it feels like a different bike and will be much more comfortable after I get use to the new arrangement. The new stem was $35, so now I have $61 invested in the remodel and the bike is a much better bike. I have met my goal, the bike is more responsive, comfortable for long rides and feels a lot like the new bikes so has put out the "fire" to get a new bike for now. The old bike is still not as stable and is 5 lbs heavier than the new bikes but I'll make do until derailleurs or shift levers fail. Those would be costly repairs and signal the time for a complete upgrade. |
|
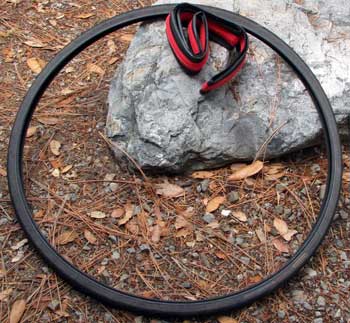 |
Monday, October 4, 2010: One additional change to my old bike is new tires. The old tire is a wire beaded tire while the new tire is a kevlar beaded tire. A kevlar tire is foldable, handy only so you can carry a spare but practicle because it is lighter. A lighter tire and tube make the wheel lighter. A light wheel makes for a responsive bike. It take less energy to get the wheels revolving. Roll your pointer through the photo to see the tires on the bike. I've never had colored tires before, it's only a novelty with me. Perhaps red will resist punctures better. |
|
| |
|
|
| |
|
|